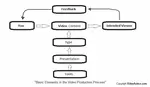
- Video Production
- Video Production Equipment for Beginners
Video Production Equipment for Beginners: Ditch the Overwhelm
Choosing the right video production equipment for beginners doesn’t have to be overwhelming -- in fact, starting simple can be your greatest advantage.
Key Takeaways: Video Production Equipment for Beginners
-
Start with what you already own. Your smartphone shoots crisp 1080p or 4K video and costs nothing extra. Master composition and storytelling first -- upgrade to a dedicated mirrorless camera only when you genuinely need manual lens control or better low-light performance.
-
Audio matters more than video. Viewers will forgive imperfect visuals, but they'll click away instantly from muffled or echoey sound. An inexpensive wireless mic system is your most impactful early investment.
-
A tripod solves 90% of stability issues. Shaky footage distracts viewers from your story. A simple, sturdy tripod eliminates hand tremors, teaches framing discipline, and lasts for years -- skip gimbals until you've mastered the basics.
-
Lighting is about control, not expensive gear. Great footage comes from shaping light -- not buying it. Start with natural window light and a white foam board as a reflector. Add a single LED panel only when you need to fill shadows consistently.
-
Free editing software is all you need to start. DaVinci Resolve and iMovie offer professional-grade tools with no watermarks or time limits. Learn just three things: import clips, cut footage, and export. Fancy transitions can wait.
-
Build your kit step by step, not all at once. Your starter formula: smartphone + tripod + wireless mic + free software. Add lighting within a month, then upgrade only when a specific limitation genuinely blocks your creative vision.
-
Solve your biggest bottleneck first. Shaky footage? Get a tripod. Distant audio? Buy a lav mic. Muddy lighting? Face a window. Identify what frustrates you most and address just that one problem.
- Upgrade mindfully, not out of gear envy. Rent before you buy, consider used equipment, and upgrade only when your current tools truly limit your storytelling -- not because something newer or shinier exists.
Picture this: You’re sitting at your desk, buzzing with ideas for your first video project. Maybe it’s a short film, a vlog, or a passion project you’ve dreamed of sharing.
But then you Google “equipment needed for video production” -- and suddenly you’re drowning in expensive camera setups, confusing jargon like “ISO” and “bitrate,” and ads for gear that feels light-years beyond your budget.
Sound familiar?
Take a breath. You don’t need perfection to start -- just the right tools to turn your vision into something real. The truth is, you don’t need a Hollywood studio (or a Hollywood budget!) to create compelling videos.
What if, with just a few key pieces of thoughtful, practical gear, you could start bringing those stories to life today?
 Video production equipment for beginners has to be simple, thoughtful, and practical.
When you’re just beginning, simplicity is your superpower. Forget the overwhelm.
We’ll focus only on what truly matters: the fundamental, budget-friendly equipment that lets you capture clear video and crisp audio -- without the complexity.
Consider this your gentle, no-stress checklist to start creating with confidence. Let’s walk through the essentials together.
What is the best starter camera for videography: Smartphone or Dedicated Camera
For beginners, the best starter camera is the smartphone already in your pocket.
It shoots crisp 4K video, costs you nothing extra, and lets you master composition and storytelling without technical hurdles.
Upgrade to a dedicated mirrorless camera only when you crave manual lens control or better low-light performance.
"Smartphone or Dedicated Camera: Which Should You Start With?"
This is often the very first question beginners ask—and honestly, there’s no single “right” answer. Your choice depends on your goals, your budget, and where you are in your creative journey. Let’s break it down gently, step by step.
The Power in Your Pocket: Your Smartphone
 Video Production Equipment for Beginners: Your Smartphone
Guess what? You might already own everything you need to start. Modern smartphones are incredible tools. They shoot crisp 1080p or even 4K video, pack built-in stabilization, and fit right in your pocket.
For vlogs, quick social clips, or learning the basics of framing and storytelling, your phone is a powerhouse.
Why it’s a great start:
- You already own it (no extra cost!).
- Ultra-portable and ready in seconds.
- Gentle learning curve—just point and shoot.
But a gentle heads-up:
- Built-in mics struggle in noisy or windy settings (we’ll fix audio later!).
- Less manual control over depth of field or low-light scenes.
Verdict: If you’re experimenting or keeping things simple, start here. Your phone is more than enough to create beautiful, professional-looking videos.
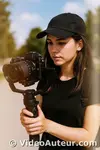
Stepping Up: A Dedicated Camera
 Video Production Equipment for Beginners: A Mirrorless Camera
If you’re dreaming of cinematic shots, interchangeable lenses, or more creative control, a beginner-friendly mirrorless camera might be your next step.
These lightweight cameras offer serious flexibility without overwhelming you.
Discover which camera is right for you.
Why consider one:
- Interchangeable lenses (e.g., a prime lens for dreamy backgrounds, a zoom for versatility).
- Better low-light performance and richer image quality.
- Manual controls to grow your skills as you learn.
Things to note:
- Higher upfront cost (but entry-level models are budget-friendly!).
- A steeper—but rewarding—learning curve.
Why mirrorless camera over DSLR camera for video shooting?
Mirrorless cameras have faster, more reliable autofocus for video—similar to your phone. DSLRs require manual focus, which can feel intimidating early on. Start simple!
So… Which Should YOU Choose?
- Just starting out? Tight budget? → Stick with your smartphone. It’s capable, free, and lets you focus on creating instead of gear.
- Craving creative control? Committed to growing? → Try an entry-level mirrorless camera. It’s a natural upgrade when you’re ready.
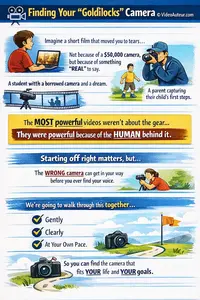
Remember: Your best camera is the one you have right now. Start where you are, create freely, and upgrade only when your craft outgrows your tools.
Your story matters most—not the gear.
What equipment do I need to make a video: Video Production Equipment List for Beginners
You need just three core tools: a smartphone (or basic camera) for video, a simple wireless microphone for clear audio, and a sturdy tripod for steady shots.
Pair them with free editing software like CapCut or DaVinci Resolve, and you're ready to create polished videos right away.
Let’s simplify things. You don’t need a mountain of gear to start creating great videos. Here’s your no-fuss, budget-friendly checklist of the absolute essentials vs. nice-to-haves.
Focus on these core tools, and you’ll capture clean video and clear audio right away.
 Video production equipment for beginners: A simplified checklist of essentials vs. nice-to-haves
The Big 3: Non-Negotiables
1. Camera
 Video Production Equipment for Beginners: Smartphone or a Mirrorless Camera
- Essential: Your smartphone (yes, really!) or an entry-level mirrorless camera.
- Why: Start with what you have. Phones can record video in 1080p and 4K resolutions; mirrorless cameras offer room to grow.
- Tip: Borrow or buy used if upgrading!
2. Audio (Your Secret Weapon)
 Video Production Equipment for Beginners: A Budget Wireless Microphone System
- Essential: An inexpensive wireless mic system. Its transmitter has a built-in mic, and many also let you plug in a lavalier (clip-on) microphone.
- Why: Clear audio matters more than 4K video. Your phone or camera's built-in microphone often picks up wind, echoes, and keyboard taps — which distracts viewers.
- Tip: These budget systems often include phone/camera connectors, so compatibility isn’t something to worry about.
3. Stabilization
- Essential: A simple tripod (for phones and cameras).
 Video Production Equipment for Beginners: A Simple but Sturdy Tripod
- Why: Shaky footage distracts viewers. A tripod keeps shots steady for interviews, tutorials, or B-roll (extra footage that helps tell your story and keeps viewers engaged).
- Tip: Skip gimbals early on. A sturdy tripod lasts years and teaches framing discipline.
Next Priorities: Grow When Ready
4. Lighting
- Essential: Natural light (sit by a window!) + a reflector (foam board works!).
- Upgrade later: A small LED panel.
 Video Production Equipment for Beginners: A Small LED Panel
- Why: Good lighting makes phone footage look pro.
5. Editing Setup
- Essential: Free software like DaVinci Resolve (desktop) or CapCut (mobile).
 Video Production Equipment for Beginners: Free Video Editing Software
- Why: Polishing your story matters most – not fancy tools.
Nice-to-Haves (Save These for Later)
- Advanced audio: Shotgun mics, audio recorders.
- Gimbals: For silky-smooth motion shots (once you’ve mastered the tripod!).
- Extra storage: External hard drives (start with cloud backups if needed).
The Starter Kit Formula:
Your phone (camera) + a wireless mic (audio) + tripod (stabilization) + free software (editing) = Everything you need to create and share your first video right now.
Can you recommend a good video camera setup for beginners?
Start with an entry-level mirrorless camera like the Sony ZV-E10 or Canon EOS R50 paired with the included 16-50mm kit zoom lens.
This combination is affordable, lightweight, and handles autofocus beautifully while you learn.
Don't forget an extra battery and a fast V30 memory card for smooth recording.
So, you’ve decided to step into the world of dedicated cameras? Wonderful!
Let’s keep this simple, affordable, and focused on what truly helps you tell stories. No jargon bombs, no pressure – just your sensible starting point.
 Video production equipment for beginners: What makes a good, dedicated camera setup?
1. Your Camera Body: Start Mirrorless
 Video Production Equipment for Beginners: A Mirrorless Camera Body
Look for: An entry-level mirrorless camera (like Sony’s ZV series, Canon EOS M/R, or Nikon Z30).
Why mirrorless? They’re compact, have fast autofocus for video (like your phone!), and are easier to learn on than older DSLRs.
Interesting report:
PW Consulting (pmarketresearch.com) reports that younger consumers (18--34), particularly millennials and Gen Z, are driving the demand for entry-level mirrorless cameras.
They are attracted by high-quality photo/video, portability, and affordability. They often start with smartphones but upgrade for better quality.
Sensor tip: Choose an APS-C sensor (smaller than "full-frame"). It’s more budget-friendly, lighter to carry, and still delivers beautiful, cinematic footage.
2. Your First Lens: The Versatile Kit Zoom
 Video Production Equipment for Beginners: Kit Lens for a Mirrorless Camera
Start with: The “kit lens” (often a 16-50mm or 18-55mm zoom lens).
Why? It’s your all-in-one learning tool. Zoom to frame wide landscapes or tight close-ups without moving. Perfect for figuring out what focal lengths you love.
Be kind to yourself: Kit lenses aren’t “pro” glass, but they’re a fantastic, low-stress way to begin.
3. When You’re Ready: Add a Prime Lens
 Video Production Equipment for Beginners: A Prime Lens for a Mirrorless Camera
Consider later: One affordable prime lens (fixed focal length).
Why? Primes excel in low light (with wider apertures like f/1.8) and help you develop your visual style.
Focal length ideas:
- 23mm (APS-C) / 35mm (full-frame equivalent): Great for vlogs, interviews, and documentary shots (my personal go-to!).
- 56mm (APS-C) / 85mm equivalent: Flattering for portraits.
Choose what suits your stories!
4. Don’t Forget the Essentials
- Extra batteries: Cameras drain power fast. Stick with original brands – they last longer (trust me, third-party ones often disappoint).
- Memory cards: Get fast cards (look for "V30" or "UHS-II" labels) to handle 4K video smoothly.
- Audio reminder: Pair your camera with that wireless mic we talked about earlier! (Even pro cameras need help with clean audio.)
Remember: A good setup isn’t about expensive gear – it’s about reliability. With these basics, you’re not just capturing moments; you’re telling stories that matter.
Do I Need Lighting for Video Production: Lighting Equipment for Video
Yes, lighting is essential for professional-looking video, but you don't need a Hollywood budget.
Great footage comes from controlling light, not expensive gear.
Start by using free natural window light.
When you're ready to invest, your first purchase should be a single, versatile LED panel to fill shadows.
Let’s be honest: Lighting is the secret sauce that turns "okay" footage into something truly special. And here’s the gentle truth — yes, lighting matters.
But before you panic about complex rigs or pricey gear, take a breath. Great lighting doesn’t mean Hollywood budgets. Let’s find your sweet spot.
Why Lighting Can’t Be Skipped
- Poor lighting = grainy, noisy footage (even on expensive cameras!).
- Harsh shadows or uneven exposure distracts viewers from your story.
- Good lighting makes your subject look clear, vibrant, and professional — even if you’re filming on a phone.
Remember: Lighting isn’t about buying fancy gear. It’s about control — shaping light so your subject looks clear, your mood feels intentional, and shadows don’t steal the show.
Why "Control" Matters for Beginners:
- Shadows on a face? → Control means bouncing light to soften them.
- Subject looks flat? → Control means angling light to add depth.
- Footage looks blue or orange? → Control means matching lights to your environment.
Examples of "Control" in Action:
Example #1:
- Without control: Backlit subject (face in shadow)
- With control: Subject facing window (soft light on face)
Example #2:
- Without control: Harsh overhead lamp
- With control: Lamp + parchment paper diffuser
Example #3:
- Without control: Glaring noon sunlight
- With control: Subject in open shade (even, gentle light)
Key Insight: Lighting isn’t about gear — it’s about control. That means:
- Directing light (e.g., moving a lamp).
- Softening light (e.g., taping paper over a bulb).
- Bouncing light (e.g., holding up a white poster board).
When you shape light intentionally, even phone footage feels cinematic.
Your Beginner-Friendly Lighting Toolkit
Start simple. Grow when you’re ready.
1. The Free Superstar: Natural Light
 Window Light as Natural Light for Video Shooting
- What: Sit facing a window (never with your back to it!).
- Why: Creates soft, flattering light — perfect for talking-head videos or interviews.
- Pro Tip: Use a foam board as a reflector to bounce light onto shadowed faces. Instant glow!
2. Your First Paid Upgrade: A Basic LED Panel
 Video production equipment for beginners: A basic LED panel makes a great first lighting upgrade
What: A small, dimmable LED panel.
Why: Portable, affordable, and versatile. Use it to:
- Fill shadows when natural light isn’t enough.
- Mimic window light on cloudy days.
- Adjust color temperature (warm for cozy vibes, cool for modern feels).
Tip: Start with one panel placed slightly above and in front of your subject.
3. Nice-to-Haves (Save for Later)
- Ring Light: Ideal for beauty shots, makeup tutorials, or if you love that signature "eye sparkle."
 Video Production Equipment for Beginners: A Ring Light
- Softbox Kit: Creates ultra-soft, forgiving light for interviews — but bulkier than LEDs.
 Video Production Equipment for Beginners: Softbox Kit
What If I Can’t Afford Lights Yet?
No guilt. No pressure. Try these:
- Repurpose a lamp: Position it behind your camera (cover with parchment paper to diffuse harshness!).
- DIY bounce card: Tape white poster board to cardboard. Reflect sunlight or lamp light softly onto your subject.
- Shoot outdoors: Golden hour (sunrise/sunset) gives magical, cinematic light for free.
Key Insight: Lighting isn’t about buying gear — it’s about shaping what’s already there. Start with free solutions, then add tools as your needs grow.
Why is high-quality audio just as important as video quality: audio equipment for video production
High-quality audio is crucial because viewers tolerate flawed video far more than poor sound.
Muffled dialogue or distracting background noise frustrates audiences, causing them to click away instantly.
Clear, crisp audio establishes trust and professionalism, ensuring your message is heard and your story remains the focus -- not the static.
Let’s talk about something we’ve all experienced: You’re watching a video with stunning visuals… but the audio is muffled, scratchy, or drowned out by background noise. Within seconds, you click away.
That’s the power of sound.
Truth is:
Viewers forgive imperfect video far easier than bad audio. (Ever watched an old film with grain but clear dialogue? Exactly!)
Poor audio distracts, frustrates, and erodes trust. But here’s the good news: Fixing it is simpler and cheaper than you think.
Your Beginner Audio Toolkit
Forget complexity. Start with one of these solutions:
 Video production equipment for beginners: A sound toolkit
1. The Everyday Hero: Wireless Mic System
 Video Production Equipment for Beginners: A Compact Wireless Mic System
What: A compact wireless system.
Why:
- Clips onto clothing (transmitter + lavalier option).
- Blocks wind, keyboard taps, and echoes.
- Plugs into phones/cameras hassle-free.
Perfect for: Vlogs, interviews, presentations.
2. The Directional Specialist: Shotgun Mic
 Video Production Equipment for Beginners: A Small Shotgun Mic
What: A mic that points like a flashlight.
Why:
- Focuses on sound in front of it (ignores side/rear noise).
- Mounts directly onto your camera.
Perfect for: Outdoor shoots, run-and-gun filming.
3. The Studio Star: USB Microphone
 Video Production Equipment for Beginners: USB Microphone
What: A desk mic.
Why:
- Records crisp voiceovers or podcast audio.
- Plugs straight into your computer.
Perfect for: Tutorials, voiceovers, Zoom calls.
Choose based on your most common project!
(Wireless mics = most versatile starting point.)
Your Secret Weapon: Headphones
 Video Production Equipment for Beginners: Headphones
- Why: Even affordable earphones and earbuds let you hear hidden problems (hums, wind, mic bumps) while recording.
 Video Production Equipment for Beginners: Earphones
- Pro Tip: If you hear plosives ('p-pops' when saying words like 'pizza' or 'baby'), angle the mic slightly toward your forehead instead of pointing it straight at your mouth. Trust me—it works wonders!" 😊
"I’ve used basic earphones for years to catch wind noise before it ruins a take—it’s a game-changer!"
Why This Isn’t as Scary as It Sounds
- You don’t need all three mics. Start with one that matches your main project type.
- Audio gear is forgiving. A $15 lav mic beats a $2000 camera’s built-in audio.
- Your credibility soars when viewers hear you clearly.
Remember: Great audio isn’t about perfection. It’s about creating a comfortable, distraction-free space so your audience can focus on your story — not static, wind noise, or straining to hear you.
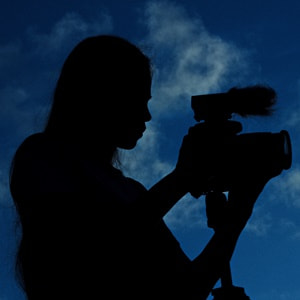
How to stop shaking while filming: Video Stabilization Solutions for Beginners
Start with a sturdy tripod for locked-off, professional shots -- it eliminates hand tremors entirely.
For handheld work, brace your elbows against your body to create a human tripod.
You don't need expensive motors first; a calm, controlled stance and a simple tripod solve most beginner shake issues.
Shaky footage can make even the most beautiful scenes feel chaotic—distracting viewers from your story.
But here’s the gentle truth: stability isn’t about fancy gadgets. It’s about giving your audience a calm, focused experience. Let’s keep this simple and stress-free.
 Video production equipment for beginners: Essential stabilization solutions
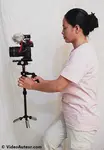
1. Your Foundation: A Sturdy Tripod
 Video Production Equipment for Beginners: A Basic Tripod
What: A basic tripod.
Why:
- Eliminates hand tremors for interviews, tutorials, or B-roll.
- Teaches you framing discipline (no rushed shots!).
- Lasts years—unlike fragile gear.
Tip: Skip "fluid heads" for now. Start simple; upgrade later.
"A tripod isn’t just a tool—it’s your quiet, reliable storytelling partner."
2. For Movement: Gimbals (If You Really Need Motion)
 Video Production Equipment for Beginners: Gimbal
What: Motorized stabilizers.
Why:
- Creates buttery-smooth tracking shots (walking, panning).
- Great for dynamic content like travel vlogs.
But:
- Battery-dependent (forget to charge? No shooting!).
- Steep learning curve + higher cost.
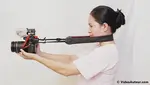
3. The Skill-Builder: Handheld Steadicam
 Video Production Equipment for Beginners: A Handheld Steadicam
What: A counterbalanced stabilizer.
Why (if you crave hands-on control):
- No batteries → never runs out of power.
- Teaches true balancing skills (rewarding long-term!).
- Achieves organic, cinematic movement.
Reality check:
- Practice-heavy (takes weeks to master).
- Best for intentional creators who enjoy the craft.
Your Beginner-Friendly Approach
- Start here: A tripod is 90% of what you need.
- Add motion later: Only if your stories demand it (e.g., walking tours).
- Remember: Purposeful shaky shots can work (e.g., chase scenes)—but unintentional shakes always distract.
You don’t need motors to make magic.
A still frame, held with care, often speaks loudest.
What equipment is required for video editing: Video Editing Essentials (software and hardware)
For beginners, the essentials are simple: a capable computer with 8GB RAM and an SSD, free editing software like DaVinci Resolve or CapCut, and any pair of headphones to monitor audio.
You don't need expensive gear; focus on learning to cut clips and tell a story first.
Editing is where your story comes alive—and the good news? You don’t need Hollywood-level gear to start. Let’s gently unpack what truly matters for your first projects.
 Video production equipment for beginners: Essential editing software and hardware
1. Software: Start Free & Powerful
Your Best Friend: DaVinci Resolve (free version).
 Video Production Equipment for Beginners: DaVinci Resolve Free Version
Why:
- Edits video, polishes audio, and color-grades—all in one place.
- Works on Mac, Windows, and Linux.
- (Bonus: CapCut for mobile editing. User-friendly, very intuitive.)
Tip: Ignore complex features at first. Learn to cut clips, add music, and export. That’s enough!
2. Computer: Keep It Simple
 Video Production Equipment for Beginners: Laptop Computer
What You Need:
- Any laptop/desktop with 8GB RAM (16GB is nicer but not essential).
- Storage: A 1TB SSD (for active projects) + a cheap HDD (for backups).
SSD = Solid State Drive
HDD = Hard Disk Drive
Why:
- SSDs make editing smooth; HDDs keep files safe.
- 8GB RAM handles 1080p editing (avoid 4K until you upgrade).
Reassurance: People edited films on far less. Your focus is story, not specs.
3. Headphones: Your Audio Lifeline
 Video Production Equipment for Beginners: Affordable Over-ear Headphones
What: Affordable over-ear headphones or earphones.
Why:
- Catch hums, plosives, or unbalanced music before you publish.
- Use what you already own!
4. Monitor? Optional!
 Video Production Equipment for Beginners: Additional Computer Monitor (optional)
- Truth: A second screen is helpful for timelines and color work…
- But: Your laptop screen is 100% fine for now.
- Upgrade later: Only if editing becomes a daily ritual.
Your Stress-Free Editing Starter Kit
All you need:
- Free software
- A computer
- Headphones (even earphones!)
That’s it! Fancy mics, color wheels, and dual monitors can wait.
Is there a 100% free video editor -- free video editing software for beginners?
Yes, absolutely. DaVinci Resolve and iMovie are 100% free with no watermarks or time limits.
While CapCut’s desktop app now restricts free exports, its mobile version remains unlimited and watermark-free.
For beginners, these tools provide professional-grade cuts, transitions, and full HD export without spending a cent.
Let’s demystify editing: You don’t need expensive software to tell great stories. In fact, some of the most powerful tools are completely free—and they’re more than enough to polish your first videos with care.
Here’s your stress-free starter kit:
 Video production equipment for beginners: A guide to free editing software
1. DaVinci Resolve (Windows/Mac/Linux)
Why you’ll love it:
- Professional power, zero cost: Edits, color-corrects, mixes audio, and adds visual effects—all in one place.
- Hollywood-grade color tools (used on actual films!).
- Gentle learning curve: Start with simple cuts; explore advanced features later.
Perfect for: Creators who want to grow without switching software later.
2. iMovie (Mac/iOS Only)
Why you’ll love it:
- Super intuitive: Drag-and-drop simplicity.
- Seamless Apple integration: Edit on your laptop, then tweak on your phone.
- Free music/sound effects: Built-in library for quick polish.
Perfect for: Apple users making vlogs, school projects, or family videos.
3. CapCut (Mobile/Windows/Mac/)
Why you’ll love it:
- Made for social media: Templates, trendy effects, and auto-captions.
- Mobile-friendly: Edit on your phone when you’re on the go.
- Cloud-synced: Work across devices.
Perfect for: TikTok/Reel creators, quick-turnaround projects.
Heads up about CapCut's desktop version!
The free plan now limits you to about two watermark-free exports per week. After that, your videos will have a watermark unless you upgrade to Pro.


Because of this, I'd stick with the free mobile app for unlimited, watermark-free editing.
CapCut regularly updates its free version, sometimes changing available features and functionality.
While the watermark feature in the desktop version could change in future updates, we maintain our position on what constitutes genuine free video editing software for beginners:
- No watermarks
- Full HD (1080p) export
- Core tools unlocked: cut, transitions, color correction
- No forced upgrades
That's the True Free Video Editor Beginners’ Checklist.
However, if you're already considering the paid version, the desktop app is definitely worth trying to see if its Pro features are what you need.
4. Clipchamp (Windows/Browser)
Why you’ll love it:
- Browser-based: No downloads! (Great for school/library computers).
- Simple templates: Resumes, presentations, montages.
Perfect for: Windows users needing quick, web-friendly edits.
Your First Editing Steps
- Download one (pick based on your device!).
- Learn just 3 things: Import clips, cut footage, export.
- Ignore perfection: Your story matters more than fancy transitions.
Editing isn’t about buttons—it’s about curiosity. Be gentle with yourself. Your first cut is a victory.
Ready to find the perfect free software that respects your time and talent? Let's explore the genuinely free options that let you focus on what matters most: your story.
How to Manage Your Video Files: Video Storage Solutions
Keep active projects on your fast 1TB SSD for smooth editing.
After each session, back up everything to an inexpensive external HDD using the two-copy rule.
Archive finished videos to free up SSD space, and rely on cloud storage only for sharing final exports.
Let’s build seamlessly on your editing setup! Remember the 1TB SSD + backup HDD from our editing essentials? Here’s how to use them effectively to protect your work.
Your Consistent, Beginner-Friendly System
1. Active Projects: Your SSD (The Editing Hub)
 Video Production Equipment for Beginners: Solid-State Drive
What: Your 1TB SSD – this could be:
- Inside your laptop/desktop (if it already has one – great!).
- An external SSD if your computer has an HDD inside.
Why:
- Essential for smooth editing: SSDs access files lightning-fast, preventing frustrating lag.
- Portability (if external): Edit anywhere.
Tip: Only keep current projects here. Archive finished work monthly!
2. Backups: Cheap External HDD (Your Safety Net)
 Video Production Equipment for Beginners: External Hard Drive
What: A 2TB+ USB 3.0 HDD.
Why:
- The Two-Copy Rule: Always duplicate your active project files here.
- Cost-effective storage: HDDs offer huge space for backups at low cost.
Critical habit: Backup after every editing session!
Space-Saving Wisdom & Cloud Options
- Record in 1080p: Unless you need 4K, this slashes file sizes by 75%+ with minimal quality loss.
- Delete unused footage: Remove raw clips that didn’t make the final edit.
- Cloud for Finished Exports Only: Use Google Drive/Dropbox for sharing final videos. Avoid storing raw files here – uploads are slow and costly.
When to Expand
- Active SSD full? → Add another external SSD or upgrade your internal drive.
- Backup HDD full? → Add a second backup drive (store it offsite!).
- Shooting 4K regularly? → Consider a larger SSD (but stick with 1080p while learning!).
Video Production Equipment for Beginners: Step-by-Step Guide to Building Your Starter Kit
Start with the smartphone already in your pocket and a basic tripod for steady shots.
Prioritize clear audio next with an inexpensive wireless mic -- good sound matters more than perfect video.
Finally, use natural window light or a small LED panel to shape your image before upgrading anything else.
Feeling unsure where to begin? Let’s walk through this together—one gentle, affordable step at a time.
Your starter kit isn’t about buying everything today. It’s about starting small, creating confidently, and growing as you go.
 Video production equipment for beginners: Step-by-step guide to building a starter kit
Step 1: Start with What You Already Own
- Camera: Your smartphone (already in your pocket!).
- Stabilization: A simple tripod.
- Why: These two tools let you film clear, steady footage immediately.
- Breathe: You don’t need permission to start. Hit record today.
Step 2: Elevate Your Sound (Within 1 Week)
- Add: An inexpensive wireless mic.
- Why: Clear sound is more important than 4K video. Viewers forgive blurry visuals faster than bad sound.
- Tip: Clip it on, plug into your phone, and suddenly—you sound pro.
Step 3: Shape Your Light (Within 1 Month)
- Add: Natural light + a reflector (poster board!) or a small LED panel.
- Why: Good lighting makes phone footage glow. Place your subject near a window, or angle an LED slightly above eye level.
- Reassurance: Shadows soften. Your stories feel intentional.
Step 4: Edit and Export (Free, Easy)
- Software: DaVinci Resolve (free) or CapCut (mobile-friendly).
- Why: Learn to cut clips, add music, and export—no complex tools needed yet.
- First project: A 60-second video about something you love.
Step 5: Protect Your Work (Ongoing Habit)
Storage:
- Active projects: On your computer’s SSD or a 1TB external SSD.
- Backups: On a cheap 2TB HDD (duplicate files here weekly!).
- Cloud: Save finished videos only to Google Drive (free 15GB!).
Critical rule: Two copies = sleep peacefully at night.
Your Mindset Matters Most
- Budget wisely: Aim for an affordable setup over a couple of months, prioritizing a tripod, microphone, and lighting. Look for cost-effective options or discounts to maximize value.
- Practice bravely: Film test clips daily. Edit for 10 minutes. Growth is better than perfection.
- Upgrade mindfully: Only buy your next piece when you feel limited—like realizing you need better low-light performance and opting for a mirrorless camera.
Remember: Your kit grows with your curiosity.
Today’s goal isn’t gear—it’s publishing your first video.
What equipment fixes common beginner video issues?
A tripod immediately cures shaky shots, while a simple wireless lavalier or shotgun mic eliminates distant, echoey audio.
For muddy indoor visuals, a basic reflector or single LED panel softens shadows.
These three affordable tools address the most common beginner hurdles and instantly elevate production quality.
We’ve all been there: You pour heart into a video, only to realize something feels "off" – shaky shots, muffled audio, or shadows swallowing your subject.
These aren’t failures – they’re invitations to grow.
Let’s gently troubleshoot the top 5 beginner pain points and match them to simple, affordable fixes.
 Video production equipment for beginners: Common struggles and gear solutions
1. "My Footage Looks Shaky and Amateurish"
Why it happens: Hand tremors, walking shots, or unstable surfaces.
Fix:
- Tripod: For interviews, tutorials, or static scenes (start here!).
- Handheld steadicam: For smooth motion shots (rewarding, but practice required).
- Gimbal: If you want automated stabilization and are ready to invest.
Gently: "Stability isn’t about locking down every shot—it’s about ensuring your audience sees what you intend them to see. A tripod teaches your eyes to frame with care."
2. "My Audio Sounds Distant or Echoey"
Why it happens: Built-in mics capture room noise, not your voice.
Fix:
- Wireless lavalier mic: Clip it near your collar.
- Shotgun mic: Point it like a flashlight at sound sources.
3. "My Videos Look Dark or Muddy Indoors"
Why it happens: Overhead lights create harsh shadows; dim rooms add grain.
Fix:
- Window + reflector: Sit facing daylight; bounce with white poster board.
- LED panel: Place it 45 degrees above eye level (soft, even glow).
- Reassurance: Light is magic. One source, well-placed, transforms everything.
4. "Editing Feels Choppy and Frustrating"
Why it happens: Large files strain underpowered computers.
Fix:
- Proxy editing (free in DaVinci Resolve): Edits lightweight copies; software swaps in full-res later.
- 8GB RAM upgrade: If your laptop allows it.
Proxy files explained: Like sketching with pencil before painting. Faster, lighter, same result!
5. "Colors Look Washed Out or Weird"
Why it happens: Auto white balance misreads warm/cool light.
Fix:
- Manual white balance: Point camera at a white sheet of paper; press "set WB."
- Color correction (free in DaVinci Resolve): Adjust warmth/tint in post.
- Gentle nudge: Your eyes see true color – teach your camera to match.
Bonus: Storage Anxiety & Workflow Hiccups
Issue: "I’m always out of space!"
Quick Fix: External HDD + delete unused raw files.
Issue: "My shots are blurry!"
Quick Fix: Practice autofocus: Tap your phone screen on your subject before recording.
Issue: "Files are everywhere!"
Quick Fix: Folder system: /Project > /Raw > /Exports. Label everything!
Remember: These "problems" are rites of passage. Each fix you learn – whether a reflector or a software toggle – makes you a stronger storyteller.
When and How to Upgrade Your Video Making Tools
Upgrade only when a specific limitation consistently blocks your vision -- like unusable audio or grainy low-light footage.
Identify that single biggest bottleneck first.
Then rent gear to test, or buy used to save money.
A better lens or microphone often transforms your work more than a new camera body.
Okay, so you've got your starter kit – maybe your phone, a simple mic, and a window for light. You're making things! That’s fantastic.
But as you keep creating, you might start wondering: "Should I get that fancy camera everyone talks about? Do I need more lights? Is my gear holding me back?" Totally normal questions!
Let’s chat about when and how to upgrade your video production equipment thoughtfully and kindly to yourself and your wallet.
 Video production equipment for beginners: When and how to upgrade your setup
First, the Golden Rule: Upgrade When Your Gear Truly Limits Your Creativity – Not Just Because It's New or Shiny.
It’s easy to fall into the trap of "gear envy." You see a YouTuber with a massive setup or a colleague raving about the latest gadget, and suddenly your perfectly good equipment feels inadequate.
Be kind to yourself here. That feeling is normal, but acting on it impulsively often leads to unnecessary spending and frustration.
The real signal to upgrade comes from your own experience:
- You consistently hit a wall: "I really want to film this interview, but my single mic just can't capture both voices clearly."
- Your vision is blocked: "I've mastered composition with my kit lens, but I need a wider angle or a tighter zoom to tell this story right."
- Technical limitations become frustrating roadblocks: "Every time I film indoors without perfect sunlight, my footage looks grainy and awful," or "Editing my videos takes days because my computer chokes on the files."
Feeling like your videos will only look professional with that new camera you've been eyeing? You might have Gear Acquisition Syndrome (GAS).
Master What You Have First
Before jumping to upgrades, truly master your current equipment for video production. Understand its strengths and weaknesses inside out.
- Can you get the absolute best audio possible from your current mic by positioning it perfectly?
- Have you explored all the manual settings on your camera?
- Can you create great lighting with lamps and reflectors you already own?
Pushing your current tools to their limits not only makes you a better creator but also clarifies exactly what you genuinely need next.
How to Upgrade Wisely: A Gentle Strategy
1. Identify Your Biggest Bottleneck:
Be brutally honest. What's causing the most frustration or holding your content back the most?
Is it fuzzy audio that makes people click away? Is it shaky footage? Is it dim, unflattering lighting? Or is your editing software crawling?
Focus your upgrade energy (and budget) here first. Don't jump to a new camera if your audio is the real weak spot.
2. Rent or Borrow Before You Buy:
This is HUGE, especially for expensive items like cameras or lenses. Before splurging, see if you can rent the specific piece of equipment for a project or borrow it from a friend/film school/library.
Test drive it in your actual workflow. Does it really solve the problem you identified? Does it feel right? This saves you from expensive mistakes and buyer's remorse.
3. Research Deeply (Beyond the Hype):
Once you know what you need to solve a specific problem, research your options. Look for reviews from creators with similar needs and budgets, not just the biggest influencers.
Ask yourself: "Does this specific feature solve my specific problem?"
Be wary of specs that sound impressive but you won't actually use. Keywords like "equipment for video production" or "best [microphone type] for beginners" can help.
4. Consider Used or Refurbished:
Professional video making tools are built to last. Buying high-quality used or manufacturer-refurbished gear from reputable dealers is a fantastic way to get much better equipment at a fraction of the new cost.
Lenses, microphones, and lights are often great candidates for this.
"Before buying new, I always search for second-hand lenses that are in full working order. I often find them for half the price of a brand-new version of the same model."
5. Align Upgrades with Your Goals & Budget:
Ask yourself:
- "Does this upgrade directly help me create the type of content I want to make now?"
- "Is this the most cost-effective way to solve my problem?"
- "Can my budget realistically handle this without causing stress?"
Common Upgrade Paths (After Mastering Basics):
- Camera Body: When you consistently struggle with low-light performance, need better color control for grading, or require specific features like high frame rates for smooth slow motion.
- Lenses: To achieve different creative looks (wide landscapes, tight close-ups, beautiful blurred backgrounds) that your kit lens can't deliver. A good lens often makes a bigger difference than a new camera body!
- Lighting: When you need consistent, controllable light for indoor setups (like softboxes or LED panels), or more power/versatility for specific moods.
- Computer: When editing becomes painfully slow, especially with higher-resolution footage (like 4K) or complex projects.
- Audio: When you need to record multiple people clearly (e.g., additional lav mics), tackle noisy environments (e.g., a shotgun mic), or get more professional control (e.g., an audio interface + XLR mic).
Remember What Matters Most
Here’s the heart of it: Amazing gear doesn't automatically make amazing videos. Storytelling, creativity, and connecting with your audience matter infinitely more than the label on your camera.
The best video making tools are the ones that serve your vision, not the ones that drain your bank account chasing trends.
Upgrade thoughtfully, strategically, and only when your current tools are truly holding your creativity back.
- Focus on solving your biggest pain point first.
- Test before you invest.
- And keep that wonderful creative spark at the center of it all.
You’ve got this!
Other Equipment for Video Production
Beyond your camera, essential support gear elevates production value.
A sturdy tripod secures static shots, while a gimbal or Steadicam smooths movement for cinematic flow.
Add a simple LED light for clarity and a lavalier mic for crisp audio.
Start with the tool that solves your biggest frustration -- stability or sound.
Simple Stabilization: Steady Shots Without Expensive Gear
As beginners, we often assume smooth videos require fancy stabilizers or gimbals—but what if you could achieve polished results with gear you already own?
Good news: stability starts with creativity, not cash.
Your camera strap, tripod, or even a humble garter can transform wobbly shots into fluid, cinematic moments. No soldering, no 3D printing—just clever tweaks to everyday tools.

Explore these gentle DIY stabilizer techniques to start shooting steadier videos today.
P.S. These methods are perfect for students, vloggers, or anyone testing the waters. If you later dive into professional gear, you’ll appreciate these foundational skills even more!
The Magic of Smooth Shots: Meet the Steadicam
Shaky shots happen to everyone—especially when you’re moving. But what if there’s a brilliant tool that turns wobbly chaos into buttery-smooth cinematic magic?
Enter the Steadicam—a clever mechanical stabilizer that’s been a secret weapon of filmmakers for decades. It doesn’t need batteries or fancy motors.

Instead, it relies on clever physics (think counterweights and balancing tricks!) to let creators glide through spaces, climb stairs, or follow subjects with dream-like stability.
You might wonder, "Do I need one as a beginner?" Not necessarily—but understanding how tools like this work unlocks a whole new layer of video storytelling. It teaches you...
- why movement matters,
- how pros achieve those hypnotic tracking shots, and
- how to think intentionally about your camera’s motion.
Curious about the science and artistry behind these smooth shots? I’ve written a whole guide breaking it down in simple terms:
How Does a Steadicam Work? Unveiling the Magic Behind Smooth Shots
Spoiler: It’s less about gadgets and more about creativity—perfect for anyone who loves turning everyday moments into cinematic gold.
The Magic of Smooth Shots: Your Introduction to Gimbals

Ever notice how some videos glide so gracefully, like they’re floating on air? If you’ve tried filming while walking or turning, you know how tricky it can be to keep things steady.
That’s where a little helper called a gimbal comes in!
Think of it as a gentle friend for your camera—whether you’re using a smartphone, a mirrorless camera, or even an action cam. Gimbals work quietly in the background, using smart sensors and tiny motors to soften shakes and bumps.
The result? Your footage looks silky smooth, almost like it was shot by a pro.
For beginners, gimbals are a game-changer:
- They’re lightweight and easy to carry on adventures.
- They turn wobbly shots into cinematic moments—perfect for vlogs, travel clips, or capturing fast-paced action.
- And yes, they’re surprisingly beginner-friendly once you get the hang of them!
If you’re curious about how these clever devices actually work (and how to choose one for your needs), I’ve written a whole guide for you.
Dive into How Does a Gimbal Work? Unlocking the Secret to Smooth Video to learn more—no technical jargon, just calm, clear insights.
Remember: Your storytelling matters most. Tools like gimbals simply help you share it beautifully.
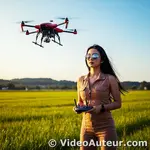
Adding Wings to Your Story: The Magic of Drone Videography
Drones have quietly revolutionized video production, turning what once required helicopters and Hollywood budgets into something accessible, intuitive, and deeply creative.

For beginners, they’re not just gadgets; they’re storytelling companions that add scale, emotion, and a fresh perspective to your videos.
You might wonder: How can something that flies so smoothly be easy to control? The truth is, modern drones are designed with you in mind.
They balance themselves like tightrope walkers, respond gently to your touch, and carry cameras that capture cinema-quality footage—all while you stay safely on the ground.
In our guide, How Does a Drone Work? Learn Flight Mechanics and Camera Tech, we gently unpack the science and artistry behind these flying wonders. You’ll learn:
- How drones stay steady in the wind (hint: it’s like they have a tiny, invisible ballet instructor onboard).
- Why even beginners can achieve silky-smooth shots (thank you, clever gimbals!).
- Simple ways to start safely and legally.
If you’ve ever dreamed of turning ordinary scenes into extraordinary moments—a graduation, a travel vlog, or a short film—drones might just be your new favorite tool.
They’re not as complex as they seem, and the view from above?
It’s pure joy.
Ready to see the world from a new angle? Let’s demystify drones together.
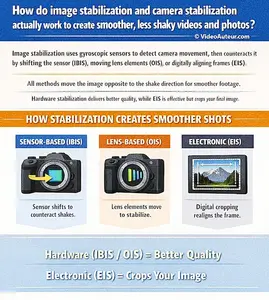
Making Your Videos Smooth and Steady: A Little Help from Image Stabilization

Keeping your camera perfectly steady isn’t always easy. Maybe your footage looks a little jittery when you’re filming by hand, or that zoomed-in shot wobbles when you breathe.
Don’t worry—this happens to everyone at first!
The good news? You don’t need magic hands or expensive gear right away to fix it. There’s a quiet hero in video production called image stabilization, and it’s here to help you turn shaky scenes into smooth, watchable moments.
Whether you’re using your smartphone, a basic camera, or just starting with a mirrorless camera, image stabilization works behind the scenes (or inside your gear!) to soften those accidental wobbles.
And guess what? There’s not just one way to do it—there are four simple techniques to try, depending on your style and tools.
In our friendly guide, How Does Image Stabilization Work? 4 Techniques for Shake-Free Videos, we break it all down in plain language. You’ll learn:
- How tiny tech inside your camera or lens quietly “fixes” shakes.
- Affordable tools (like tripods or even your editing software) that can save the day.
- When not to use stabilization (yes, sometimes shaky is okay!).
No jargon, no overwhelm—just practical tips to make your videos feel more polished and professional.
FAQs: Video Production Equipment for Beginners
Do I really need an expensive camera to start?
Do I really need an expensive camera to start?
Not at all! You absolutely do not need an expensive camera to begin making videos.
Many beginners start with the camera they already have—often a smartphone—and get great results.
The most important thing is learning how to use your equipment well. As you grow, you can always upgrade, but don’t let a lack of fancy gear hold you back.
Even experienced creators often say that skill and creativity matter far more than the price tag of your camera.
What’s more important: audio or visuals?
What’s more important: audio or visuals?
Surprisingly, audio is often more important than visuals.
Viewers are much more likely to forgive a video with average visuals than one with poor sound.
Clear, crisp audio keeps people engaged, while bad sound can quickly drive them away—even if your video looks amazing.
So, if you’re deciding where to spend your budget, consider investing in a decent microphone before upgrading your camera.
What equipment do I need to start making videos?
What equipment do I need to start making videos?
- Camera: This could be your smartphone or a dedicated video camera.
- Microphone: Good audio makes a big difference, so consider a simple external mic.
- Tripod: Keeps your shots steady and professional.
- Lighting: Even a basic ring light or natural window light helps.
- Computer: For editing your footage afterwards.
What's the absolute basic video making tool I need?
What's the absolute basic video making tool I need?
Honestly, the absolute basic tool is the smartphone you already own! Modern phones can shoot high-quality video, and many have great microphones and editing apps built in.
Start with your phone and upgrade as you gain confidence and experience.
Besides a camera, what other essential equipment do I need for videography?
Besides a camera, what other essential equipment do I need for videography?
Along with your camera, it helps to have:
- Microphone: Even a basic lavalier (clip-on) will boost your audio.
- Tripod or gimbal: To keep your video smooth and steady.
- Extra batteries and memory cards: So you don’t run out mid-shoot.
- Lighting: Softbox, ring, or LED panel lights—even daylight from a window.
- Headphones: To monitor your audio quality when recording.
What equipment do I need for video editing?
What equipment do I need for video editing?
You’ll need:
- Computer or laptop, ideally with at least an Intel Core i5 processor, 8GB RAM, and decent storage.
- Headphones or speakers: For accurate sound editing.
- (Optional) External hard drive: To store big video files safely.
How can I upgrade without breaking the bank?
How can I upgrade without breaking the bank?
Start small and focus on what will make the biggest difference. Here are a few affordable ways to upgrade:
- Use your smartphone with a tripod for steady shots.
- Get an external microphone for better sound—there are many budget-friendly options.
- Add a simple lighting setup, like a ring light or softbox, to improve your visuals.
- Learn basic editing with free or inexpensive software.
You don’t need to buy everything at once. Gradual upgrades, based on your needs and experience, are the best way to build your kit without overspending.
Conclusion: Video Production Equipment for Beginners
Stepping into video production can feel like entering a vast, exciting world – and it’s easy to get lost in the sea of shiny gadgets.
But here’s the most important thing to remember, especially when you're starting out: you don’t need every piece of gear under the sun to create something meaningful and impactful.
Focusing on the absolute essentials – a camera, decent audio, simple stabilization, thoughtful lighting, editing software, and reliable storage – gives you everything you need to start telling your story well.
This core kit lets you concentrate on what truly matters: learning the craft, honing your technique, and finding your unique voice.
The best video making tools for beginners aren't the most expensive or impressive ones. They're the ones that get out of your way.
If a piece of equipment distracts you from actually creating, complicates your process, or weighs you down (literally or financially!), it might not be the right fit for you right now.
Don't feel pressured to buy fancy gear just to "look professional" or impress others. Authenticity and compelling storytelling resonate far more deeply than pristine technical specs ever will.
Start small. Master the basics you have. Let your creativity lead.
As your skills and confidence grow, you can strategically upgrade your kit based on the real limitations you encounter in your projects – not because of fleeting "gear envy" or the urge to appear a certain way.
Your passion and your perspective are your most powerful pieces of equipment.
At Video Auteur, we believe in practical, caring guidance that helps you create videos that truly connect, without unnecessary complexity or expense.
So, now that you know the essentials... are you ready to take that first bold, wonderfully creative step into video production?
Your story is waiting to be told. Go make it happen.
You might like these
DIY Camera Stabilizer: Repurpose, Don't Rebuild
Learn how to create a DIY camera stabilizer using gear you already own -- camera strap, tripod, monopod and more. Achieve steady video without buying anything.
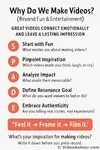
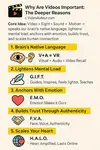
Why do we make videos? Create Emotional Connection
Why do we make videos? Discover how to create emotionally resonant content that connects with audiences through authentic storytelling and real experiences.
How Does a Steadicam Work? Smooth Shots Explained
How Does a Steadicam Work? Learn the physics of gimbal balancing, operator technique, and smooth camera movements for professional video storytelling.


Alvin Motilla is the creator of VideoAuteur.com, where he helps everyday people make videos that truly connect with audiences. With over 20 years of experience spanning scriptwriting, documentaries, corporate, and freelance video production, he champions the human side of creation over gear obsession. A graduate of AB Mass Communication, he believes that showing up with heart matters more than owning expensive equipment. Off-screen, Alvin enjoys biking with his wife and daughter, staying active, and studying Scripture.

Join the
Video Auteur Club
Get tips, step-by-step guidance, and gear guides that make video production simple.
What's New
-
Video Making Tips for Beginners: Start Creating Today
 Video Making Tips for Beginners: Overcome overwhelm and start creating. Practical tips on content, audio, framing, editing and finding your voice.
 -
How to Make a Family Video: Capture Real Moments
Learn how to make a family video that captures authentic moments, not perfect takes. Simple steps, free tools, and heartfelt memories your family will treasure. -
What Type of Camera Should I Get as a Beginner?
 What type of camera should I get as a beginner? Learn which mirrorless cameras, features, and budget kits work best for video creators starting their journey.