- Video Production
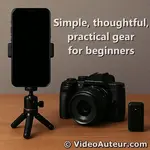
- Video Production Equipment for Beginners
- DIY Camera Stabilizer
DIY Camera Stabilizer: Steady Videos With Gear You Already Have
Not all DIY camera stabilizer devices are built.
Yes, you can steady your videos using a camera strap and tripod you already own.
Create tension by pulling the strap taut around your neck or under your foot.
Extend one tripod leg as a monopod, or use a string through your plate screw for smooth crane-like moves.
No extra gear needed.
Key Takeaways: DIY Camera Stabilizer
- Repurpose, Don't Rebuild: True DIY stabilization isn't about sourcing materials from a hardware store; it’s about using the gear you already own -- specifically your camera strap and tripod -- in unconventional ways to eliminate handheld shake.
- The Camera Strap is Your First Stabilizer: By creating tension between your body and the camera (pulling the strap taut around your neck, shoulder, or under your foot), you can instantly dampen micro-jitters for smoother pans and tilts.
- The Tripod as a Multi-Tool: Beyond just a three-legged stand, your tripod functions best as a quick monopod (extend one leg only) for run-and-gun shooting or as a makeshift shoulder rig when combined with your neck strap.
- Leverage Weight and Tension for Stability: For heavier setups, draping the camera strap under the lens creates a suspended, handheld platform ideal for smooth, slider-like or minimal movement shots.
- The String-and-Plate Trick: Threading a garter string through your quick-release plate screw ring creates a zero-cost tension rig. Stepping on the string while pulling up or lowering the camera mimics the fluid motion of a small jib or crane.
- Creative Movement on a Budget: A simple blanket on a smooth floor can turn a standard tripod into a functional slider, proving that stable, dolly-like movement is achievable with household items and a controlled environment.
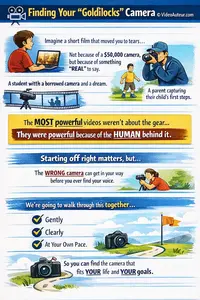
Are you looking for ways to improve the quality of your shots without spending so much? No fancy tools required. But very handy for beginners.
In this article, we're not going to talk about buying raw materials, and making your own camera stabilizer.
Why?
Because, honestly, it's better and more convenient to buy a low-cost, ready-made, but properly designed stabilizer. Not everyone wants to go through the hassle of sourcing materials, and building a camera stabilizer by trial and error.
So...
We'll only focus and talk about some free, alternative ways of stabilizing your camera as you're shooting videos. Using gear or tools you may already have.
What are DIY camera stabilizers?
DIY camera stabilizers are homemade or improvised tools used to smooth out shaky handheld footage without buying expensive branded gear.
For beginners, this usually means repurposing everyday items -- like a tripod as a counterweight or a string-and-washer tension rig -- to physically absorb bumps and create steadier, more professional-looking video on a budget.
Okay, let's clarify first what "DIY camera stabilizer" is. As you can see, it is the combination of...
... "DIY" + "camera stabilizer".
"DIY" means "do it yourself".
And "camera stabilizer" refers to any tool you use to make your camera stable, while you're shooting videos.
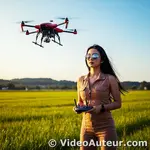
Ever record a video and end up with shaky footage? It happens to me as well! A camera stabilizer smooths out all those bumps and jitters, so your videos look polished and pro.
So, a "do-it-yourself camera stabilizer" is different from a dedicated or branded camera stabilizer. A DIY camera stabilizer is an alternative device for making your camera stable while you're shooting.
But wait! Not everyone has the time or tools to build a stabilizer from scratch. That's okay! There are many ways to achieve stable footage using gear you might already have.
You can categorize DIY camera stabilizers into two groups...
- devices that you build yourself using various raw materials, and
- existing gear that you repurpose to be used in other creative ways of keeping your camera steady.
This article focuses on the second group.
Crazy stat alert! Cisco says a whopping 82% of internet traffic is videos. No wonder everything feels like video these days! Wild, right?
This means more and more people are creating their own videos, like vlogs and stuff for social media. And guess what? That makes learning some simple video stabilization tricks super helpful for beginners!
That's where DIY video stabilization comes in – perfect for affordable, high-quality content!
How do you use a camera strap as a DIY camera stabilizer?
To use a camera strap as a stabilizer, create tension by pulling the camera away from your body until the strap is taut against your neck or shoulder.
This tension limits micro-shakes.
For low-angle shots, step on the strap and pull upward.
This simple leverage provides smoother, more controlled handheld video.
Most likely, you also got a camera strap, when you bought your camera. The strap can be your best friend, because it's always there, to help you quickly stabilize your camera.
It's so handy. :-)
Here's some ways of using the camera strap as camera stabilizer...
- Camera strap around your neck.
- Camera strap hanging on your shoulder, like a sling bag.
- Stepping on the camera strap.
- Hanging your camera and lens on the strap.
Now, let's take a closer look at each method...
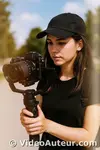
1. Camera strap around your neck.
 DIY camera stabilizer: Using camera strap as stabilizer
- Wear the camera strap around your neck.
- Make sure that strap length matches the length of your arms. Not too long, not too short. And your eyes can clearly and comfortably see the camera screen.
- Hold the camera in a manner that you're pulling it away from you. But not too tight, to avoid hurting the back of your neck. This will help you record stable shots.
- With your arms extended, pulling the camera strap tight enough, start shooting and doing camera movements—like panning and tilting.
2. Camera strap hanging on your shoulder, like a sling bag.

- This method is similar to, "camera strap around your neck". But this time, you're wearing the camera and its strap, like a sling bag.
- Position your camera to the front.
- Hold the camera, pulling it away from you.
- Start shooting and executing camera movements.
3. Stepping on the camera strap.

- This technique helps stabilize your shots, from a low angle.
- Step on the camera strap with one foot, while holding the camera with both hands.
- Pull the camera upwards and start shooting.
4. Hanging your camera and lens on the strap.

- This method works better, if you apply it to a fairly heavy camera—like a DSLR with wide angle zoom lens. Because the heavier the weight of camera-lens combination, the better the stabilization.
- You'll find it easier to use this technique, if your camera has a swiveling screen. Because you can see your framing well, while making your shots.

- For better and realistic results, I recommend this technique, only if you're going to do minimal camera movements. Such as small slider-like, or crane-like movements. I don't recommend this for extended walking and running shots—like when using a steadicam, or a gimbal.
- To use this method, both ends of the camera strap need to be attached to the camera body. Then, wrap the middle of the strap under the lens.
- Ensure that camera strap is not touching the lens focus ring. Because you don't want the strap to interfere with focusing, when you're shooting.
- Now, carry your camera like a hand bag. Press the record button, and start shooting. Remember—"minimal camera movements", only.
How can I use a tripod in unconventional ways to create a DIY camera stabilizer?
Use a tripod as a stabilizer by extending just one leg to create a quick monopod for fluid movement.
For steadier handheld shots, collapse all legs, rest them on your shoulder, and use your camera strap to brace it like a makeshift shoulder rig.
Can I use a tripod as a stabilizer?
Yes. That's my quick answer. :-)
But, we'll only talk about alternative ways of using the tripod, as camera stabilizer. Ways that are more sensible, more effective, and easier to do, in the real world.
How to use a tripod as a stabilizer?
- Use tripod as a monopod.
- Use tripod and camera strap as shoulder rig.
- Use tripod like a dolly, or to get dolly-like shots.
- Use tripod and blanket as slider.
Let's take a closer look at each method...
1. Use tripod as a monopod.

This is what I love about the monopod...
I only have to adjust one leg—just one leg—and I can go on shooting my subject from different angles.
What a huge time saver!
I can even incorporate minimal camera movements, and my monopod shots still look great. Very convenient to use.
In other words, a monopod helps a lot when shooting real life events. When you cannot afford to miss capturing precious life moments.
Hey, what if I don't have a fancy one-legged camera stand (monopod), but I do have a regular tripod? Can I just use the tripod like a monopod in a pinch?
Yes. Here's how...
- Extend only one tripod leg, all the way.
- Keep the other 2 legs collapsed, or closed up.

- Use that one extended tripod leg as a monopod, when shooting. Treat the other 2 legs, as if they don't exist.
- Now, you only have one leg to adjust—say, when you want to shoot from a low angle.
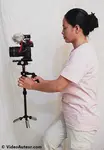
2. Use tripod and camera strap as shoulder rig.
When you watch news on TV, do you notice those raw, unpretentious, but still decent-looking handheld shots?
Those shots usually result from carrying a big, heavy broadcast camera. The camera operator puts the videocam on his—or her shoulder, and moves to where the action is happening, while shooting.
You can also get that similar resulting look. Even though, you're using a relatively lighter camera—like a DSLR, a mirrorless camera, or a small camcorder.
But how?
- By mounting your camera on a tripod.
- And using that tripod and the camera strap as shoulder rig.
—
There are 2 ways of using a tripod and a camera strap as shoulder rig...
Version 1: All 3 tripod legs on just one shoulder.
 How to use a tripod as a stabilizer?
This tripod-camera strap combination as shoulder rig, is easy to set up. Especially when you're shooting events. Here's how...
- Collapse all 3 tripod legs.
- Place the 3 tripod legs on your right shoulder—if you're right-handed. (Or, on your left shoulder—if you're left-handed.)
- Hang the camera strap from your neck. Position the camera in a way that you can clearly, and comfortably see the screen. Adjust the strap length as you do this.
- Now, all 3 tripod legs are resting on your shoulder. Next, pull the camera away from you with your 2 hands, without hurting the back of your neck.

- Then, start shooting.
—
Version 2: 2 tripod legs on both shoulders.

This is not as easy to set up as "version 1". But "version 2" is better for your shoulders, because of the equally distributed weight of tripod legs.
I prefer to use version 2 of tripod-camera strap as shoulder rig, when shooting in more controlled environments—like in studios. I also like using "version 2", when shooting more structured presentations—say, a scripted short film, or a music video.
Here's how to do "version 2" of using a tripod and a camera strap, as shoulder rig...
- Collapse all tripod legs but place the 2 legs on your left and right shoulders (as shown in the picture above).
- Hang the camera strap from your neck. Position the camera in a way that you can clearly, and comfortably see the screen. Adjust the strap length as you do this.
- Now, the 2 tripod legs are resting on your shoulders. Next, press the "record" button.
- Then, hold the one remaining tripod leg with your 2 hands. Pull it firmly away from you, without hurting the back of your neck.
. A form of DIY camera stabilizer.")
- Start shooting.
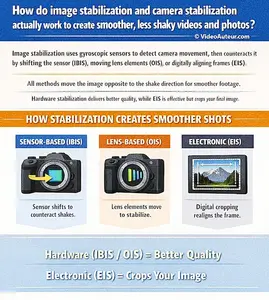
Tip: If your lens has Image Stabilization—or, IS—turn it off. If your camera has in-body image stabilization—or IBIS—turn it off as well.
Why?
You'll get a more natural, rawer, and more documentary feel to your shoulder rig shots.
3. Use tripod like a dolly, or to get dolly-like shots.

I'd like to emphasize, "dolly-like". Because this alternative way of using a tripod, only gives a look similar to the authentic dolly shot.
A dolly shot is a smooth sideways, forward, or backward movement of the camera. A cinematographer uses a cart with wheels—or something that moves on a rail track—to do a dolly shot.
With a real dolly, you can get the look of a camera moving fluently, along a straight line.
But, using a tripod as a dolly, gives you a look where the camera rises a little, and then moves downward.
So how do use a tripod like a dolly?
- Mount your camera on a standing tripod.
- Position the tripod legs, in a way that one leg is directly pointing towards you.
- Hold that one tripod leg, and carefully do some "dolly in" and "dolly out" shots. (You "dolly in", when you push the tripod forward. You "dolly out", when you pull the tripod toward you.)
4. Use tripod and blanket as slider.

I prefer to do this technique...
- indoors,
- on a smooth floor, and
- in a controlled environment.
Why?
To easily execute and get the slider effect.
Here's how to do it...
- Place a blanket on a smooth floor.
- Place the tripod on that blanket and mount your camera on the tripod.
- Consider how you'll film your subject, using this technique. Know the start and the end of your improvised slider shot.
- Press the "record" button, and slowly pull the blanket across the floor, to do your slider-like shot.

How can I create a DIY camera stabilizer using a monopod and a camera strap to function as a shoulder rig?
Mount your camera to the monopod’s tilt head and fully collapse the leg.
Place the collapsed monopod on your shoulder while wearing the camera strap around your neck for tension.
Pull the camera forward with both hands until the strap is taut, creating a stable third point of contact for smoother handheld footage.
 DIY camera stabilizer: Using monopod and camera strap as shoulder rig
This technique is similar—in fact—almost identical with, "using tripod and camera strap as shoulder rig".
The only difference? You got it—we're using monopod, instead of tripod.
Note: This works if your monopod has a tilt head.
 The tilt head allows you to use the monopod as shoulder rig.
So, how do we use monopod and camera strap as shoulder rig?...
- Mount your camera on the monopod's tilt head.
- Collapse the monopod leg.
- Hang the camera strap from your neck. Then, place the monopod leg on your right shoulder—if you're right-handed. (Or, on your left shoulder—if you're left-handed.)
- Adjust the tilt head to position the camera, in a way that you can clearly, and comfortably see the screen. Adjust the strap length, as you do this.
- Now, the monopod leg is resting on your shoulder. Next, pull the camera away from you with your 2 hands, without hurting the back of your neck.
- Start shooting.
How can I make a cheap/DIY camera stabilizer using readily available materials like garter string and a tripod plate to reduce camera shake and get smoother footage?
Thread a garter string through your tripod plate’s screw ring.
Step on both ends to create tension.
The taut string counteracts jitters as you slowly raise or lower the camera, producing smoother crane-style shots.
It’s an effective, zero-cost stabilizer using gear you already own.
 DIY camera stabilizer: Using garter string and tripod plate to stabilize camera movement
A garter string can come in handy, as another form of camera stabilizer, when you're already using a tripod.
How?
Remember that to use a tripod, you need to attach the tripod plate under the camera body. So, you can mount the camera on a tripod.
But...
This alternative way of stabilizing camera movements will only need...
- the tripod plate already attached to camera body, and
- a garter string.
Here's how to do it...
- Simply insert the garter string into the ring of the plate screw.

- Now, how you use the garter string and the tripod plate, will depend on the camera movement you want to do.
- Let's say you want some crane-like motion. To do it, step on both ends of the garter string.

- Press the record button.
- To do a "crane up" shot, slowly pull the camera up while filming your subject. (Doing this will stretch the garter string, of course. So, try to do this at a consistent speed.)
- Now, try to do the opposite—a "crane down" shot. With the garter string already stretched, slowly let the camera be pulled down by the garter string, while filming your subject. (Again, try to do this at a consistent speed.)
It's important to note that these DIY methods may not be as effective as high-end, store-bought stabilizers, especially for long shoots or demanding situations. However, they're a great way to get started and improve your videography skills without a significant investment.
FAQs: DIY Camera Stabilizer Ideas and Alternatives
What are DIY camera stabilizers? (For phones and cameras)
What are DIY camera stabilizers? (For phones and cameras)
DIY camera stabilizers are simple, homemade tools or rigs you can build yourself to help keep your phone or camera steady while filming.
Instead of buying expensive gear, you can use common household items—like PVC pipes, weights, or even rubber bands and hammers—to reduce shaky footage and get smoother shots.
These stabilizers work for both smartphones and regular cameras and are perfect if you're on a budget or just starting out.
How do I stabilize my camera without any special equipment?
How do I stabilize my camera without any special equipment?
You can stabilize your camera easily without buying anything special. Here are some handy tips:
- Use a solid surface: Place your camera or phone on a stable table, wall, or even a rock if you're outside.
- Make your body a stabilizer: Tuck your elbows into your sides, spread your legs a bit for good balance, and gently press the shutter after you finish exhaling.
- Use your camera strap: Pull the strap tight against the back of your neck while you hold the camera in front. This creates tension and steadies your shot.
How do you hold the camera to minimize shaky movement?
How do you hold the camera to minimize shaky movement?
To keep things steady, hold your camera like this:
- Use both hands: One hand grips the camera body, the other supports the lens from below.
- Tuck your elbows: Keep your elbows close to your body for stability.
- Stand stable: Spread your feet hip-width apart and, if possible, lean against a wall or solid object.
How can I stabilize my camera without a tripod?
How can I stabilize my camera without a tripod?
No tripod? No problem! Try these tricks:
- Rest your camera on a sturdy object like a table, shelf, or even a backpack.
- Use a beanbag or rice bag: Place your camera on one to absorb small movements and steady your shot.
- Make a string tripod: Tie string to your camera, step on it to create tension, and pull up gently for extra support.
- Lean against a wall or tree to steady yourself.
How can I use a tripod as a DIY camera stabilizer?
How can I use a tripod as a DIY camera stabilizer?
Your tripod can become an impromptu stabilizer—even when not set up on the ground:
- Hold the tripod horizontally: With your camera attached, hold the tripod by the legs and let its weight counteract small shakes.
- Use as a monopod: Extend just one leg and brace it lightly on the ground for more mobility while still reducing shakes.
- Center column hack: Hold your tripod by the center column and let the weight help stabilize your shot.
Conclusion
There you have it! With a little creativity and these handy DIY methods, you can achieve surprisingly stable footage using gear you already own.
Remember, these DIY methods are a great way to achieve stable footage without breaking the bank.
So, grab your camera, pick a method that suits your needs, and get ready to shoot some amazing videos!
To learn about some dedicated camera stabilizers, check out these related topics on...
You might like these
Practicality in Videography: Great Videos. Zero Debt
Practicality in Videography means prioritizing your story over expensive gear. Learn how to create amazing videos without debt using the P.A.C.E.S. approach.
Editing Videos: Overcome Confusion, Complete Your Project
Struggling with editing videos? Find clarity by seeing the big picture first. Learn the key strategies to move from raw footage to your final cut.
What is the Difference: Pre-Production, Production, Post-Production
Confused by film terms? We explain what is the difference between pre-production, production, and post-production using a simple house-building analogy.


Alvin Motilla is the creator of VideoAuteur.com, where he helps everyday people make videos that truly connect with audiences. With over 20 years of experience spanning scriptwriting, documentaries, corporate, and freelance video production, he champions the human side of creation over gear obsession. A graduate of AB Mass Communication, he believes that showing up with heart matters more than owning expensive equipment. Off-screen, Alvin enjoys biking with his wife and daughter, staying active, and studying Scripture.

Join the
Video Auteur Club
Get tips, step-by-step guidance, and gear guides that make video production simple.
What's New
-
What Are the Most Common Beginner Video Mistakes and How to Fix Them
 Discover what are the most common beginner video mistakes and how to fix them. Learn zero-cost fixes: audio, lighting, editing. Elevate your content instantly.
 -
What is the Difference: Pre-Production, Production, Post-Production
 Confused by film terms? We explain what is the difference between pre-production, production, and post-production using a simple house-building analogy.
 -
What Type of Camera Should I Get as a Beginner?
 What type of camera should I get as a beginner? Learn which mirrorless cameras, features, and budget kits work best for video creators starting their journey.