- Video Production
- Video Making Tips for Beginners
Video Making Tips for Beginners: From Overwhelmed to Creating
Discover essential video making tips for beginners that will help you overcome the initial hurdles and start creating engaging content.
Key Takeaways: Video Making Tips for Beginners
Before you dive into the technical details, let's get the most important lessons out of the way. These are the principles I leaned on to stop feeling overwhelmed and actually start creating. If you remember nothing else from this guide, hold onto these:
-
The Story Beats the Specs: A compelling, clear message filmed on a shaky phone will always outperform a boring, polished video shot on expensive gear. Don't let the lack of a "real camera" stop you from pressing record today. Content trumps equipment every single time.
-
Audio is the Dealbreaker: Viewers will forgive bad lighting or a crooked frame, but they will click away instantly if they can't hear you clearly. Prioritize getting close to your subject or using an inexpensive lapel mic. Clear sound is the viewer's experience.
-
Stop Chasing Viral, Start Chasing Your Voice: You don't need to imitate trends to be successful. Your unique perspective -- the specific way you see the world -- is your secret weapon. Lean into what feels true and authentic to you, not what the algorithm is doing this week.
-
Progress is the Goal, Not Perfection: You are going to make shaky videos. You are going to use a transition that makes you cringe a year from now. That's not failure; that's the only way to build the muscle memory needed to improve. Embrace the wobbly bike ride phase.
- Connect Before You Create: Before you even think about lighting, ask yourself: Who is this for? Defining your audience (their age, interests, and where they watch) isn't just marketing fluff -- it dictates how you frame the shot, how fast you edit, and what story you tell.
Let's face it, the thought of creating a compelling video can feel overwhelming. Especially if you're just starting out.

There's a sea of info out there, filled with technical jargon and expensive gear recommendations.
And there's the pressure to be the next viral sensation.
These are enough to make anyone hit pause.
But I think a newbie doesn't have to feel that way. Even I find it hard to start doing something when I'm feeling overwhelmed. It hampers my productivity.
The good news is, video making can be a fun and rewarding way to express yourself, share your ideas, and connect with a wider audience!
What I find helpful is to have just enough actionable tips I can use right away at the start of my learning journey.
I know those tips are not all that I need to learn. But at least, they're easy enough to implement.
And that gives me the feeling that I'm progressing, and it encourages me to learn more and do more.
So, to guide you through the video making basics, let's dive into some actionable video tips for beginners that you can use right away.
Video Making Tip #1: Know that people want to be engaged by videos.
Viewers don't just want information -- they want a reason to keep watching.
Engagement means sparking curiosity, emotion, or a smile, not just reciting facts.
As a beginner, forget being a polished presenter; focus instead on creating a clear moment of connection or value that holds their attention from the very first second.
You can be someone who provides videos that people enjoy.

According to stats published by Oberlo, 91% of consumers want to see more online video content from brands. People also love to see more videos on social media.
This means that your future engaging videos are in demand.
An audience is waiting to enjoy what you have to share on video.
Video Making Tip #2: Know your audience and engage them.
Before you hit record, define exactly who will watch.
Are they classmates, hobbyists, or potential customers?
Tailor your language, pace, and music to their taste.
For a beginner, simply asking a direct question in the video or description invites immediate interaction and makes viewers feel seen.
Of all the video production tips, I think knowing your audience is the most important.
Why?
It's because you cannot make an engaging video, if you don't know who you're engaging with your video.
Your video needs an audience to watch and appreciate it.

And identifying the intended or ideal viewers of a specific video influences other video making tasks like scriptwriting, shooting, editing, and distribution (how the video reaches the audience).
--
How can you identify your target audience for a video project?
Start by defining three basics: their age and general interests, what specific problem your video solves for them, and where they already watch similar content online.
Research trending hashtags or comments in that space.
This simple profile prevents guesswork and ensures your editing style and message actually connect with the intended viewer.
Get to know the intended viewers of a particular video project by asking,
- Who are they exactly?
- What interests them?
- Where do they hang out online? Or, Where and how are they going to watch the finished video?
This way, you can tailor the video content to resonate with them.
For example, if your target audience is teenagers interested in skateboarding, you'll want to use fast-paced editing, energetic music, and visually appealing shots to capture their attention.
Note also that, just like you, your audience deserves a pleasurable and meaningful viewing experience.
--
You can also involve your audience with your video. For example, if the video is for social media uploading, you can...
- ask them questions,
- encourage their comments, and
- respond to their feedback.
You can do these using the title, description, and comment sections of your video post.
By understanding and engaging your audience, you'll be well on your way to creating compelling videos that resonate.
Video Making Tip #3: Content trumps equipment. Start creating now.
You don't need a high-end camera; compelling content keeps viewers watching, not sensor size.
Your smartphone removes technical friction, letting you focus purely on story and delivery right now.
While mirrorless cameras offer more control later, they won't fix a weak idea.
Start filming with what's in your pocket.

Do you think you need a high-end camera to create great videos, or is your smartphone enough?
Here's a secret many video creators won't tell you...
One of the biggest reasons you'll give in to this urge of getting an expensive camera, or a different camera model, is peer pressure.
For example, if you want to join a production team that only uses a certain camera brand, you'll be forced to own that same brand. Otherwise, they won't allow you to join their team.
However, if you're shooting your own videos, or making your own projects, you can start using what you already have.
A study made by TechSmith found that high-end gear is not a prerequisite for creating engaging videos. Instead, good content is what keeps viewers interested and engaged -- specifically, easy-to-follow and relatable content.
So, start creating with the device you already have.
Video Making Tip #4: Harness the power of light, from natural to studio.
Harness light by first mastering what's free: use soft window glow or overcast skies, and avoid harsh midday sun.
For golden warmth, shoot near sunrise or sunset.
When nature fades, add affordable LED panels or ring lights for control.
Good light simply means your subject is clearly visible without unflattering shadows.
You need good light. Every video needs it.
Now, I don't mean you have to go out and buy fancy studio lights right away.
Here's a tip I really love but others won't openly tell you about...
Often, your best option is to use natural light. It's free and gives you beautiful results -- if used correctly.
How to use natural lighting in film or video?
Use natural light by avoiding harsh midday sun; shoot during overcast days or near windows for soft, flattering illumination.
For a warm, cinematic glow, film during the "golden hour" just after sunrise or before sunset.
Always position your subject so the light source is in front of them, not behind.
Here's how I use it...
- I avoid the 12:00 noon sunlight -- sunshine that's directly above the subject and creates harsh shadows on the subject's eyes.
 Harsh shadows on a person's face caused by direct sunlight above the head.
- I take advantage of overcast sunlight -- that soft quality of light you get when the sky is covered by clouds. Overcast light can happen any time of the day and doesn't create harsh shadows on your subject.
 The soft light quality you get when you shoot under overcast sunlight. (By the way, she's Mariel, my daughter. :-) )
- If indoors, I look for opportunities to shoot near windows or doors and let the natural light illuminate my subject. I aim for enough natural glow, similar to the way the Dutch painter Vermeer uses sunlight to enhance the look of his subjects.
 Indoor natural light that comes from windows and doors illuminates Jessica--my wife. ;-)
- Sometimes -- and if needed -- I shoot during the day's "golden hour", which is just after sunrise and before sunset. It gives my subjects that unique, golden warm look.
 A photo I took of the golden hour. This was just before the sun has set.
What about when the sun has set?
How do you shoot a video when natural light is gone or the sun has set?
When natural light fades, use any available light source -- streetlights, lamps, or LED panels.
Position your subject near the light to avoid underexposure.
If your camera allows, open the aperture or raise the ISO slightly.
Remember, darker scenes can create mood; you don't need studio brightness for a compelling shot.
I just take advantage of available light from different sources. LED lights, street lights, fluorescent lights, tungsten lights, whatever.
 A photo I took of the street lights at night.
The trick is to make sure you have sufficient available light that illuminates well your subject or the moment.
Not all moments or scenes have to be brightly lit (high key lighting).
 An example of high-key lighting.
Sometimes, you may want to capture shadows or dark areas in your shots to achieve a different mood or look (low key lighting).
 A photo of Jessica Motilla near a street light to demonstrate low-key lighting.
--
How about using those fancy studio lights?
In what situations is studio lighting recommended for filming videos?
Studio lighting is recommended whenever natural light is inconsistent, weak, or unflattering -- such as filming indoors at night, in windowless rooms, or on overcast days.
It’s also essential for product close-ups and talking-head interviews where you need to eliminate shadows and maintain a crisp, professional look from start to finish.
Of course, there are use cases for studio lights.
- One is when you want more control over the brightness of your subjects, especially when shooting indoors or at night.
- Or when an event doesn't have enough available light.
So, ring lights and photography lights fall under the "studio lights" category.
 Ring light used by an influencer.
 An LED light can be used both for videography and photography.
Studio lights are artificial lights that you yourself set up for the video shoot.
What is the purpose of using studio lighting in videography?
Studio lighting gives you total control over how your video looks, rather than relying on unpredictable room light or sunlight.
It eliminates unflattering shadows, ensures your subject is clearly exposed, and allows you to intentionally set the mood -- making your footage look polished and professional instead of amateur.
Studio lighting in videography gives you complete control over your image. Its main purposes are:
- Make Things Look Good: Eliminate bad shadows, flatter your subject, and ensure proper exposure (no dark/grainy or blown-out footage).
- Set the Mood: Create drama, warmth, seriousness, or happiness purely through how you light the scene.
- Solve Problems: Overcome bad natural light, film in any location/time, and make green screens work.
- Look Professional: Achieve a polished, intentional look that separates your videos from amateur footage shot with just room lights or sunlight.
In short: Studio lighting lets you decide how your video looks, instead of being stuck with whatever light is available. It's essential for quality and creative control.
Video Making Tip #5: Aim for clear audio, the unsung hero of great videos.
Viewers forgive shaky or low-res video, but muffled sound makes them click away.
Prioritize clean audio by using an inexpensive lapel microphone and getting close to your subject.
Even a basic external mic drastically improves clarity, ensuring your message is heard and understood -- the true secret to keeping your audience engaged.

I don't know about you, but to me, I'd rather watch a low-resolution video with clear sound... than to struggle understanding a high-resolution video with bad audio.
Of course, high-resolution video + clear audio = ideal.
However, it's more satisfying for me to learn from a low-res -- even a bit shaky -- video with great sound... than to stare at a hi-res video with poor audio.
A TechSmith study has shown that people consider clear audio quality to be the number one and most important feature a video needs to have.
Not clear video. Not fancy graphics and effects. But simply clear sound.
Take a look at this screenshot...

--
My point?
Avoid obsessing so much on the visual side of things.
Focus also on capturing clear audio for your video.
Especially when you're shooting interviews, covering key messages or speeches from events, or filming short narratives.
Clear audio captures the important details of your story.
Much better than a video that relies solely on music as their sound track. Which usually happens because the videographer is not keen on capturing clear audio.
--
How to improve audio quality on video?
For clearer video audio, use a lapel microphone positioned close to the speaker.
Record in quiet spaces, turning off fans and air conditioning.
Avoid windy areas or use a windscreen.
Perform a sound check to set levels around 75% peak to prevent distortion.
Here are some ways we can capture clear audio...
- Use an inexpensive lapel mic, especially for shooting interviews and messages. Your sound will become impressively good.
 A lapel mic on the interviewee's shirt.
- As much as possible, pick a quiet place to record your key sound files, like interviews and voice over narrations. This is to lessen any background noise.
- Stay away from aircon and fans -- or, in the meantime, turn them off if possible. Any wind noise can literally make your sound unusable.
- If you have to film in a windy place, like outdoors, you can use a dead cat filter on your mic to minimize wind noise.
 A sample dead cat filter on an external mic lessens the wind noise during video recording.
- Avoid shooting near refrigerators and smartphones. They can cause interference and unwanted sound frequencies in the recorded sound.
- Get closer to your subject to minimize undesired ambient sounds and to capture the sound clearly.
- Do a sound check and a test record to set your audio levels. I aim to keep the maximum peak level at 75%. I want enough headroom to keep the audio from distorting.
Video Making Tip #6: Frame your shot and compose its contents well.
To frame well, first choose your "window": use 9:16 vertical for phones or 16:9 widescreen for TV.
Then, compose the contents...
Use the Rule of Thirds grid for balanced widescreen shots, but center a person's face in vertical video to avoid awkward stretching near the edges.
Let's talk about framing and composition specifically for shooting videos, to avoid confusion with photography and painting.
I admit, I was also confused because I couldn't tell exactly the difference between framing and composition. Though I know how to shoot visually appealing shots in practice.
What is framing and composition in videography?
Framing is the boundary of your shot -- the "window" the camera looks through.
Composition is the intentional arrangement of subjects and objects inside that frame.
Mastering both means moving beyond just pointing the camera; it's about guiding your viewer's eye and telling a clearer visual story with every shot.
Here's my take on framing and composition...
Think of framing as choosing your window.
And think of composition as arranging the contents you see inside that window.
Framing sets the boundaries to your shot. Composition uses those boundaries to create a compelling visual.
How to frame someone in a video: Choosing the Right Frame ("Window")
Decide your aspect ratio (the "window" shape) before you shoot.
A 16:9 horizontal frame is standard for YouTube and film, while 9:16 vertical is essential for phone-first platforms like TikTok.
Choose the shape that matches where viewers will watch, then position your subject's eyes and headroom to fit that specific window.
The first step to framing your shot well is knowing the aspect ratio you'll be using. This essentially refers to the shape of your video, like a window that captures your scene.
What are the two most common video aspect ratios nowadays?
The two most common video aspect ratios today are 9:16 (vertical) for social media like TikTok and Instagram Reels, and 16:9 (widescreen) for television, YouTube, and most online viewing.
Choose 9:16 for mobile-first platforms and 16:9 for widescreen displays.
There are two main aspect ratios to consider:
- 9:16 Vertical Video: This format is ideal for social media platforms like TikTok, Instagram Reels, and YouTube Shorts.
 The 9:16 "window" (aspect ratio).
--
- 16:9 Widescreen: This is the classic format for TVs, YouTube videos, and most online content.
 The 16:9 "window" (aspect ratio).
--
The best aspect ratio depends on where your video will be displayed.
- For platforms like TikTok, YouTube Shorts, and Instagram Reels, choose the 9:16 frame.
- For TVs, laptops, desktops, and most video hosting sites, choose the 16:9 frame.
Composing Within Your Frame
Use the Rule of Thirds: Imagine a tic-tac-toe grid over your shot.
Instead of centering everything, place your main subject or a person’s eyes along those lines or intersections.
This simple shift creates breathing room and instantly makes your frame feel more balanced and professional.
Now that you've chosen your frame size, let's talk about composing the elements within it.
Composition refers to how you arrange the objects and people in your shot to create a visually pleasing image.
What is the rule of thirds in video shooting: Using the Rule of Thirds (for 16:9 Frames)
The rule of thirds is a compositional guideline for 16:9 video.
Imagine a tic-tac-toe grid over your widescreen frame.
Instead of centering your subject, place it along the vertical or horizontal lines -- or better yet, at one of the four intersecting points.
This off-center placement creates visual tension and a more engaging, professional-looking shot.
Imagine dividing your 16:9 widescreen frame into a grid with nine squares (three rows and three columns).

The "rule of thirds" suggests placing your subject along these lines or at the points where the lines intersect. This technique can help create a more balanced and interesting composition.
 This placement of subject follows the rule of thirds. See how those grid lines guided me to compose this shot?
Here's another one. This time a silhouette...

Many smartphones and cameras offer a grid overlay feature to help you visualize the rule of thirds. It's a handy tool to use when framing your shots.
--
However, the rule of thirds isn't a rigid rule. Sometimes, a centered composition can work better, especially for close-up shots of someone talking directly to the audience.
 An example of a centered composition.
What is the rule of thirds in video shooting: Composing Within Your Frame (for 9:16 Frames)
The rule of thirds overlays a 3x3 grid on your 9:16 frame.
Placing key objects along these lines or intersections adds balance and visual interest.
However, for vertical video featuring a single person, centering the subject is often stronger; following the grid on a face in this tall format can look awkward.
This is the 9:16 aspect ratio with grid lines. This frame is commonly used for vertical videos.

The rule of thirds can still be effective for composing objects within your vertical frame.

However, it's generally less applicable for people, particularly when focusing on their faces.
For vertical videos, centering a person within the frame often creates a more natural and visually appealing composition. If you place a person's face near the edges of the 9:16 frame, it can appear stretched and unnatural.
 Example of a centered composition of a person within the 9:16 "frame".
Video Making Tip #7: Edit with a purpose.
Edit with a purpose means every cut should serve your story, not your ego.
Skip flashy effects; instead, cut the fluff and arrange only the "golden moments" that evoke genuine feeling.
As a beginner, constantly ask: "Does this specific edit help my viewer feel or understand something meaningful?" If not, delete it.
Why do we need to edit videos?
Editing shapes raw footage into a clear, intentional story.
You remove distractions, arrange the best moments, and control the pacing so viewers feel something specific -- whether it's understanding, curiosity, or emotion -- instead of just watching random, unorganized clips.
It's how you communicate meaning, not just record motion.
Here's what I know is the very reason I need to edit a video...
To make the viewers feel something worthwhile and get something meaningful out of my video.
I know what it feels to get drowned in executing techniques and effects, just for the sake of the techniques and effects themselves. It's a waste of time!
Techniques and effects are a waste of time if they're not used to serve that core purpose of editing a video.
And if they're not about the specific video I'm trying to make.
And I hate to use or do things just to impress people. (But that's just me!)
What I want is to express a feeling or a thought. To evoke sincere feelings. To communicate meaning.
So,...
Instead of being flashy to look cool in how I edit the video, I'm aiming to be relevant and sincere... to evoke feelings in my viewers.
--
Knowing your purpose for editing a video, what do you do then when you edit a video?

How do you properly edit your videos?
Start by cutting out all the dead air and mistakes first -- focus purely on the flow of your ideas.
Get the story sequence right with simple cuts before reaching for any flashy transitions or text. Always ask yourself if an edit serves the video's purpose or just distracts from it.
- Familiarize yourself with the raw footage: Get a feel for your raw footage to identify the strongest moments for your story.
- Cut the fluff: Remove unnecessary pauses, rambling, or anything that doesn't directly contribute to your message.
- Discover the golden moments: Find clip parts that evoke the strongest emotions, convey your intended meaning, or help tell the video's specific story. These are the building blocks of your compelling video.
- Craft a compelling sequence: Arrange these golden moments using cuts to create a clear and engaging flow. You can add transitions later, but focusing on the raw emotional impact of the sequence is key at this stage.
- As you edit, regularly ask yourself: "Does this cut/transition/effect serve my video's purpose and enhance the viewer's experience?" This is something I ask myself every time I edit a video. And it helps a lot.
- Enrich your video: Consider additional layers of shots (B-roll) and text overlays to provide context and depth. B-roll can illustrate your points visually, while text can emphasize key ideas or provide additional information.
Most of the time, I find that a simple cut is sufficient as a transition. It helps me to pace the presentation, in addition to cutting out errors during the shoot.
When you're still cutting out the fluff, I suggest you focus more on the flow of thought and mood conveyed by your cuts. Instead of immediately adding transitions or effects. Those can come later.
Remember, editing is about enhancing your story, not just applying fancy effects. Focus on your purpose and let that guide your editing decisions.
Video Making Tip #8: Practice is essential. Practice again. And again.
Your first videos will likely be shaky or have odd edits -- and that's exactly how you learn.
Like riding a bike, you'll wobble and fall before finding balance. Each flawed attempt builds muscle memory and sharpens your instincts, so keep creating.
Progress, not perfection, is the only goal.
I can move on now to the next main point in this article, because the message of the above subheading is clear enough.
But I decided to add something else -- a reality in life that others seem to forget...
Your first attempts at video making won't be perfect.

But that's fine!
Research indicates that mastering complex skills like video making requires deliberate practice. This means focused, effortful training designed to enhance specific aspects of your craft.
For instance, you could dedicate time to mastering different camera angles, experimenting with various editing techniques, or learning advanced audio post-production.

--
Just like learning to ride a bike, mastering video making requires patience and persistence.
I remember the time when I was still learning how to ride a bicycle and keep my balance.
My first attempts at riding a bike weren't perfect. I mean, I fell many times. And even if I already knew how to balance a bike, I sometimes rode the bike carelessly, so I still fell.
Well, learning how to make a video that works is just like learning how to ride a bicycle and keep your balance.

--
For example, my first attempts at editing an audio-visual presentation were far from being professional. The first one I made had a fancy transition after every shot or visual I included in the presentation.
But I just kept making videos and every video I made taught me something new. So that helped me improve.
And I'm still learning and improving.
It helps if you keep in mind that being perfect or impeccable isn't a healthy target to aim for. You'll just disappoint yourself.
What is the goal of video production or video making?
The primary goal of video production is to effectively communicate a specific message or story to a target audience.
Whether aiming to educate, entertain, or inspire action, it is about translating an idea into a visual format that captures attention and evokes a clear, intended response from the viewer.
A worthy goal of video making to me is to communicate and connect. And what helps achieve that is by being authentic and sharing your own take on life in videos you make.
So, keep creating videos, keep testing, keep learning, and enjoy the process!
Video Making Tip #9: Tell a story.
To tell a story, show actions and emotions visually instead of just explaining them.
Use voice-over for extra context or a presenter speaking directly to the viewer.
Keep your narrative simple: follow a clear structure like "problem-then-solution" or "before-and-after" so you can easily hold your audience's attention.
It doesn't matter what kind of video you're making, or how long or short it is. A video has to tell a story.
But...
What is a story?
A story is simply a narrative -- or account -- of something that interests humans.
According to dictionary.com, a story is "a narrative, either true or fictitious, in prose or verse, designed to interest, amuse, or instruct the hearer or reader".
Why is storytelling important in video making?
Storytelling transforms passive viewing into an active, memorable experience.
While facts and figures are easily forgotten, a simple narrative structure -- a beginning, middle, and end -- creates an emotional hook.
This connection makes your message stick and helps beginners hold audience attention far more effectively than a list of dry information alone.
Storytelling important in video making because when you use storytelling in your videos, your viewers will better remember the info you communicate and present to them.
Studies suggest storytelling is an effective way to influence, inspire, and teach. So much better than merely giving facts and figures.

How to tell a story in a video?
Tell a story by combining visuals with a clear voice-over.
Let the footage show the action while your narration adds context the viewer can't see.
Keep the structure simple -- use a "problem, then solution" or "hook, middle, conclusion" format so beginners can easily follow along without getting lost
Here are several ways you can tell a story in your video...
- Visual storytelling
- Voice-over narration
- On-camera presenting
Visual storytelling
The use of actions, video, images and other visuals to depict an idea or mood, instead of describing it in words.
The use of visuals better evokes emotions, builds suspense, or explains complex concepts.
This is why you hear sayings like, "Show, don't tell", and "Action speaks louder than words".
Voice-over narration
The use of recorded human voice and words to communicate feelings and thoughts in video.
The viewers only hear the narrator's voice, but don't see their face.
Voice-over narration usually accompanies the visuals, but it doesn't describe what the visuals already show the audience. Voice-over is another layer of info that the audience receives.
On-camera presenting
The use of the talking head of a person that directly addresses the viewers.
The on-cam presenter may simply report a piece of information, share an anecdote or experience, or explain and demonstrate how to do something.
--
I suggest that you keep the structure of the story in your video simple. This helps your viewers easily follow what you convey to them.
For example, you can use simple guides like, "before-and-after", "problem-then-solution", "question-and-answer", and "beginning (hook)-middle (main content)-end (conclusion)".
--
Okay, here are other essential video making tips for beginners.
Video Making 101: Further Basics
Beyond the first step of simply pressing record, the further basics are about shifting focus from gear to story.
Concentrate on a clear, compelling message and let your unique perspective guide you.
Master simple framing and clean audio; technical polish can come later.
A strong narrative always outshines flashy effects.
Video content matters more than style.
Content is the message and story you share; style is the visual polish.
For beginners, a clear, authentic story filmed simply will always outperform a visually busy video with nothing to say.
Focus first on what you want to communicate -- that’s the part viewers truly remember and connect with.
Let's talk about something really important when you're starting out in video making: content versus style.
Think of content as the heart of your video – it's what you're actually saying or showing.
On the other hand, style is how your video looks – the fancy effects, transitions, and all that visual jazz.
Here's the thing...
Your story is the real hero. It's what really matters. Don't get me wrong, style is great too, but it should complement your story or content, not overshadow it.
Imagine you're telling a story to a friend. You wouldn't focus on using big words or fancy gestures if the story itself isn't interesting, right?
It's the same with videos.

A simple, natural-looking video with a great story or message can really connect with your audience.
On the flip side, a video that looks super polished but doesn't say much... well, it might not hold people's attention for long.
So, when you're planning your video, start with your message.
- What do you want to say?
- What story do you want to tell?
Once you've got that nailed down, then you can think about how to present it in a way that fits.
Remember, as you're just starting out, relax. Avoid stressing about making your videos look like Hollywood productions.
Instead...
Focus on telling your story in your own unique way. That's what will make your videos stand out and connect with people.
Discover your unique voice in video making.
Your unique voice isn't about fancy gear -- it's the specific way you see the world.
Stop imitating trends and start noticing what makes you curious or laugh.
Embrace your natural perspective and let that guide your shot choices and storytelling.
Your quirks are your superpower; film what feels true to you.
There's one thing I'd love to share with you that could really make your videos stand out from the crowd.
You see, every person has a unique way of looking at the world. Your experiences, memories, and personality all come together to create a perspective that's entirely your own.

And guess what? That uniqueness is your secret weapon in video making!
Ever heard the term "auteur" in filmmaking? Don't worry if you haven't - it's just a fancy way of describing someone who brings their personal touch to their work.
The cool thing is you don't need to be a big-shot Hollywood director to be an auteur.
You can start developing your unique voice right now, with whatever equipment you have.
Want to learn more about how to unleash your inner video auteur? I've written a detailed guide that breaks it all down. This guide will help you understand:
- What exactly an auteur is (in simple terms!)
- Why your unique perspective matters in video making
- How to start developing your personal style
- Tips for expressing yourself, even when working in a team
Ready to dive deeper and discover how your unique voice can create amazing videos? Check out the full article here...
Remember, your individuality is your strength. Don't be afraid to let it shine through in your videos!
Create engaging videos. Here's your guide...
Start with a clear idea and use whatever camera you have.
Focus on good lighting -- face a window -- and keep your first takes short.
Tell a simple story or share one helpful tip rather than trying to cover everything.
Most importantly, trim the boring pauses when you edit.
Practice beats perfection.

So, you want to make videos that people actually enjoy watching? It's a skill anyone can learn with a bit of patience and practice.
Think about the last video that really caught your attention. What made it special?
- Was it the story it told?
- The way it made you feel?
- Or maybe how it presented information in a unique way?
That's the kind of effect we're aiming for!
The good news is, you don't need expensive gear, or years of film school to create videos that connect with your audience. There are simple techniques you can use to make your content more creative and engaging.
Ready to explore? Check out this detailed guide on...
I'll walk you through the process step-by-step, from coming up with ideas to sharing your finished work.
Remember, every skilled person was once a beginner too!
How to Become a Videographer: A Beginner's Guide
Start by mastering fundamentals like composition and lighting using any camera you have, even a smartphone.
Practice consistently through personal projects, family events, or social content.
Develop your storytelling eye by learning from mistakes.
Focus on creativity and gradual skill growth -- expensive gear isn't required to begin your videography journey.
Have you ever watched a beautifully crafted video and thought to yourself, "I wish I could make something like that"?
Maybe you're curious about video production but feel overwhelmed by all the technical terms and fancy equipment. Or perhaps you've already started experimenting with your smartphone camera but want to take your skills further.
Here's something encouraging: Every professional videographer started exactly where you are now – at the beginning.

Some began with just a basic camera and a desire to tell stories through video. Others discovered their passion while documenting family events or creating content for social media. Many learned through trial and error, gradually building their skills one project at a time.
The journey from beginner to skilled videographer isn't about having the most expensive gear or mastering complex techniques right away. It's about understanding the fundamentals, developing your creative eye, and learning how to connect with viewers through your videos.
Want to explore this path and see if videography might be right for you? I've put together a comprehensive guide that walks you through everything you need to know about becoming a videographer – from essential skills and equipment to different career paths and common mistakes to avoid.
Read more...
Curious About Digital Video Production? Let’s Start Here.
Digital video production is simply storytelling with moving images.
You don't need a studio -- just the phone in your pocket and an idea.
Start by filming a 30-second sequence of something you find interesting today.
Forget perfection; the only way to learn is by pressing record.

Digital video production might sound technical, but here’s the secret: it’s really about telling stories with the tools you already have.
Think of it like learning to cook. You don’t need a gourmet kitchen to make a meal that matters—just a few basics, some practice, and a dash of courage.
In this guide, we’ll walk through...
- What digital video production actually means (spoiler: it’s simpler than you think).
- How to start small, with gear as simple as your phone and free editing apps.
- Why your unique perspective matters more than fancy equipment.
No pressure, no jargon—just a friendly roadmap to help you take that first step.
Ready to turn “what if?” into “I did it!”?
Video Tips for Beginners in the Form of 1-minute Short-form Videos
Start with the "AIM" method before you even touch the camera: define your Audience, Intent, and Message.
Then, focus on steady shots using affordable gear and develop your unique "auteur" voice by choosing one consistent visual detail.
These quick 1-minute lessons break down the process so you can stop just filming and start creating.
Here are the links to some "shorts" we made. Each short video focuses on delivering a single, clear tip or insight about video making that you can quickly understand and apply.
Video production for beginners
- Why do we make videos? It's not for fun only.
- Why Are Videos Important? 5 Deeper Reasons You Need to Know
- Practicality in Videography: Gear Up Without Going Broke
- What is the first step to making videos people love to watch? AIM
What is auteur
- What Does Auteur Mean in Film and How You Can Become One
- What Makes a Person an Auteur? Discover Your Unique Perspective
- Beyond the Director's Chair: Does an Auteur Have to Be a Director?
- How to Make Your Own Video Style--Creative Tips for Beginners
FAQs: Video Making Tips for Beginners
Where should a complete beginner start with video making?
Where should a complete beginner start with video making?
Start by focusing on your story or message, not fancy effects.
Use the gear you already have, like a smartphone, and learn basic skills like framing and lighting. Don’t worry about perfection—practice is key.
What is the first step of making any video?
What is the first step of making any video?
The very first step is planning: decide on your topic, target audience, and the main message you want to share.
A simple outline or script is also helpful.
How do I plan a video?
How do I plan a video?
- Define your audience and goals.
- Outline the structure: intro, key points, conclusion.
- Write a basic script. Decide on locations, props, and any “extras” like music or graphics.
What are three things one should identify when preparing video projects?
What are three things one should identify when preparing video projects?
- Your target audience.
- The main message or story.
- Your video’s goal (inform, entertain, persuade?)
What are the four main steps involved in creating a video?
What are the four main steps involved in creating a video?
- Pre-production (planning, scripting).
- Production (filming).
- Post-production (editing).
- Publishing/distribution.
How to start a video content? (Meaning: the creation process)
How to start a video content? (Meaning: the creation process)
Begin with a hook—something interesting or direct to grab attention. State what the video’s about and what viewers will get from watching.
What do I need to start creating videos?
What do I need to start creating videos?
You only need a smartphone (or camera), basic audio (a simple mic helps), and access to editing apps.
How to successfully record a video?
How to successfully record a video?
- Use good lighting (natural light is great).
- Keep your audio clear (film in quiet spaces; use an external mic if possible).
- Hold your camera steady (a tripod or stable surface helps).
- Frame your subject well.
What are the rules in videography?
What are the rules in videography?
- Use the rule of thirds for composition.
- Keep shots steady and focused.
- Capture good audio.
- Film from multiple angles.
- Don’t overuse zoom or move the camera too much if you’re a beginner.
What not to do when filming a video?
What not to do when filming a video?
- Don’t film in poor lighting.
- Avoid distracting backgrounds and background noise.
- Don’t place your subject dead-center all the time.
- Don’t shoot in one long take—get multiple, shorter shots.
What is the biggest mistake while making a video?
What is the biggest mistake while making a video?
Neglecting your story or message is the biggest mistake.
Also, bad audio can ruin an otherwise good video. Always plan and check sound quality.
How to shoot video like a pro?
How to shoot video like a pro?
- Mix up camera angles and perspectives.
- Ensure smooth, intentional camera movements.
- Use manual focus when possible.
- Plan your shots ahead.
- Watch your lighting.
How should I start my video? (The actual content hook/intro)
How should I start my video? (The actual content hook/intro)
Open with an engaging question, a bold statement, or a quick preview of what’s coming.
Show energy and get to the point fast.
How do beginners start editing?
How do beginners start editing?
Use easy software like iMovie, or CapCut. Start with simple cuts: trim unnecessary parts, arrange clips, and add basic titles or music.
What is the first tip in video editing?
What is the first tip in video editing?
Keep things simple. Focus on telling your story clearly, rather than flashy effects.
How do beginners practice video editing?
How do beginners practice video editing?
- Edit short clips regularly.
- Try challenges like editing a 15-second story or recreating a favorite video’s style.
- Watch tutorials and experiment with templates.
What is the golden rule of video editing?
What is the golden rule of video editing?
Every cut and effect should serve the story. Don’t add transitions or effects unless they help deliver your message.
How to properly edit a video?
How to properly edit a video?
- Cut out unnecessary parts.
- Keep audio consistent.
- Add captions if needed.
- Use transitions sparingly.
- Watch all the way through before exporting.
What is the hardest part of video editing?
What is the hardest part of video editing?
Maintaining good pacing and keeping your video engaging from start to finish is often the hardest for beginners.
How to make a good short video?
How to make a good short video?
Be clear and concise—focus on one idea. Hook viewers quickly, use dynamic visuals, and end with a strong conclusion or call to action.
How many seconds should a short video be?
How many seconds should a short video be?
Short videos typically run from 15 to 60 seconds, especially for social media platforms like TikTok or Instagram.
Do shorter videos perform better?
Do shorter videos perform better?
Generally, yes, shorter videos hold attention better and are more likely to get watched all the way through, especially on social media.
Is a 2-minute video too long?
Is a 2-minute video too long?
For social media, 2 minutes is often a bit long.
For YouTube or in-depth topics, it can be just right—aim for 1–2 minutes unless your content truly needs to be longer.
How long should a vlog video be?
How long should a vlog video be?
Most vlogs do well between 7–15 minutes, but beginners can start shorter (3–5 minutes) while building skills and audience.
How can I improve my video?
How can I improve my video?
- Get feedback and rewatch with fresh eyes.
- Improve your lighting and audio.
- Edit for clarity and pace.
- Try new techniques or learn from others in your niche.
How to create an effective video?
How to create an effective video?
Plan your story, film clear visuals, prioritize good audio, and edit for flow.
Always keep your audience in mind.
How do I make high quality videos?
How do I make high quality videos?
Use good lighting, invest in clear audio, frame your shots thoughtfully, and edit carefully.
The equipment matters less than your technique and planning.
How to create a video like a pro? (Focus on techniques)
How to create a video like a pro? (Focus on techniques)
- Think about camera angles, lighting, audio, and editing.
- Plan your shoot, use smooth movements, and edit tightly.
- Practice and learn from your mistakes—pros refine their style over time.
What is the final step in creating a video?
What is the final step in creating a video?
Publish or export your video in the correct format, then promote it on platforms that suit your audience.
Monitor performance and learn from feedback.
How to make a video step by step?
How to make a video step by step?
- Choose your topic and audience.
- Plan and script it.
- Gather equipment.
- Film.
- Edit.
- Export in the right format.
- Publish and promote.
What is the most effective video format? (For delivery/export)
What is the most effective video format? (For delivery/export)
MP4 (H.264 codec) is the most widely supported and effective format for exporting and sharing videos online.
How to be a video content creator for beginners?
How to be a video content creator for beginners?
- Start making videos on topics you enjoy.
- Publish regularly on platforms like YouTube, TikTok, or Instagram.
- Learn basic filming/editing skills, engage with your audience, and keep improving with each video.
Conclusion: Video Production Tips for Beginners
Video creation becomes approachable when you focus on fundamentals rather than flashy techniques. By...
- prioritizing audience connection,
- leveraging available tools, and
- honing storytelling skills,
... you’ll create meaningful content that resonates far beyond technical specs. Remember: every expert began as a beginner.
What unique perspective will you bring to your first—or next—video project?
You might like these
What is Digital Video Production? A Beginner's Complete Guide
What is digital video production? Learn the basics, tools, and step-by-step process to create videos—from concept to sharing. Perfect for beginners!
What Type of Camera Should I Get as a Beginner?
What type of camera should I get as a beginner? Learn which mirrorless cameras, features, and budget kits work best for video creators starting their journey.
Editing Videos: Overcome Confusion, Complete Your Project
Struggling with editing videos? Find clarity by seeing the big picture first. Learn the key strategies to move from raw footage to your final cut.


Join the
Video Auteur Club
Get tips, step-by-step guidance, and gear guides that make video production simple.
What's New
-
What Type of Camera Should I Get as a Beginner?
 What type of camera should I get as a beginner? Learn which mirrorless cameras, features, and budget kits work best for video creators starting their journey.
 -
Free Editing Software for Beginners: No Watermarks
 Discover genuinely free editing software for beginners without watermarks. Learn which tools like DaVinci Resolve & CapCut truly deliver—no tricks, no paywalls.
 -
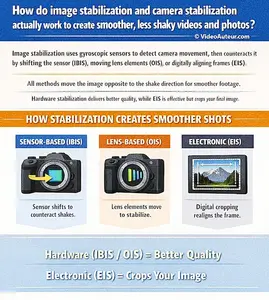
How Does Image Stabilization Work? 4 Key Techniques
 How Does Image Stabilization Work? Learn 4 techniques -- OIS, IBIS, external devices & software -- to create smoother, shake-free videos and photos.