- Video Production
- Video Production Equipment for Beginners
- How Does Steadicam Work
How Does a Steadicam Work? Unveiling the Magic Behind Smooth Shots
How does a steadicam work in a video shoot?
Key Takeaways: How does a steadicam work?
-
It's Mechanical, Not Magical: A Steadicam is a purely mechanical, battery-free stabilizer. It relies on a balanced gimbal and counterweights -- not motors or computers -- to isolate the camera from your body’s shakes and footsteps.
-
Balance is Non-Negotiable: Smooth footage is impossible without proper setup. You must achieve neutral balance so the camera stays center without leaning. Verify this with the "2-second drop test" before you even think about rolling.
-
Master the "Ninja Walk": Holding the rig is only half the battle. You must learn to glide by bending your knees and rolling heel-to-toe to eliminate vertical bounce. If you walk normally, your shot will look like home video, not cinema.
-
Technique Over Technology: Unlike a gimbal, a Steadicam does nothing on its own. It demands physical stamina and a deliberate touch -- use your dominant hand for weight support and only a feather-light finger touch on the post to steer the lens.
- Serve the Story: Don't just stabilize for the sake of it. A Steadicam shot is a storytelling tool best used for deliberate POV shots, long unbroken takes, or navigating terrain where a dolly can't roll (stairs, gravel, hills).
What is a steadicam in the first place? What is a steadicam shot? How does a steadicam work to achieve smooth, stable footage? How do you balance and use a steadicam? What is the difference between steadicam and a similar video camera stabilizer, the gimbal?
Let's get to know these and more about this camera stabilizer called, the steadicam.
 How does a steadicam work? Let's find out...
What is a steadicam?
A Steadicam is a mechanical, non-electronic camera stabilizer that uses a counterbalanced arm and vest to absorb shake.
It allows you to capture smooth, floating moving shots while walking or following a subject -- without needing batteries or motors to power the stabilization.
A steadicam is one of the camera stabilizer devices that you can use, to shoot steady moving shots--which aren't easy to get, if you're only shooting handheld while walking.
You’ll find that you’ll normally use a steadicam, when you want to follow your subject’s action. Or, when you want to record smooth tracking shots.
The key thing we need to bear in mind about steadicam—or, “steadycam”—is this...
... It is a “mechanical video camera stabilizer”.
Meaning, you don’t need to use batteries, in order to stabilize your footage. A steadicam stabilizer is...
- non-electronic, and
- non-motorized.
--
When people say “steadicam” and “steadycam”, they're talking about the same thing. The keyword is “steady”. And “steadi” is just another way people spell it.
Why is Steadicam used?
Steadicam is used to capture smooth, floating camera movement while walking or running, eliminating the distracting shakes and jolts of handheld footage.
Beyond technical stability, it allows beginners to create immersive point‑of‑view shots and long, unbroken takes that slowly reveal story details without relying on fast editing cuts.
There are, at least, 2 main reasons that I know, why video shooters and video creators would want to use a Steadicam…
- practical reasons
- expressive or communicative purposes
Practical reasons
These are your most obvious reasons for using a steadicam video stabilizer...
- You want to avoid shakes, jolts, or unintentional jumpy shots, that may irritate your viewers. You don't want them to feel dizzy, watching your video.
- You want to achieve smooth tracking shots. Even when you're walking on rough surfaces, or uneven ground.
Expressive or communicative purposes
These are going to be your very personal reasons.
It means, when you use a steadicam, it’s going to be dictated by your interpretation of subjects, and your style. Somehow, you hope to evoke some feelings, or thoughts in your audience.
You may want to use a steadicam to do the following examples…
- You create a "point of view shot" (POV) of your character, who's walking while seeing things around him. Here, you want to show your audience what your character is seeing.
- Instead of giving your audience a series of fast cuts—or, montage—to reveal key details one by one, you shoot just 1 long take—a long tracking shot that slowly unveils those story details.
Tip:
Use any steadicam-style stabilizer to really convey, or suggest an idea to your viewers.
Use it mindfully.
What kind of shot is a steadicam good for?
A Steadicam is ideal for smooth, flowing tracking shots over uneven terrain like stairs, hills, or gravel paths where a dolly can't roll.
It lets you walk or run with the camera while keeping the footage steady, perfect for following a subject through tight spaces or rough ground.
Any moving shot on uneven surfaces--like rough roads, stairways, hills, etc... In whatever direction of your camera movement... And whenever you want it.
That’s the advantage that any steadicam-style stabilizer has, over a camera dolly.

You simply cannot execute a smooth, tracking shot with a dolly, on uneven terrain. A dolly will only give you steady motion shots, on smooth surfaces. Some expensive camera dollies—like those used in feature filmmaking—will require you to set up tracks, similar to a railway.
What is a Steadicam shot?
A Steadicam shot is a smooth, stabilized moving shot captured using a Steadicam -- a wearable vest and arm that isolates the camera from the operator’s bumps.
For beginners: it’s not just about eliminating shake.
Use it deliberately to follow action, reveal information, or create mood that serves your story.
Let the story guide you.
What is a steadicam shot?
Let me say first what it isn't...
A steadicam shot is not simply a moving camera shot executed with a mechanical video stabilizer, called the steadicam.
A steadicam shot is not done just for the sake of getting smooth camera movements. Or "always" having the effect of moving in space.
Now, here's what I think what it is...
A steadicam shot is an expressive camera movement that conveys something important to your viewers. When you wield a steadicam, you do it because you intend to create a shot that is worth-watching because it gives your viewers a piece of information that advances the story.
Not all shots have to be done with a steadicam, or its derivatives. And this is true whether you shoot events, documentaries, music videos, short narrative films, or other video presentations. Let the story be your guide.
 How does a steadicam work? It doesn't work so well, if all your shots are steadicam shots, or tracking shots.
How does a steadicam work?
A Steadicam works by isolating your camera from your body’s shakes using a balanced sled and a precision gimbal.
The vest and spring-loaded arm absorb footsteps and bumps, while the gimbal allows the camera to "float" independently, transforming shaky walking into smooth, cinematic motion.
Know first that the original “Steadicam” brand was designed mainly for heavy cameras used in big productions, with big budgets. This particular Steadicam system works through the help of its basic parts, namely...
- the vest,
- the arm, and
- the camera sled.
In order for the Steadicam to work, the Steadicam operator wears a mechanical vest that supports the entire stabilizer, the big heavy camera, and some accessories like the display monitor. And so, the video shooter might look like a cyborg, as a result. ;-)
 How does a steadicam work - A representative image of a steadicam with vest.
The vest is connected to an adjustable arm. That arm is attached to the camera sled, which carries the video or cinema camera, and other equipment.
Why is it necessary to wear a vest?
The purpose of the vest is to keep the Steadicam operator from getting tired so easily. If you are that person wearing the vest, you feel that the weight of the camera stabilizer—and other equipment it supports—is allocated to your shoulders and waist.
Also, wearing the Steadicam system makes you feel really in charge, as you’re executing camera movements. You have that strong sense of grasp and control. Because, it’s not only your hands that hold the stabilizer device, but your upper body as well.
How does a steadicam work in a video shoot to make your footage smooth?
A Steadicam keeps footage smooth by using a balanced gimbal mount that lets the camera float independently.
The operator's body movements are absorbed by a supportive vest and an articulated arm, which isolates the camera from steps and shakes.
This separation means the lens captures fluid motion even while you're walking or turning.
Imagine you're shooting a moment where the camera needs to move with your subjects, but without any jittery shakes. That's where the Steadicam comes in!
But how exactly does it turn shaky steps into stunning shots? Let's delve into the secret behind this filmmaking wonder, using easy-to-understand explanations
The Balancing Act: Gimbal Power
Remember that trick where you balance a spoon on your finger? I used to do that as a kid. :-) There's this perfect spot you gotta find, like magic!
 How does a steadicam work? Take a look at this spoon...
A Steadicam uses a similar principle, but with a high-tech twist. Its core is a gimbal, a special mount that allows the camera to rotate freely along various axes. Think of it as a super-sophisticated version of your finger trick.

Here's the cool part: the gimbal uses gyroscopic systems, those amazing things that help airplanes stay upright. These tiny gyroscopes sense any tilt or wobble and send signals to tiny motors that counteract those movements.
So, even if you bump or turn, the gyroscopes keep the camera perfectly balanced, like a superhero for smooth footage!
--
Here's how a gyroscope basically works...
--
And here's an explanation of how gyros work on a steadicam...

--
The Invisible Hand: Isolation with the Arm and Vest
Imagine holding a camera with your outstretched arm. Every little movement you make gets transmitted to the camera, resulting in shaky footage. That's where the Steadicam's genius arm and vest system come in.
The arm connects to the gimbal and extends upwards, holding the camera assembly. This creates distance between your body and the camera, essentially isolating it from your movements.
It's like having an invisible hand holding the camera steady, even as you walk, run, or climb stairs.

The vest plays a crucial role too. It distributes the weight of the camera and Steadicam system across your upper body, making it easier to hold everything steady for longer periods.
It's like having a built-in support system for your filming adventures!
--
Here's a Steadicam and its operator in action. It shows how important the Steadicam operator's skill in achieving smooth footage...

--
Beyond the Basics: A World of Smooth Possibilities
The core functionality of the Steadicam is built on these easy-to-grasp principles – balancing, isolation, and a sprinkle of gyroscopic magic!
The original Steadicam model looked big and bulky. But Steadicam models that came after that were becoming lighter due to advancements in material science. This allows for longer takes and more dynamic movement by the operator.
Garret Brown, Steadicam's inventor, believed that it allows the operator to become more like an artist, moving freely and creating new storytelling possibilities. But...
"It’s not a black box: push a button and it’s stable. Without a gifted human being, it does nothing, it’s no more valuable than an unattended violin." - Garret Brown
—
However, you also need to know that the original Steadicam brand—which has a vest and an elastic arm—may not be for someone who’s just starting out. Unless, you really want to become a Steadicam operator in big productions. And you have the money to buy a Steadicam system, and want to practice with it. ;-)
How does a steadicam work - specifically the handheld steadicam?
A handheld steadicam uses a gimbal handle and counterweights to isolate your camera from body movement.
As you walk, the gimbal lets the camera float independently, while counterweights balance it.
This smooths out shakes and bumps, giving you that steady, gliding look -- without needing a bulky vest or arm.
There are simpler versions--or derivatives--of the Steadicam—those that are handheld. For a beginner, a handheld steadicam stabilizer may be enough, and more suitable.

A handheld steadicam--which is lighter and smaller--works similarly to the original Steadicam. But without the need for you to use the more complicated parts of the original Steadicam.
Here are some key points to know about a handheld steadicam-style stabilizer...
First, it is designed mainly for lightweight cameras, that normal people may already have. They simply don’t want to own those bulky broadcast studio cameras, for no reason at all.
Operating a handheld steadicam for reasonable amount of time, is just fine.
 How does a steadicam work? A handheld steadicam works simpler than the original Steadicam.
Second, a handheld steadicam-style stabilizer, has a simpler design. No need for you to wear a mechanical vest, connected to a mechanical elastic arm. Because the vest and the arm don't exist. You still look like human, not half-robot half-human... or a cyborg. ;-)
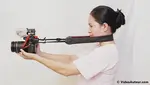
 How does a steadicam work in a real-world video shoot? (Photo of me courtesy of Jessica Motilla.)
However, since you’re holding the device with your bare hands, your arms are carrying all the weight. Which means... your hands, arms, and even your back, can get tired soon. Especially, if you’re new to using a handheld steadicam.
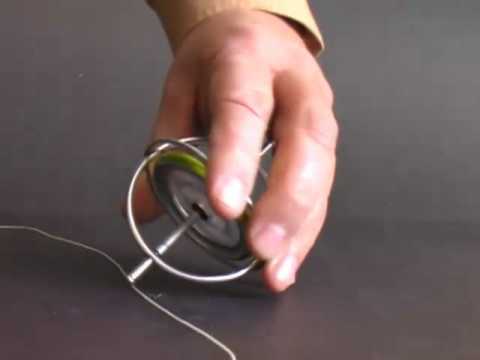
Lastly, a handheld steadicam has a gimbal handle and counterweights. The handle and the counterweights help smoothen your camera movements—say, when you’re walking and following your subject.
 How does a steadicam work - gimbal's handle and counterweights. And this is how you hold a handheld Steadicam when executing a camera movement.
--
Here's an example of smooth camera motion you can achieve by properly using a handheld steadicam...

I shot this video with a mirrorless camera mounted on a handheld steadicam.
--
 Photo of me and my daughter courtesy of Jessica Motilla. :-)
What does a Steadicam operator do?
A Steadicam operator wears a specialized body-mounted rig (vest and mechanical arm) to capture smooth, stabilized footage while walking or running.
They work closely with the director to execute precise tracking shots that follow the action seamlessly, eliminating handheld camera shake to help tell the story visually.
If you’re going to work as a steadicam operator, in a big production team—say, in a film production set—here's some of your tasks…
- You work closely with the director, the cinematographer (or director of photography), and the on-camera talents—like the actors and actresses.
- You set up the Steadicam system. So that it works optimally with the cinema or video camera, that you’ll attach to it.
- You wear a mechanical vest with arm that carries the camera, and the monitor that you’ll look at, as you operate the steadicam.
- You execute the required camera movements stated in the shot list—like following the action of your subject, and other tracking shots.
- You work in different environments, whether in studios or outdoors. And you work in different genres—like, narrative, documentary, sports, entertainment events, reality TV, etc.
—
But, if you’re in a small team, or you’re a solo video creator—who’s also going to operate the steadicam, here's some things you need to bear in mind and do…
- You don’t have to own that expensive Steadicam brand of camera stabilizer. You just need to borrow, or own, a similar functioning device—that is, a steadicam-style stabilizer. This is for small, lightweight cameras that you’ll typically use.
- If you’re a newbie, using a handheld mechanical stabilizer, will feel like a challenge. Because the muscles in your arms, legs, and back have to gain stamina by practice. So practice, and in no time, you’re a good handheld steadycam operator.
- Make sure you have a purpose when you use a handheld steadicam. It should help tell the story. So, consider how your steadicam shots will affect your audience.
How to balance a handheld steadicam
Attach your camera securely, then adjust the gimbal until it stays centered without leaning forward, back, or to either side.
Fine-tune the counterweight so the bottom takes roughly two seconds to drop vertically.
Finally, test with smooth arm movements; if the camera remains level, you're balanced and ready to shoot.
It is sensible to prepare the steadicam stabilizer, and practice using it first—before you can use it well, in real-world situations.
One simply cannot learn, develop, and refine the needed skills overnight. It takes time…
- Time you need to invest in rehearsing how to prepare, and operate a steadicam-style stabilizer. And...
- Time away from your "real-world" video shoot, or video coverage.
--
Here's how to set up and balance a handheld steadicam...
 How does a steadicam work - setting up and balancing the steadicam, or "steadycam"
1. Decide on the very camera setup you'll actually use during filming.
A basic setup could just be a smartphone, an action cam, a small camcorder—or any camera with built-in lens and mic. Plus, the handheld steadicam.
However, an interchangeable-lens camera mounted on a steadicam, may not be that basic at all.
So, if yours is a mirrorless camera, a DSLR camera, or a cinema camera, take away any unnecessary weight. Remove the lens cap, the camera strap, and the lens hood—if you opt not to use it when shooting.
2. Attach your camera to the base plate of your handheld steadicam stabilizer.
Then, attach the base plate to the stabilizer itself. Make sure that the camera, the base plate, and the steadicam are securely connected as one.
Tighten enough what needs to be tightened—depending on the design, of your mechanical handheld stabilizer.
3. Balance your camera so that it stays center.
It shouldn't lean forwards, or backwards too much. And it shouldn't lean to the left, or to the right too much, as well.
Make incremental adjustments to the stabilizer, as you do this.
4. Check if the counterweight is sufficient.
There are several designs of mechanical camera stabilizer counterweight. But regardless of the counterweight's form, we want to see that the stabilizer's bottom is neither too heavy, nor too light.
To check this, raise the counterweight platform horizontally, then release it so it drops.
If it takes about 2 seconds, before the counterweight platform reaches the vertical position—the counterweight is just enough.
If it doesn't, just do incremental adjustments, until you achieve that 2-second drop time.
5. Do a quick test.
Hold the handle of your steadicam stabilizer.
While you're firmly holding it, move your arm forward and backward.
Stretch your arm again horizontally and move it to the left, then to the right.
If the camera stays level, your handheld steadicam is ready to use.
Video Key Takeaways - How to setup and balance a portable, handheld steadicam
First, find your camera's center balance point and align it with the "zero" marker on the cheese plate.
Adjust forward/back for horizontal tilt, then fine-tune the gimbal height until the drop test returns upright smoothly in about two seconds.
Pre-balance once with the leg fully extended and mark positions for instant future setup.

How to Setup and Balance Your Steadicam (Step-by-Step):
- Find the Center: Before mounting, find your camera's front/back balance point (e.g., balance it on a rail or block).
- Align the Plate: Mount your camera on the steadicam's cheese plate. Slide the plate so its "zero" marker lines up with your camera's balance point.
- Test and Adjust Balance:
- Horizontal (Tilt): Lens pointed forward shouldn't lean up/down. Adjust the plate forward/back.
- Vertical (Drop): Lens pointed straight down should stay down. If it swings up, your camera is top-heavy (add weight below the gimbal or lower the gimbal). If it swings down, it's bottom-heavy (add weight above the gimbal or raise the gimbal).
- Side (Roll): Tilt the steadicam on its side. It shouldn't tip over easily. Adjust side-to-side on the cheese plate if needed. - Verify with Drop Test: Tilt the steadicam forward/backward about 45 degrees and let go gently. It should return to upright slowly and smoothly (aim for about 2 seconds). If it snaps back or falls, re-check steps 2 and 3.
Pro Tips for Beginners:
- Pre-Balance Once: Fully extend the telescoping leg during your initial balance. Later, just attach the camera and extend the leg to the same spot for near-instant balance.
- Mark Your Spot: Use quick-release plate markings to reattach your camera in the exact same position every time.
- Use All Weights: Start by attaching all included counterweights for maximum stability.
- Adjust the Gimbal Height: This is crucial! Lower it if top-heavy, raise it if bottom-heavy.
- Check the Bubble: Use the built-in bubble level to ensure the horizon is straight after balancing.
Key Takeaway: Proper balance (verified by the drop test) is essential for smooth, sway-free shots. It takes practice, but following these steps and using the fine-tuning knobs makes it achievable. Pre-balancing and markings save huge time in the field!

Here are the key points and actionable insights from the video about portable handheld steadicams (like the CAME-H4 Handheld Camera Stabilizer)...
Key Advantages and Features of a High-quality, Reliable Handheld Steadicam
- Battery-Free and Portable:
- No batteries required; operates indefinitely without power concerns.
- Compact, lightweight design folds for easy transport (legs collapse, weights included).
- Faster field deployment vs. electronic gimbals. - Ergonomic Design:
- Angled handle with knurled grip for precise steering control.
- Adjustable gimbal height to fine-tune balance and reduce sway.
- Telescoping bottom leg (extends fully for stability; deploy once for consistent balance). - Balancing System:
- Long cheese plate with multiple mounting points for forward/back/side-to-side camera adjustments.
- Fine-tuning knobs on the stage for quick micro-adjustments.
- Bubble level for horizon alignment. - Compatibility:
- Supports mirrorless cameras, DSLRs, and lenses.
- Your camera's battery compartment remains accessible during use.
Actionable Insights and Tips
- Balancing Best Practices:
- Find your camera’s center balance point first (use a rail or block to test).
- Align the plate’s "zero" marker with this point.
- Test balance in all directions:
- [a] Horizontally (prevents leaning forward/back).
- [b] Vertically (lens pointed down should stay down).
- [c] On its side (should not tip over).
- Aim for a ~2-second "drop test" (slow, controlled fall indicates proper balance). - Critical Features to Prioritize When Buying Any Steadicam-style Camera Stabilizer:
- Adjustable gimbal (essential for tuning drop time/sway).
- Long cheese plate with multiple mounting options.
- Fine-tuning knobs for quick adjustments.
- Telescoping leg (simplifies field deployment).
- Avoid stabilizers lacking these. - Field Deployment Speed:
- Pre-balance once with the leg fully extended; later, just attach the camera and extend the leg to the same position for instant balance.
- Use quick-release plate markings to reattach the camera identically every time. - Weight Optimization:
- Use all included weights for maximum stability.
- Lower the gimbal to reduce bottom-heaviness; raise it if top-heavy.
Performance Takeaway
A high-quality, portable handheld steadicam delivers smooth, sway-free shots with practice, rivaling electronic gimbals in stability while eliminating battery dependency.
Its design prioritizes quick field setup and ergonomic control, making it ideal for run-and-gun filming.
That’s why I still rely on this type of camera stabilizer, especially when shooting solo. It helps me create natural, organic camera movements—not robotic or artificial ones.
Final Note: Mechanical stabilizers remain relevant for reliability and portability, especially when battery life or weight is a concern.
How to use a steadicam
To use a steadicam, grip the handle firmly with your dominant hand to support the weight.
Use only your thumb and index finger of the other hand to lightly guide the center post.
Move with a smooth "ninja walk," keeping your knees bent to avoid any up-and-down bounce for stable, floating footage.
Sometimes, the story or script for a proposed video, will tell you the need for some camera movements—especially tracking shots.
It means, you need to be able to handle and operate a camera stabilizer device--like the steadicam--in the actual shoot. That skill applies whether you’re shooting events or documentaries—or more structured pieces, like narrative short films or music videos.
How to operate a steadicam during the shoot
To operate a steadicam during the shoot, grip the handle firmly with your dominant hand to bear the weight.
Use the thumb and index finger of your other hand to gently touch the post just below the gimbal.
This light touch steers the camera's aim without introducing shaky movements or jerks.
 How does a steadicam work? It works when properly handled and used as a storytelling tool.
When handling a mechanical camera stabilizer, like the steadicam, there are 2 things you're actually doing, at the same time...
- Your stronger hand is firmly holding the stabilizer's handle. (In my case, my "stronger hand", is my right hand.)
- Your other hand is gently touching the stabilizer column, just below the handle. (In my case, my "other hand", is my left hand. But I only use my index finger and thumb, to gently touch the stabilizer column.)
You're doing #1, to support the overall weight of your camera stabilizer setup. And it's not just your stronger hand and arm that carry that weight. But your back and leg muscles as well.

—
You're doing #2, to steer the stabilizer column—to guide what your camera's lens will look at. Remember, you're not tightly holding the stabilizer column with your left hand—if you're right-handed. You're only touching it lightly with your index finger and thumb, to help your camera record smooth motion.

However, when you're operating an electronic gimbal, it's a different story…
Let’s say your gimbal is properly set up and balanced. You may just have to hold the gimbal handle with one hand. Maybe two hands, depending on the gimbal’s brand and model.
The gimbal handle usually has some buttons that you can press, to control gimbal movements.
It can feel like some artificial intelligence—or AI—is helping you control, and enhance camera movements. There's some automation involved when you're operating a gimbal.
It's a different experience compared to using a handheld steadicam, which is mechanical and operated manually.
Camera stabilizer tips -- how to operate a steadicam
Master the "Ninja Walk" to eliminate vertical bounce: bend your knees slightly and roll heel-to-toe, keeping your head at a constant height.
Lock a specific distance to your subject and watch the monitor -- while using peripheral vision to avoid obstacles.
This gliding motion is essential for smooth, professional-looking tracking shots.
Here's some advice on using a camera stabilizer device -- like the handheld steadicam...
Relax if your camera setup feels a bit heavy, after you included what's essential in your setup -- say, an external mic.
A reasonably heavy load, or extra weight, can help make your shots more stable.
The only drawback is your arms and hands -- even your back muscles -- get tired faster, after shooting for some time.
So, make sure your use of camera stabilizer really serves some purpose. It will keep you from overusing your “reasonably” heavy setup.
Go for a wide angle lens, instead of a telephoto zoom lens.
Why?
Wide-angle lenses are forgiving! That's because they capture a lot of the scene, even if your camera moves a little.
Telephoto lenses, on the other hand, zoom in so much that any little wobble gets magnified in the photo.
Wide angle lens mitigates the effect of camera shake.
It means, your viewers will perceive enhanced camera motion, when you're using a wide angle lens—like 18-55mm, or 16-50mm lens.
Be mindful of your lens focusing, when executing tracking shots -- like walking to follow your subject.
You want your subject to stay in focus.
If you're using a mirrorless camera with advanced auto focus technology, you may not need to worry about keeping your subject in focus. As long as no other subject enters the frame.
If you're using a DSLR or a cinema camera that uses photography or cinema lenses, set your camera to manual focus. Be the one to decide where your lens focuses on.
This tip is also true, when you're filming with a mirrorless camera with a fully manual focus lens.
Use deeper focus for smooth tracking shots.
Avoid using a very "shallow depth of field" -- which creates a narrow, blurry focus area -- when filming tracking shots.
Note: This tip is for anyone using manual focus lenses, whether you're shooting on a mirrorless camera, a cinema camera, or a DSLR. If you're using an autofocus lens, this is less of a concern.
What is depth of field?
Depth of field refers to how much of your shot is sharp and clear versus how much is soft and blurry.
The Problem:
If your focus area is too narrow (often called "shallow"), your subject can easily drift out of focus as you or the camera moves.
The Solution:
To fix this, use a larger depth of field (often called "deep focus"). This keeps a wider slice of the image looking sharp, giving you a better chance of keeping your moving subject clear.
Quick Camera Settings Guide:
- Shallow focus (Blurry background): Lens aperture set to f/2.8 (for fast zoom lenses) -- or f/1.8 (for some prime lenses)
- Deep focus (More things clear): Lens aperture set to f/4 or f/5.6
By closing the aperture to a higher f-number, you make the shot more forgiving and ensure your subject stays crisp even when you're on the move.
How to Walk with a Stabilizer: The "Ninja Walk" for Smooth Tracking Shots
Before you hit record, decide how close or far you want to be from your subject. Locking in this specific distance is the secret to keeping your subject in sharp focus during a tracking shot.
So, how exactly do you walk (or even run) while using a camera stabilizer?
Step 1: Hold the Line
Once you've set your distance, stick to it like glue. As your subject moves forward, you move with them.
Try to imagine there’s an invisible pole connecting your camera to the person you're filming -- the length of that pole should never change.
Step 2: Watch the Screen, Not the Scene
Trust your monitor. Keep your eyes on the camera screen to maintain good composition.
But be careful: You also need to use your peripheral vision to scan the path ahead of you. The last thing you want is to trip over a curb or walk into a light post while you're focused on the shot.
Step 3: Master the "Ninja Walk"
This is the most important technique for beginners.
When we walk normally, our bodies bounce up and down. If you walk like this with a camera, that vertical bounce will ruin your footage -- it will look like a home video instead of a professional film.
You want to move horizontally only. Whether you are walking forward, backward, or sideways, your head and hips should stay at the exact same height.
To do this, bend your knees slightly and walk heel-to-toe, rolling through your feet to absorb the shock. Video shooters call this smooth, gliding movement "The Ninja Walk."
Practice this without the camera first -- it might feel silly, but your footage will look incredible.
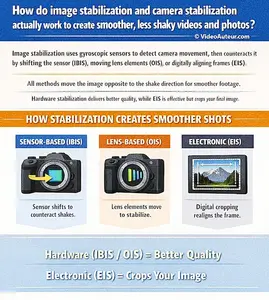
What is the difference between a Steadicam and a gimbal?
A Steadicam is a purely mechanical stabilizer that relies on your body movement and skill to absorb shake.
A gimbal uses battery-powered motors and a computer to electronically counteract movement.
In short: a Steadicam demands practice and physical technique, while a gimbal offers automated, out-of-the-box smoothness for beginners.
 How does a steadicam work? Steadicam works similarly to the gimbal... but still differently from it.
Steadicam? Gimbal? What's the difference?
A gimbal is a motorized arm for your camera. It's all electronic, with batteries, tiny motors, and a clever computer program working together to smooth out your shaky hands. Pretty cool, right? And the best part? You can hold it all yourself!
On the other hand, a steadicam is a mechanical camera stabilizer. Meaning, you harness your technical skills and muscle strength to get smooth camera motion, without using batteries and motors. And without being assisted by a computer.
Glidecam vs gimbal. Flycam vs Steadicam. Steadicam vs Glidecam.
You might be wondering how these camera stabilizers - Steadicam, Glidecam, Flycam - are different from the gimbal thingy.
Well, here's the thing: Steadicam, Glidecam, Flycam, those are all brand names for a similar camera stabilizer type.
And “gimbal” is just a common name for one of the many forms of camera stabilizer.
Now, those three brands mainly refer to mechanical stabilizers. While gimbal, as you already know, is motorized and electronic.
Of course, other brands of camera stabilizer exist. Those companies design and manufacture their own versions of camera stabilizer, both for hobbyists and professionals.
Here’s the first ever steadicam shot that moviegoers saw in a film…

The film, "Bound for Glory", was directed by Hal Ashby. Cinematographer Haskell Wexler, won the “Academy Award for Best Cinematography”. Steadicam operator-inventor Garrett Brown, was the one who executed that shot.
FAQs: How Does a Steadicam Work? (Beginner Video Production Edition)
What is a steady shot in film?
What is a steady shot in film?
A steady shot—sometimes called a stabilized shot—is one where the camera remains stable and smooth throughout the filming, with little to no visible shake or jitter.
This helps keep the audience focused on the action and maintains a professional look to the footage
What's a problem with too much camera movement?
What's a problem with too much camera movement?
Too much camera movement can make footage look distracting, unprofessional, and even cause discomfort for viewers, such as motion sickness.
Excessive shake can take attention away from the story or subject, making it harder to follow what's happening on screen.
What is the purpose of a Steadicam?
What is the purpose of a Steadicam?
The main purpose of a Steadicam is to remove unwanted camera shake and create smooth, fluid motion shots.
It lets the camera operator move freely while keeping the camera stable, making action sequences or complex shots much more watchable.
What is a Steadicam shot used for?
What is a Steadicam shot used for?
A Steadicam shot is used whenever filmmakers want the camera to move smoothly through a scene—tracking a character, navigating tricky or uneven terrain, or creating dynamic, flowing movements—all while maintaining a cinematic look.
What is the Steadicam shot effect?
What is the Steadicam shot effect?
The Steadicam shot effect creates the sensation that the viewer is “gliding” through the scene, increasing immersion and often connecting the audience more closely to characters or action on screen. It’s a fluid, dreamlike movement that handheld shots can’t match.
What is a Steadicam and why would you use it?
What is a Steadicam and why would you use it?
A Steadicam is a camera stabilizing tool invented in the 1970s. You’d use a Steadicam to get smooth, professional-looking video footage, especially when moving through spaces, following action, or shooting scenes that are hard to do with a tripod or dolly.
What are the benefits of a Steadicam?
What are the benefits of a Steadicam?
Benefits include:
- Super smooth shots, even while moving quickly
- More creative and complex camera moves
- Flexibility to move through tight spaces or rough terrain
- Helps reduce fatigue for camera operators compared to handheld shooting
- Boosts the overall production value of your video.
Who invented Steadicam?
Who invented Steadicam?
Garrett Brown, who is an American, invented the Steadicam.
“Steadicam” is really a camera stabilizer brand name. But over the years, the word has become synonymous with any similar device, that can mechanically keep your movement apart from the camera.
Garrett saw the need to film moving camera shots, without the shake or wobble. Even when the camera operator is walking on uneven, and rough surfaces.
That led him to make the Steadicam. Although he said, “I wasn’t enthralled with the idea of professionally inventing.”
When was the Steadicam invented?
When was the Steadicam invented?
It is said that Garrett invented the Steadicam in 1974. At first, he called it the “Brown Stabilizer”.
But Cinema Products Corporation bought his invention, and officially named it the “Steadicam”.
How did the first Steadicam work?
How did the first Steadicam work?
The first Steadicam used a system of counterweights, springs, and a gimbal (pivot point) to balance the camera and isolate it from the operator’s movements.
The operator wore a vest attached to an arm, allowing them to walk, run, or climb and still keep the camera stable.
What was the first movie to use Steadicam?
What was the first movie to use Steadicam?
It was Bound for Glory, which the American audience first saw on December 5, 1976.
It’s a biographical film—or “biopic”—that features the musician-songwriter, Woody Guthrie.
Which film is known for its use of the Steadicam?
Which film is known for its use of the Steadicam?
Classic examples include Rocky (1976), famous for its training montage up the steps, and The Shining (1980), known for its eerie hallway tracking shots.
What is the most famous Steadicam shot?
What is the most famous Steadicam shot?
Many point to the chilling tricycle sequence in The Shining and the long tracking shot on the beach in Atonement (2007) as some of the most famous Steadicam shots in cinema history.
What is the longest Steadicam shot?
What is the longest Steadicam shot?
One of the longest and most iconic is the five-minute continuous shot on Dunkirk Beach in Atonement, which is celebrated for its complexity and emotional impact.
How heavy is a Steadicam rig?
How heavy is a Steadicam rig?
A full Steadicam rig can weigh anywhere from 25lb to 70lb (about 11kg to 32kg), depending on the camera and accessories. Modern lightweight rigs for smaller cameras can be much lighter, though.
Who makes Steadicam?
Who makes Steadicam?
The Steadicam brand was originally sold by Cinema Products Corporation and has been owned by Tiffen since 2000. Tiffen is the main manufacturer today, but other companies make similar camera stabilizers.
Is Steadicam better than a gimbal?
Is Steadicam better than a gimbal?
Both have strengths. Steadicams are purely mechanical, don’t require batteries, and can be more “organic” in motion. Gimbals use motors and electronics to stabilize.
Gimbals are generally smaller and easier for beginners, while Steadicams offer more flexibility for heavier cameras and can produce unique motion aesthetics.
Why don't steadicams seem as popular as other camera stabilizers?
Why don't steadicams seem as popular as other camera stabilizers?
Steadicams take considerable skill and practice to operate properly, and rigs can be heavy and expensive.
Cheaper, lighter, and easier-to-use electronic gimbals have become more popular, especially for smaller cameras and hobbyists.
What is a Steadicam and why would you use it to shoot dance?
What is a Steadicam and why would you use it to shoot dance?
A Steadicam is ideal for shooting dance because it allows the camera to move with the performer(s) smoothly, following fast or flowing motion without distracting shake—giving viewers a sense of “dancing” with the subject.
What is a Steadicam operator job description?
What is a Steadicam operator job description?
A Steadicam operator is trained to set up and use the Steadicam, balance the camera, and move smoothly to achieve dynamic shots.
They need to be physically strong, have good coordination, and work closely with the director and director of photography to achieve the right shots.
How do you become a Steadicam operator?
How do you become a Steadicam operator?
Becoming an operator usually involves:
- Learning camera basics and gaining industry experience
- Attending specialized Steadicam training or workshops
- Practicing regularly to master balancing and movement
- Building stamina—operating a Steadicam is physically demanding!
- Networking to find job opportunities on sets and productions
How to hold Steadicam?
How to hold Steadicam?
You wear a vest that distributes the rig’s weight across your torso. One hand (often the dominant one) gently steers the Steadicam handle, while the other guides or balances at the gimbal.
You keep your body movement smooth and let the rig “float” with minimal force—never gripping tight—so the rig absorbs footsteps and body sway.
Conclusion: How does a steadicam work
The Steadicam remains a cornerstone of cinematic storytelling, blending mechanical ingenuity with human artistry. By isolating the camera from the operator’s movements through counterweights, gimbals, and strategic balance, it transforms shaky steps into fluid, intentional motion.
Whether following a character’s emotional journey or navigating challenging terrain, the Steadicam empowers creators to craft immersive, dynamic shots that serve the story.
Yet, its magic lies not just in the technology but in the operator’s skill—the delicate dance of physical endurance, precise calibration, and creative intuition.
Your steadicam is only as good as your understanding of both its mechanics and its purpose in your creative vision. With practice and intention, you'll transform from simply operating a device to wielding an expressive instrument that brings your storytelling to life.
Now that you understand how a steadicam works, what creative camera movements have you been inspired to try in your next video project?
See also a camera stabilizer similar to the handheld steadicam...
You might like these
How to Start Video Production for Beginners Step by Step
How to start video production for beginners step by step guide. Focus on purpose, audience, and message. Skip the overwhelm. Create videos that truly connect.
How Does a Drone Work: Complete Beginner's Guide
How Does a Drone Work explained simply. Discover drone history, components, controls, and why they're game-changers for filmmaking and photography.
What Is Gear Acquisition Syndrome? Own Less, Create More
What Is Gear Acquisition Syndrome and how it sabotages video creators. Discover psychology behind GAS and practical steps to stop buying, start creating.


Alvin Motilla is the creator of VideoAuteur.com, where he helps everyday people make videos that truly connect with audiences. With over 20 years of experience spanning scriptwriting, documentaries, corporate, and freelance video production, he champions the human side of creation over gear obsession. A graduate of AB Mass Communication, he believes that showing up with heart matters more than owning expensive equipment. Off-screen, Alvin enjoys biking with his wife and daughter, staying active, and studying Scripture.

Join the
Video Auteur Club
Get tips, step-by-step guidance, and gear guides that make video production simple.
What's New
-
Video Making Tips for Beginners: Start Creating Today
 Video Making Tips for Beginners: Overcome overwhelm and start creating. Practical tips on content, audio, framing, editing and finding your voice.
 -
How to Make a Family Video: Capture Real Moments
Learn how to make a family video that captures authentic moments, not perfect takes. Simple steps, free tools, and heartfelt memories your family will treasure. -
What Type of Camera Should I Get as a Beginner?
 What type of camera should I get as a beginner? Learn which mirrorless cameras, features, and budget kits work best for video creators starting their journey.