- Video Production
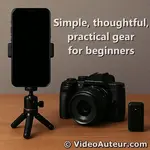
- Video Production Equipment for Beginners
- Free editing software for beginners
Free Editing Software for Beginners: No Watermarks, Just Creativity
For a truly free, watermark-free start, use DaVinci Resolve on desktop -- it’s Hollywood-grade yet beginner-friendly with no paywalls.
On mobile, CapCut’s app offers effortless editing and zero watermarks.
Both let you learn and create without hidden costs, so you can focus purely on your story.
Key Takeaways - Free editing software for beginners
-
"Genuinely Free" Means Four Specific Things: True free software costs $0 forever, exports in full 1080p HD, has zero watermarks, and keeps core editing tools (trim, cut, music, text) unlocked. If you have to pay to remove a logo or unlock resolution, it’s a trial, not a free tool.
-
CapCut is for Mobile Only: The mobile app is excellent for fast, social-ready clips with no watermark. Do not rely on the free desktop version -- it currently enforces watermarks after just a couple of exports per week.
-
DaVinci Resolve is the Long-Term Desktop Choice: It offers Hollywood-grade power with no export limits and no watermarks. Start on the "Cut Page" for speed and simple trimming; you can grow into the advanced "Edit Page" later.
-
Performance Hack: Use MP4 and Proxies: Always record and export in MP4 (H.264) for universal compatibility. If your computer struggles with lag, enable Proxy Editing or lower the Playback Resolution to 1/2 or 1/4 -- this makes editing smoother without affecting final video quality.
-
First Edit Action Plan: Cut Dead Air First: Your very first step in the timeline should be trimming the silence from the beginning and end of clips. Start with a "rough cut" to get the story order right before obsessing over transitions or effects.
-
Fix Audio Before Visuals: Viewers forgive shaky video, but they won't tolerate bad sound. Lower background music volume to around 30% so dialogue remains clear.
- B-Roll is Your Best Friend: Extra footage (like close-ups or scenery) layered over your main audio track is the quickest way to hide jump cuts and make a simple edit look professional.
So, you’re ready to dip your toes into video editing? You might have heard that "free" editing tools often come with hidden frustrations.
Maybe you’ve downloaded software, poured time into your project, only to find your final video stamped with a distracting watermark… or discovered essential features locked behind a pricey "pro" upgrade.
It’s disappointing, isn’t it? It can feel like you’ve been tricked — like "free" wasn’t really free after all.
But here’s the truth: You don’t need expensive software to create something meaningful. Powerful editing shouldn’t be a luxury reserved for pros with big budgets.
And you definitely deserve tools that are genuinely free — no watermarks, no pressure to upgrade, and no confusing limitations.
The good news? Such software exists! Tools that let you focus on your creativity, not hidden costs.
Whether you’re editing school projects, passion videos, or just experimenting, let’s find the right free software for you — simple, caring, and truly yours.
Ready to start creating with confidence? Let’s dive in.
And if you’re still putting together your full video toolkit, don’t miss our main guide on
When searching for Genuinely Free Editing Software for Beginners, what does the term "genuinely free" really mean?
“Genuinely free” means software that’s fully functional forever at $0 cost -- no watermarks, no locked essential tools, and no export quality limits (like 1080p).
It’s a full-featured workspace that lets beginners learn and create without the frustration of “trial traps” or surprise paywalls blocking their finished video.
“Genuinely free” means you get a fully functional editing experience at $0 cost, with no hidden penalties for being a beginner. No tricks, no traps—just software that respects your creativity and time.
Sadly, many programs claim to be free but leave you frustrated when exporting your work.
You might discover...
- watermarks splashed across your video,
- core features locked away, or
- resolution limits that make your project look outdated.
I know how discouraging that feels—like your effort and trust were wasted.
For beginners like you—students, self-learners, and curious creators— “genuinely free” software must deliver these four essentials:
- Zero Watermarks
- No Paywalls on Core Tools
- Full HD (1080p) Exports
- Truly $0 Cost—No “Trial Traps”
 Free editing software for beginners respects your creativity and time.
Zero Watermarks
Your finished video belongs only to you—not a branding billboard.
No company logos, no subtle stamps.
If you poured love into your project, it deserves to shine without distractions.
No Paywalls on Core Tools
Trimming clips, adding text/transitions, syncing music, basic color fixes—these are your editing foundation.
All should be freely available.
You shouldn’t pay just to unlock what’s essential.
Full HD (1080p) Exports
We’re not in the DVD era anymore.
720p feels retro, and 1080p is today’s baseline for clear, sharable videos.
Genuinely free software won’t downgrade your resolution to “nudge” you toward paid plans.
Truly $0 Cost—No “Trial Traps”
Freemium models (where “free” is just a limited trial) don’t count here.
We want software that’s fully usable forever—not a countdown timer hiding behind the word “free.”
Why This Matters to You
Imagine spending hours perfecting a project—only to realize your video has a tacky watermark, or you can’t export in HD without paying. It doesn’t just waste your time; it dims your creative spark.
Genuinely free software empowers you. It lets you learn, experiment, and grow without pressure.
No upgrades to remove logos, no begging for basic features. Just pure creativity.
Thankfully, such editors do exist—and we’ll explore them next. Your stories deserve to be told freely, clearly, and entirely on your terms.
What are the best free editing software for beginners with no watermark?
The best free, watermark-free editors for beginners are DaVinci Resolve (desktop) for powerful, Hollywood-grade tools you can grow into, and CapCut (mobile app only) for fast, stylish social media clips.
For a simple, offline mobile alternative or older computers, VN Video Editor and Kdenlive are excellent, completely unrestricted choices.
Finding genuinely free editing software shouldn’t feel like a treasure hunt. That’s why I’ve curated these trusted, watermark-free options—perfect for beginners who want to create freely, without hidden costs or creative limitations.
Whether you’re editing on a laptop or phone, these tools respect your effort and vision.
 Free editing software for beginners with no watermark
Top Recommendations
Let’s start with my top recommendations—the ones I personally use and trust:
1. DaVinci Resolve (Desktop: Windows/Mac/Linux)
 Free editing software for beginners: DaVinci Resolve (Edit Page interface)
Best for: Beginners with big dreams
If you’re serious about growing your skills long-term, this is your match.
Yes, it’s Hollywood-grade (used on films like Dune!), but don’t panic—its "Cut" page is made for quick, intuitive edits.
 Free editing software for beginners: DaVinci Resolve (Cut Page interface)
Why you’ll love it:
- Zero watermarks, even at 4K exports (yes, truly free!).
- Gorgeous color correction and audio tools (no paid upgrades needed).
- Organizes your clips effortlessly (great for creative storytelling!).
My tip: Start with its free training tutorials—they’re gold!
"I use Resolve’s free version for paid client work. It’s that powerful."
2. CapCut (Mobile: iOS/Android)
 Free editing software for beginners: Capcut mobile
Best for: Social media creators and busy parents
Perfect for quick, stylish videos—my wife and I use it for everything from family moments to school projects!
Why you’ll love it:
- Zero watermarks on mobile exports (desktop version adds them!).
- Drag-and-drop simplicity + fun effects (auto-captions, trendy music).
- Ready to share in minutes.
Heads up: Use the mobile app only—the free desktop version now adds watermarks.
The free CapCut desktop version currently allows only about two watermark-free exports per week.


Beyond that, you need a paid plan for clean videos.
Be aware: CapCut frequently changes free features, so this watermark limit could change.
Regardless, we stand by our definition of a truly free beginner video editor:
- zero watermarks,
- full HD (1080p) exports,
- core tools unlocked (cutting, transitions, color correction), and
- no forced upgrades.
"My non-techy wife learned CapCut in an hour. Our daughter’s school projects? Sorted!"
Hidden Gems: Less Hype, Same Freedom
These underrated picks deliver pro features without the buzz—ideal for tight budgets:
3. VN Video Editor (Mobile: iOS/Android)
 Free editing software for beginners: VN Video Editor (mobile)
Best for: Offline editing and simplicity
A lightweight CapCut alternative that works without internet.
Why it shines:
- No watermarks, no paywalls on core tools.
- Intuitive timeline—no tutorials needed!
- Great for short films or school presentations.
Tip: Keep all your clips in one phone folder before starting!
4. Kdenlive (Desktop: Windows/Mac/Linux)
 Free editing software for beginners: Kdenlive
Best for: Open-source fans and older PCs
A powerhouse that runs smoothly even on low-spec laptops.
Why it shines:
- Truly unrestricted (no watermarks, no export limits).
- Proxy editing makes 4K work possible on basic hardware.
- Built by a passionate community (free forever!).
Tip: Enable "proxy clips" in settings for buttery-smooth playback!
Niche Wonders: For Specialized Needs
These serve specific audiences beautifully—still 100% free:
5. Canva (Browser/iOS/Android)
 Free editing software for beginners: Canva
Best for: Social media marketers and designers
If you already design graphics in Canva, its video editor feels like home.
Sweet spots:
- Watermark-free 1080p exports.
- Drag-and-drop templates + royalty-free assets.
- Perfect for Reels, YouTube intros, or ads.
Note: Best for short videos (under 5 mins). Save long edits for desktop software!
6. OpenShot (Desktop: Windows/Mac/Linux)
 Free editing software for beginners: OpenShot
Best for: Students and educators
Think of it as a warm hug for editing—simple, gentle, and open-source.
Sweet spots:
- No watermarks, unlimited tracks.
- Ideal for lectures, presentations, or documentaries.
- Runs on older computers gracefully.
Tip: Lower preview resolution while editing for smoother performance!
A Special Tribute: For Film Lovers
One more deserves mention—flawed but full of soul:
7. Lightworks (Desktop: Windows/Mac/Linux)
 Free editing software for beginners: Lightworks
Best for: Aspiring film editors
Used on classics like Pulp Fiction and The Irishman. Its elegant interface makes storytelling feel sacred.
The love:
- Precision cutting tools + gorgeous timeline.
- Makes you feel like a pro editor.
The catch: Free version exports only at 720p.
My plea to Lightworks: "Let beginners export at 1080p—they’ll fall in love with you!"
How to Choose? Follow Your Heart ❤️
Use Case: Long-term growth
Top Pick: DaVinci Resolve
Why: Grow from beginner to pro without switching tools.
Use Case: Phone edits
Top Pick: CapCut (mobile)
Why: Social-ready videos in minutes, zero fuss.
Use Case: Low-spec PC
Top Pick: Kdenlive
Why: Open-source freedom, no performance anxiety.
Use Case: Classroom/PPT
Top Pick: OpenShot
Why: Gentle learning curve for educational projects.
Remember: Your creativity matters more than any software. Start simple, stay curious, and create fearlessly—you’ve got this!
Research in International Journal of Information and Education Technology (IJIET) shows that affordable, accessible tools (smartphones + free video editing software) empower educators and students to create compelling digital stories easily, no expertise needed.
This accessibility directly enables digital storytelling as an effective teaching method for practical concepts challenging in traditional settings.
What should be your first edit action plan when getting started with video editing?
Your first edit action plan is simple: Import your main clip, trim the dead air at the start and end so the action begins immediately, and drag a background music track underneath.
Lower the music volume to 30%, add a simple text title, and export.
This builds a clean, snappy story without overwhelm.
--

--
What Should Be Your First Edit Action Plan?
Let’s simplify: Your goal isn’t perfection—it’s progress. Follow these gentle steps to turn your raw clips into a cohesive story, without overwhelm.
Step 0: Prep Your Space (Before Opening Software!)
Why? A tidy workspace = a calm mind.
- Create a folder on your computer named "My First Edit."
- Gather everything inside:
- Main video clips (keep them short! 2-3 mins max).
- Background music (e.g., free tracks from YouTube Audio Library).
- Photos or B-roll (extra visuals that support your story).
"This saves so much time later. Trust me—I’ve learned the hard way!"
Step 1: Sketch Your Story (5 Minutes)
Why? Even simple planning prevents frustration.
- Grab paper & pen. Sketch 3 scenes:
- [1] Intro (Hook viewers: "Hi, I’m Alvin—today we’re baking cookies!").
- [2] Middle (Key moments: mixing dough, oven timer).
- [3] End (Final result + closing thought: "Look how golden they are!").
Keep it loose! This is your creative safety net.
Your First Editing Session
Now open your chosen software (e.g., DaVinci Resolve / CapCut Mobile).
Step 2: Import & Arrange
- Click "Import Media" (usually under File > Import).
- Drag your main clip onto the timeline.
- Trim dead air:
- Place the playhead where the action starts.
- Split the clip (scissors icon) → delete the quiet beginning.
- Repeat for the end.
"Begin late, end early—it keeps your video snappy!"
Step 3: Add Polish (Simple & Sweet)
Music: Drag your audio track below the video. Lower its volume to 30% so your voice shines.
- Text: Add a title using presets (e.g., "Intro" template).
- B-roll: Sprinkle in supplemental shots (e.g., close-up of cookie dough).
Tip: Use transitions sparingly—a simple "fade" between scenes works wonders.
Step 4: Export & Celebrate!
- Click "Export" → Choose MP4 format → Select 1080p resolution.
- Name your file (e.g., "My_First_Video_Final").
- Save to your folder → Hit render!
While exporting: Close other apps (and maybe turn off Wi-Fi for smoother processing).
Pro Tips for a Calm Experience
- Start tiny: Edit a 1-min video before tackling longer projects.
- Learn gradually: Watch one beginner tutorial (e.g., Resolve’s Cut Page Guide—see the special next section below).
- Lag fix: If playback stutters, enable proxy editing (in Resolve/Kdenlive)—it edits lightweight copies!
- Be kind to yourself: Your first edit is a victory. Compare it to your growth, not YouTube pros!
"Remember: Every editor started where you are now. Breathe, play, and enjoy the process—you’re telling your story."
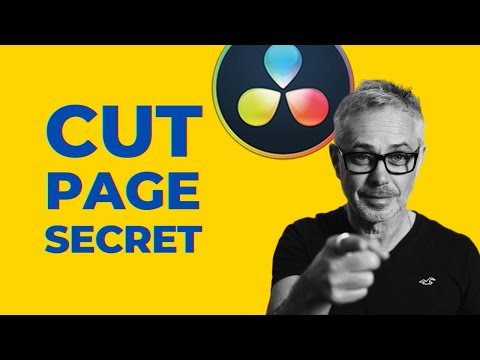
Video Key Takeaways: Summary of DaVinci Resolve Cut Page Tutorial for Beginners
The DaVinci Resolve Cut Page is built for speed, not precision.
Use its dual timeline and automatic ripple behavior on Video Track 1 to assemble your rough cut quickly.
Start here to build the story foundation, then switch to the Edit Page only when you're ready for fine-tuning and detailed adjustments.
Here are the key points and actionable insights from the video...
Key Points
- Cut Page vs. Edit Page: The Cut Page is designed for faster, more efficient initial editing, while the Edit Page is better for detailed refinement. Both pages share the same timeline but offer different tools and workflows.
- Double Timeline Interface: The Cut Page features two timelines - a top overview showing all shots and a bottom zoomed-in view of the playhead position. This eliminates constant zooming in/out needed in the Edit Page.
- Dynamic Timeline Behavior: The presenter's "number one secret" is that Video Track 1 (V1) behaves differently than higher tracks. V1 automatically ripples and closes gaps when clips are deleted or trimmed, while tracks above V1 leave gaps, just like in the Edit Page.
- Unique Cut Page Features:
- Single Viewer: Toggles between timeline and source clips (unlike Edit Page's dual viewers)
- Source Tape: Allows viewing all clips in a bin as one continuous tape
- Smart Insert: Automatically inserts clips at the nearest edit point, not necessarily where the playhead is
- Ripple Overwrite: Replaces shots while automatically adjusting timeline duration
- Place on Top: Creates zoomed-in shots to fix jump cuts in interviews
- Quick Export: Enables direct export without going to the Delivery Page
Actionable Insights
- Optimal Workflow: Build your initial edit in the Cut Page for speed and efficiency, then switch to the Edit Page for fine-tuning and detailed work.
- Master Keyboard Shortcuts:
- JKL keys for navigation (J=reverse, K=pause, L=forward)
- I/O for setting in/out points
- F9 to insert, Shift+F12 to append to timeline
- D to disable/enable clips - Leverage Source Tape: When working with multiple clips in a bin, use Source Tape to view them as one continuous tape, saving time clicking through individual clips.
- Understand Track Behavior: Remember that V1 automatically closes gaps when clips are removed, while higher tracks don't. This knowledge is crucial for using the Cut Page effectively.
- Use Smart Insert: Don't worry about placing the playhead exactly at the edit point - Smart Insert will find the nearest one automatically.
- Fix Jump Cuts Efficiently: Use "Place on Top" to automatically create a zoomed-in version of a shot to hide jump cuts in interviews.
- Right-Click Playhead: Access quick functions like selecting everything to the left/right of the playhead.
- Audio Management: While audio editing is more limited in the Cut Page, you can still mute clips and add music tracks before moving to Fairlight or Edit Page for detailed audio work.
The Cut Page is designed to streamline the editing process once you understand its unique features and behaviors, particularly the dynamic timeline functionality on Video Track 1.
Can my computer run Free Video Editing Software? (We simplify the system requirements!)
Yes, most likely!
Any computer running Windows 10/11 or recent macOS from the last 5–7 years can start.
For smooth basic editing, aim for 8GB RAM and an SSD.
Even older machines work with free software’s performance settings.
You don’t need a high-end setup to begin creating videos.
Yes, most likely your computer can run free video editing software!
I understand this is a common concern when you're just starting your video editing journey.
The good news is that you don't need a high-end, professional setup to begin creating wonderful videos. Let's break down the requirements in the simplest way possible.
 Free editing software for beginners: Will my computer run it? (System needs made simple)
What Your Computer Needs
Operating System:
If your computer is running Windows 10 or 11, or a recent version of macOS, you're all set! Most free editing programs work perfectly well on these modern systems.
If you're not sure which version you have, don't worry - most computers from the last 5-7 years will meet this basic requirement.
Note: The "5-7 years" timeframe for computer compatibility is reasonable for mid-range or better computers from that period, though entry-level machines might struggle with more demanding editors.
It's important to check the specific hardware requirements of the software you choose, as performance can vary greatly.
Processor (CPU):
Think of this as your computer's brain. A multi-core processor (like an Intel Core i5 or AMD Ryzen 5) will make your editing experience smoother.
While you can manage with less powerful processors, having one of these will help your software respond faster when you're making edits.
Note:
- Intel Core i5 and AMD Ryzen 5 CPUs are good entry points for video editing, particularly for 1080p footage.
- But for more demanding tasks—such as editing 4K, or working with complex effects—higher-end processors like the Intel Core i7/i9 or AMD Ryzen 7/9 are recommended. These CPUs offer more cores and threads, leading to significantly faster performance.
- Also, some CPUs also have integrated graphics or dedicated hardware for video acceleration, which can further speed up certain editing processes.
Memory (RAM):
Random Access Memory (RAM) is what allows your computer to handle multiple tasks at once. If editing is cooking, RAM is a clean workspace you can work on.
You can start with 8GB of RAM, which will work for basic editing.
However, if you plan to work with longer videos or higher quality footage, 16GB—or, a larger workspace—will give you a much more pleasant experience with less frustration.
Reviewer card:
- RAM = workspace; more space = fewer slowdowns.
- 8 GB: basic, short 1080p with proxies; close other apps.
- 16 GB: smoother for longer 1080p/light 4K.
- 32 GB: recommended for heavy 4K, effects, multicam.
- Workflow (proxies/optimized media) matters as much as specs.
Graphics Card (GPU):
This component helps with rendering your final videos and playing back your edits smoothly.
While many free editors can work with your computer's built-in graphics, having a dedicated graphics card with 2-4GB of VRAM will make a noticeable difference in speed and responsiveness.
Rough VRAM Guide:
- 2–4 GB: Entry-level; fine for HD/basic timelines.
- 4 GB: A better starting point for 1080p editing/longer timelines.
- 6-8 GB: Minimum recommendation for 4K editing and more complex projects.
- 12 GB or more: For professional 4K/6K/8K workflows; for optimal performance and responsiveness.
Storage:
Where you store your video files matters! A Solid State Drive (SSD) is highly recommended over an older Hard Disk Drive (HDD).
Why?
Because SSDs load your software, video files, and previews much faster, which means less waiting around for things to happen.
Recommendation:
- Use an SSD for your active editing projects and your operating system.
- Use an HDD for long-term storage and archiving of completed work, as they are a more cost-effective option for large volumes of data.
SSD = live workspace; HDD = cold storage.
What If You Have an Older Computer?
If you're reading this and feeling worried because your computer is a few years old, please don't despair!
Many free editing programs have settings that can help improve performance on less powerful machines.
Later in this article, we'll share some simple tips to optimize your editing experience, regardless of your computer's age.
Remember, everyone starts somewhere, and many successful creators began their journey with modest computer setups.
The most important thing is to begin learning and creating, which you can absolutely do with most modern computers and the right free software.
How can beginners ensure smooth performance and handle Video File Format compatibility in free editing software?
For smooth performance, enable proxy editing or lower the preview resolution to 1/2 or 1/4.
For format compatibility, always use MP4 (H.264) -- it works in all free editors.
If a file won’t import, convert it to MP4 using a free tool like Shutter Encoder.
Start simple, and your workflow will stay frustration-free.
Short answer: With a few gentle tweaks!
Laggy playback or "file not supported" errors don’t have to ruin your creativity. Let’s simplify this step by step.
 Free editing software for beginners: Performance tips and video file format compatibility
Keeping Editing Smooth (Even on Weaker Computers)
Editing should feel like gliding—not wrestling. Try these kind-to-your-PC habits:
1. Proxy Editing (Your Secret Weapon!)
- What it is: Software creates lightweight, low-res copies of your clips for editing.
- Why it helps: Your timeline stays buttery-smooth. Final export still uses original quality!
- How to enable:
- DaVinci Resolve: Right-click clips > "Generate Proxy Media"
- Kdenlive: Project Settings > "Enable Proxy Clips"
"On a budget laptop, I sometimes use proxy clips to edit 1080p footage—it’s magic."
2. Lower Preview Quality
While editing, change playback resolution to 1/2 or 1/4 (look for a dropdown in your preview window).
- Bonus: Doesn’t affect your final video’s quality!
3. Free Up Breathing Room
- Close browsers (Chrome/Firefox drain RAM).
- Pause cloud sync (Dropbox, Google Drive). I even turn off the computer’s internet connection to prevent automatic background updates.
- Restart your computer before starting big projects.
4. Choose Efficient Formats
Format: ProRes
Best For: Editing (even on slow PCs!)
Why: Large files but super easy for computers to process
Format: H.264 MP4
Best For: Final exports
Why: Small files, perfect for web/social
Surprise! ProRes edits smoother than compressed MP4s—even on old laptops.
A little editing trivia:
H.264 MP4 files are everywhere, and their small size comes from heavy compression. That means your computer has to work harder to "unpack" them in real time during editing.
In contrast, formats like Apple ProRes use less compression. The files are larger, but they often play back more smoothly in editors because the data is easier to read.
You don’t need to worry about this early on, but it’s a useful tip to keep in mind as you advance in your editing journey. For now, sticking with MP4 is a great place to start.
File Format Compatibility: No More Confusion!
Rule of thumb: Stick to MP4 (H.264) for footage and exports. It’s the universal language of free editors.
Avoid Headaches:
- Record in MP4: If your phone/camera allows it.
- Convert tricky files: Use free tools like Shutter Encoder to turn MOV/AVI into edit-friendly MP4s.
- Export as MP4: All recommended software support it.
Your Stress-Free Checklist
Before editing:
- Convert footage to ProRes (for buttery editing) or MP4 (for compatibility). Again, a free tool like Shutter Encoder can handle this and supports batch processing.
- Enable proxy mode if editing 4K or long videos.
While editing:
- Lower the playback resolution to 1/2—even 1/4—quality.
- Close other apps to give your editor “focus time.”
Before exporting:
- Ensure proxies are disabled for guaranteed full-quality export (most NLEs automatically use original footage, but this prevents any rare issues).
- Choose MP4 (H.264) for universal compatibility and web-friendly delivery.
"Remember: Your creativity matters more than technical perfection. Start simple—smooth workflows grow with practice!"
Which is right for you, Mobile Video Editing or Desktop Video Editing?
For beginners, mobile is ideal for quick social clips on the go, while desktop offers better precision and power for longer projects like vlogs.
If you're just starting out and feel overwhelmed, begin with a free mobile app like CapCut -- it’s the simplest, most joyful way to learn the basics.
Short answer: Both are valid! Your choice depends on your lifestyle, projects, and comfort. Let’s find your perfect match.
 Free editing software for beginners: Mobile video editing vs. desktop video editing
Mobile Editing (e.g., CapCut, VN Video Editor)
- Best for: Quick social clips (TikTok/Reels), on-the-go edits
- Ease of Use: Super simple (drag-and-drop, presets)
- Project Length: Short-form (under 5–10 mins)
- Portability: Edit anywhere (bus, café, park)
- Precision: Touchscreen controls (great for speed, less for fine cuts)
- Advanced Features: Basic transitions/text/music
Desktop Editing (e.g., DaVinci Resolve, Kdenlive)
- Best for: Longer videos (vlogs, tutorials), precise control
- Ease of Use: Gentle learning curve (more menus, but more power)
- Project Length: Long-form (10+ mins, multi-track)
- Portability: Requires a desk setup
- Precision: Keyboard shortcuts + mouse (frame-by-frame accuracy)
- Advanced Features: Color grading, effects, audio mixing
When to Choose Mobile Editing
Pick this if you...
- Create mostly for social media (Reels, TikTok, Stories).
- Need speed over perfection (e.g., documenting daily life).
- Prefer learning in tiny bursts (5–10 minute edits).
- Travel often or lack desk space.
"My wife edits daughter’s school projects on CapCut between chores—no stress."
Top Picks:
- CapCut (Mobile): Trendy templates, auto-captions.
- VN Video Editor: Works offline, no watermarks.
When to Choose Desktop Editing
Pick this if you...
- Work on vlogs, tutorials, or passion projects (15+ mins).
- Crave creative control (color grading, layered audio).
- Have an older computer? Kdenlive runs smoothly!
- Want to grow long-term skills.
"At first, editing event recap videos in DaVinci Resolve seemed intimidating, but the free tutorials helped everything finally click."
Top Picks:
- DaVinci Resolve: Hollywood tools, free forever.
- Kdenlive: Lightweight + open-source (perfect for basic laptops).
Key Questions to Ask Yourself
- Where will I edit most?
→ Bed/couch/outdoors? Mobile.
→ Quiet desk space? Desktop. - What’s my usual video length?
→ Under 5 mins? Mobile.
→ Over 10 mins? Desktop. - Do I want to add fancy effects?
→ Filters/text? Mobile.
→ Color grading/audio tweaks? Desktop.
Remember: You Can Always Switch!
Start with mobile if you’re overwhelmed. It’s a friction-free playground.
Graduate to desktop when your stories demand more depth.
"Your first edits aren’t about ‘professionalism’—they’re about joy. Choose the tool that makes you excited to create!"
What are essential Video Editing Terms explained simply for beginners?
Timeline is your canvas for arranging clips.
Trim cuts unwanted ends; a Cut switches instantly between clips.
B-Roll is extra footage covering the main audio, and Export creates your final sharable video file.
Master these five basics, and you can start editing confidently.
Let’s go over the most important video editing terms you’ll come across, explained in plain, friendly language.
These are your new creative friends! And we’ll unpack each one gently.
Your Editing Toolkit: Simple Definitions
Timeline
Your story canvas—where you arrange clips in order (like a digital scrapbook!).
- Why You’ll Love It: "Drag your sunrise clip here, your interview there… voilà, your story unfolds!"
Trimming
Shortening clips by cutting off boring starts/ends (like pruning a rose bush!).
- Why You’ll Love It: "Remove that ‘um…’ before you speak—keep only the gold!"
Splitting
Cutting one clip into pieces (like slicing a cake to rearrange layers!).
- Why You’ll Love It: "Split your 5-min vlog to insert a cat meme right where it fits!"
Cut
The simplest transition—an instant switch between clips (used 90% of the time!).
- Why You’ll Love It: "Like flipping a photo album page—clean, quick, and powerful!"
B-Roll
Extra footage that spices up your story (e.g., coffee brewing while you talk).
- Why You’ll Love It: "Cover jump cuts or show context—like rain outside during a sad monologue."
Export/Render
Baking your video into a shareable file (MP4). Like saving a doc as PDF!
- Why You’ll Love It: "Click ‘Export’ → your masterpiece is ready for YouTube!"
A Little Deeper (Still Gentle!)
Fade/Dissolve
Softer transitions where clips blend (like sunset melting into night).
- Real-Life Example: "Use sparingly: fade to black for endings, dissolve for time jumps!"
Proxy Editing
Editing with lightweight copies (like sketching with pencil before oil paints!).
- Real-Life Example: "Smooth playback on slow laptops—final export still uses HD originals!"
Keyframe
A bookmark for animations (e.g., text sliding in).
- Real-Life Example: "Set one where text starts, another where it stops—software fills the movement!"
Resolution
Video sharpness (1080p = clear HD, 720p = retro DVD).
- Real-Life Example: "Choose 1080p—today’s standard for crisp phone/TV viewing!"
Frame Rate
Motion smoothness (24fps = film dreamy, 60fps = game-like fluid).
- Real-Life Example: "Stick to 24fps or 30fps—perfect for most videos!"
Chroma Key
Green screen magic—replace backgrounds (float in space!).
- Real-Life Example: "Film yourself against green cloth → swap in a galaxy!"
Why These Matter to You
- No overwhelm: Start with timeline + trimming + cuts—that’s 80% of editing!
- B-Roll is your superpower: 10 seconds of B-roll hides 10 awkward cuts.
- Proxy editing saves sanity: Laggy playback? Enable proxies → breathe easier.
"When I began, I only knew ‘timeline’ and ‘export’—and that was enough! Your first video doesn’t need fancy terms. Just tell your story."
Your Cheat Sheet for Day 1
- Timeline = Your story’s home.
- Trim/Split = Cut clutter.
- B-Roll = Visual seasoning.
- Export = Share your creation!
- Cut = Your go-to transition.
Keep this table handy while editing—soon, these terms will feel like second nature!
Remember: Great editors aren’t walking dictionaries. They’re storytellers who know which tools serve their vision. You’ve got this!
What are some quick and easy workflow tips for a Beginner Video Editor?
Start organized: Create folders for footage, music, and exports.
Next, build a rough cut first -- just sequence clips and trim obvious dead space before fine-tuning.
Finally, address audio early; lower background music to prioritize clear voice levels.
Clean audio fixes more problems than flashy effects.
Short answer: Work smarter, not harder! These gentle habits will save you time, reduce overwhelm, and let your creativity shine:
 Free editing software for beginners: Quick and easy workflow tips
Your Stress-Free Editing Flow
1. Prep Your "Creative Kitchen" First
Before opening software:
- Create a project folder named "My_Video_Project"
- Make subfolders:Raw FootageMusic & SFXExports
Why? Future-you will find everything instantly!
2. Start with a "Rough Cut" (Embrace Imperfection!)
Drag clips to your timeline in story order (Intro → Middle → End).
Trim only dead air for now—don’t polish yet!
"Your first cut is like sketching with pencil—details come later!"
3. Fix Audio Early
Lower background music to 30% volume (so voices stand out).
Add subtle "room tone" (silent audio) under dialogue gaps.
Why? Viewers forgive imperfect video, but never bad audio.
4. Keyboard Shortcuts = Your Secret Superpower
Key: J
Action: Rewind playback
Saves You From: Dragging the playhead
Key: K
Action: Pause
Saves You From: Hunting for pause button
Key: L
Action: Fast-forward
Saves You From: Waiting for real-time playback
Efficiency Boosters (5 Min or Less!)
Use Templates Wisely
Apply pre-made intro/outro templates (in CapCut/Canva), then customize colors/text.
Saves 15+ minutes per project!
Simplify Your Timeline
Limit yourself to 4 tracks max for now:
- Main Video
- B-Roll
- Dialogue/Music
- Sound Effects
Less clutter = fewer mistakes.
Export Test Clips
Before final export: Render a 10-second segment to check:
- Audio sync
- Quality
- Forgotten watermarks!
The Golden Rule: Protect Your Creative Joy
"Fancy effects won’t move hearts—your story will. If a transition doesn’t add meaning (like a fade for time passing), use a simple cut. Your viewers will thank you!"
When You Feel... Overwhelmed
Try This: Edit just 1 minute daily
When You Feel... Stuck on perfection
Try This: Share your rough cut with a friend
When You Feel... Lost in features
Try This: Watch one 5-min tutorial
Beginner-Proven Workflow Checklist
- Organize files before starting
- Rough cut first (sequence clips only)
- Adjust audio levels (voice > music!)
- Add B-roll to hide jump cuts
- Export test clip (10 seconds)
- Render final as MP4 (1080p)
"Remember: Every pro editor started with these same steps. Be patient with yourself—creativity grows like a garden, not a wildfire."
FAQs: Free Video Editing Software for Beginners
What is the easiest free video editing software for beginners?
What is the easiest free video editing software for beginners?
For absolute ease and the gentlest learning curve, CapCut is widely regarded as the easiest free video editor for beginners. It’s intuitive, especially on mobile, where even non-techy users can pick it up quickly without manuals.
Other easy-to-use options include VN Video Editor (mobile), Canva (browser-based), and OpenShot (desktop).
What is the best free video editing software for beginners with no watermark?
What is the best free video editing software for beginners with no watermark?
DaVinci Resolve stands out as the best free video editor with no watermark. It offers professional-grade features for free, including advanced color grading and effects, which normally cost a lot in paid software.
OpenShot is a good no-watermark alternative if DaVinci Resolve feels overwhelming at first.
Note, CapCut mobile is free without watermark, but its desktop version now adds a watermark.
Can I really create professional-looking videos with free software?
Can I really create professional-looking videos with free software?
Absolutely! The gap between free and paid software is small now.
With tools like DaVinci Resolve, which Hollywood professionals use for color grading and editing, beginners can craft professional-quality videos.
With practice, a good story, and creative eye, free video editors can deliver highly polished projects without any subscription fees.
Can my older or slower computer still run free editing software?
Can my older or slower computer still run free editing software?
Yes! Even older computers can often handle basic video editing using free software.
Techniques like creating proxy files and lowering playback resolution can significantly boost performance.
However, for a smoother experience – especially if you mainly produce 1080p videos (which is perfectly sufficient for most needs) – consider upgrading if your budget allows.
Aim for a desktop or laptop that slightly exceeds your editing software's minimum requirements.
What free editing software do YouTubers use (that is beginner-friendly)?
What free editing software do YouTubers use (that is beginner-friendly)?
Many YouTubers start or stick with DaVinci Resolve for its advanced but free tools, especially for color grading and effects.
For quick, trendy shorts and vlogs, CapCut is popular due to its speed and social media-friendly features.
Others use OpenShot, Clipchamp, or Canva for simplicity and template support.
As channels grow, some may transition to paid options, but these free editors remain powerful starting points.
Is CapCut good for editing (for beginners)?
Is CapCut good for editing (for beginners)?
Yes, CapCut is excellent for beginners, especially mobile users and social media creators. It has an intuitive interface, auto-captioning, many effects, and fits vertical video formats like TikTok perfectly.
Just be aware that the free desktop version now includes a watermark on exported videos, so stick to mobile CapCut if you want watermark-free editing for free.
Conclusion: Free Video Editing Software for Beginners
You’ve just unlocked a beautiful truth: powerful video editing isn’t about expensive software—it’s about your vision, your voice, and your courage to begin.
Whether you choose:
- CapCut for quick social stories on your phone,
- DaVinci Resolve to grow skills that rival Hollywood editors,
- Kdenlive to breathe life into an older laptop,
...or any of the truly free tools we’ve shared, remember this:
Your creativity is the only "pro feature" that matters.
3 Gentle Reminders as You Begin:
- Start small, but start: Your first edit won’t be perfect—it will be yours. That’s a triumph.
- Tools serve you: If software feels overwhelming, switch. Your joy matters more than features.
- Community over competition: Share your work, ask questions, and remember—every editor was once where you are now.
"Great videos aren’t made by fancy gear. They’re made by humans who dare to say, ‘This matters—let me show you.’"
Your Next Step (Tonight!):
- Pick one software from our Top Picks.
- Download it (official links provided!).
- Open it, breathe, and drag in one clip.
That’s it. You’re now a video editor.
Which software will you download tonight to turn your next idea into reality?
You might like these
Editing Videos: Overcome Confusion, Complete Your Project
Struggling with editing videos? Find clarity by seeing the big picture first. Learn the key strategies to move from raw footage to your final cut.
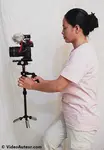
DIY Camera Stabilizer: Repurpose, Don't Rebuild
Learn how to create a DIY camera stabilizer using gear you already own -- camera strap, tripod, monopod and more. Achieve steady video without buying anything.
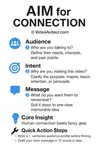
How to Start Video Production for Beginners Step by Step
How to start video production for beginners step by step guide. Focus on purpose, audience, and message. Skip the overwhelm. Create videos that truly connect.


Alvin Motilla is the creator of VideoAuteur.com, where he helps everyday people make videos that truly connect with audiences. With over 20 years of experience spanning scriptwriting, documentaries, corporate, and freelance video production, he champions the human side of creation over gear obsession. A graduate of AB Mass Communication, he believes that showing up with heart matters more than owning expensive equipment. Off-screen, Alvin enjoys biking with his wife and daughter, staying active, and studying Scripture.

Join the
Video Auteur Club
Get tips, step-by-step guidance, and gear guides that make video production simple.
What's New
-
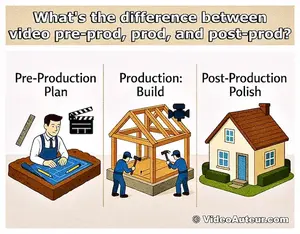
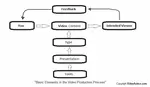
What is the Difference: Pre-Production, Production, Post-Production
 Confused by film terms? We explain what is the difference between pre-production, production, and post-production using a simple house-building analogy.
 -
What Type of Camera Should I Get as a Beginner?
 What type of camera should I get as a beginner? Learn which mirrorless cameras, features, and budget kits work best for video creators starting their journey.
 -
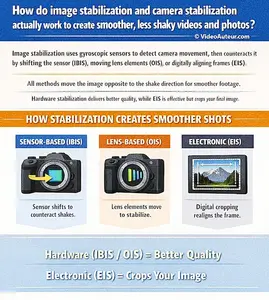
How Does Image Stabilization Work? 4 Key Techniques
 How Does Image Stabilization Work? Learn 4 techniques -- OIS, IBIS, external devices & software -- to create smoother, shake-free videos and photos.