- Video Production
- Video Making Tips for Beginners
- What is digital video production
- How do I record high-quality sound
No Gear? How do I record high-quality sound if I do not have a professional mic
Use what you have: a phone or cheap lavalier.
Get the mic about 7 inches from your mouth, angle it 45 degrees, record in a quiet room, put devices in airplane mode, and soften hard surfaces.
Clap to sync audio later.
Clean capture beats expensive gear.
Key Takeaways - How do I record high-quality sound if I do not have a professional mic?
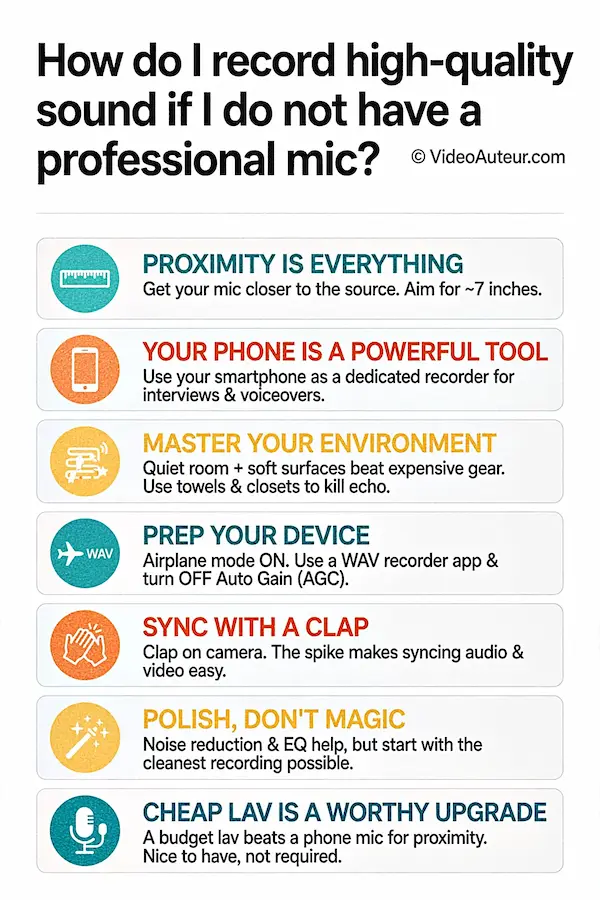
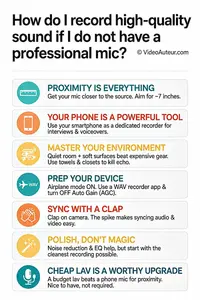
- Proximity is everything: The single most effective way to improve audio quality is to get your microphone closer to the sound source (aim for about 7 inches).
- Your phone is a powerful tool: You can use your smartphone as a dedicated audio recorder for interviews, voiceovers, and solo videos, often yielding better results than a camera's built-in mic.
- Master your recording environment: A quiet room and soft surfaces are more important than expensive gear. Use timing, towels, and closets to absorb echo and silence background noise.
- Prep your device for a perfect take: Always put your recording device in airplane mode to prevent notifications from ruining a take. For more control, use an app that records in WAV format and lets you disable Automatic Gain Control (AGC).
- Sync with a clap: The simple hand clap technique creates a clear visual and audio spike, making it easy to sync your external audio with your video footage in post-production.
- Polish, don't magic: Editing tools like noise reduction, EQ, and normalization can clean up and improve your audio, but they can't fix a bad original recording. Start with the cleanest capture possible.
- A cheap lavalier is a worthy upgrade: A budget lavalier mic beats a smartphone mic because it guarantees proximity. However, it's a convenience, not a requirement to get started.
--
Can I use my phone as a dedicated microphone?
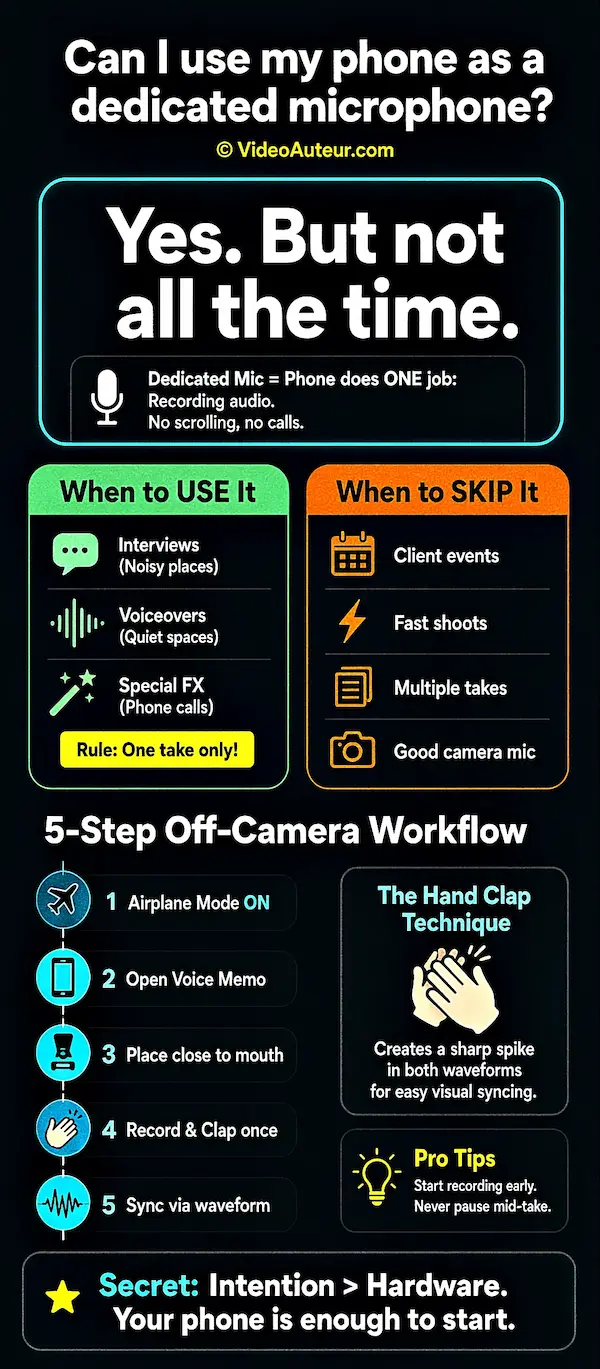
Short answer: Yes. But not all the time.
I use my phone as a dedicated microphone in some situations, and I avoid it in others. The real secret isn’t the phone. It’s how you use it.
When I say “dedicated microphone,” I mean the phone is doing one job: recording audio. You’re not scrolling, taking calls, or using it as your camera. It’s just a voice recorder.
Here’s the gentle truth:
- You can use your phone as a dedicated microphone.
- It works best for interviews, voiceovers, and a few special effects.
- It’s less ideal for fast event shoots with lots of takes.
- The phone matters less than how close it is to your mouth and how quiet your space is.
Two kinds of videos I make
In my own video work, I’ve noticed I make two kinds of videos. The difference changes how I use my phone.
- Event-driven videos: These are shoots for clients, events, interviews on location, and moments I don’t fully control. Clients often expect me to shoot with my video camera and perhaps an external microphone. So, I usually don’t use a phone as a dedicated microphone here.
- Concept-driven videos: These are videos based on what I want to create. I have more control over the setting, the timing, and the sound. So I use my phone as a dedicated microphone more often here.
Learn more about these kinds of videos in this article about...
When I don’t use my phone as a dedicated microphone
I usually skip the phone-as-mic setup when:
- I’m filming an event for a client.
- I need to move quickly and can’t manage a second device.
- I’m recording many takes that would be a nightmare to sync later.
- The camera’s built-in mic is already good enough for the moment.
For events, a phone can feel like extra work. And if I have too many shots and too many separate recordings to sync, editing stops being calm and starts feeling heavy.
When I do use my phone as a dedicated microphone
There are a few situations where my phone becomes a lovely little audio recorder.
- Interviews in noisy places: I use the video camera to shoot the person being interviewed. Then I use my phone, with the internet turned off, as a dedicated microphone. Sometimes it serves as the interviewer’s microphone.
- Voiceovers: This is probably the easiest way to start. I go to a quiet place and use my phone as a dedicated recorder for my voice. Later, I bring that audio into my video editing software.
- Special effects: For example, a phone conversation where the sound should really feel like it’s coming from a phone. That’s a different story, but the phone is perfect for it.
When I use my phone for interviews, I usually keep it to one take only. One interview take, one phone recording. That’s it. Why? Because too many shots and too many recordings make syncing a nightmare in post. One clean take keeps things simple.
How to use a second phone as an off-camera recorder
If you’re filming on a camera -- even a consumer DSLR or mirrorless -- you can use a second smartphone as a dedicated off-camera voice recorder.
That second device could be:
- an old phone you keep in a drawer,
- a tablet,
- or even an old MP3 player with a mic.
Here’s the simple workflow:
- Put the second device in airplane mode so there are no calls, notifications, or interference.
- Open its voice memo or voice recorder app.
- Place it close to your mouth -- not three feet away on a tripod.
- Start the camera rolling.
- Start the phone recorder rolling.
- Clap once firmly in front of the lens.
- Sync the audio to your footage using the waveform in your editing software.
Because that second microphone is near your face instead of far away, it hears you over the room. This is exactly what professionals mean when they talk about separate audio: record on a second device, then sync it to your footage.
The hand clap technique
“But won’t syncing be complicated?”
It isn’t. Use the hand clap technique.
- Once the camera is rolling and the recorder is rolling, reach into frame.
- Clap firmly once, right in front of the lens.
- That clap creates a sharp, unmistakable spike in both waveforms.
- Then you slide the audio clip until the two spikes line up.
Most editors can even auto-sync by waveform now -- I do it on DaVinci Resolve, by the way -- but the clap gives you a visual anchor. It also keeps you calm when the software misbehaves.
One small tip pros rarely mention:
- Start both recordings a few seconds before you speak.
- Never pause either device mid-take.
So, can you use your phone as a dedicated microphone?
Yes. But not all the time.
I usually reserve it for interviews, voiceovers, and occasional special effects. And honestly, the secret is how you use it -- not the hardware.
You don’t need a professional mic to begin. You need a little intention, a quiet space, and a simple way to sync. Your phone can be a dedicated microphone -- sometimes. And sometimes is more than enough to start making better-sounding videos.
What is the single best tip to make home recordings sound clear without buying new gear?
If you remember only one thing, let it be this: get closer.
No plugin, no purchase, no subscription does anything close to that. It's like leaning in to talk to a friend in a busy cafe. Your voice doesn't get louder, but it stands out more against the noise.
I prefer about 7 inches away from the sound source or mouth. (I feel that 7 is a perfect number. There are 7 days in a week, right?)
But before we go further, let me walk you through how I actually do this at home. Because getting closer is the main tip, but there are a few gentle habits that make it work even better.
Start with a quiet moment, not a quiet room
The first thing I do is make sure I record in an area of my home where it is really quiet.
That day or time could be:
- Night time, when the world slows down.
- Before lunch, when neighbors are usually out or busy.
- Before sunset, when the day is winding down but not yet loud with evening activity.
It depends on your neighbors. Sometimes neighbors can be noisy. Their dogs can be noisy. So it's really about timing -- choosing the time of day when it tends to be really quiet. That's the first thing.
Then bring the mic close, but not too close
Next, whatever you use to record sound -- the built-in microphone of your phone, your camera's built-in mic, or an external microphone -- make sure the mic is close enough to the sound source.
Here's one thing I think many people get wrong. Yes, the advice to speak closer to the mic is sound. It's good.
But some people put the mic so close to their mouth that the recorded sound becomes distorted and not clear. They think the closer the mic to the mouth, the better the sound quality. That's not true.
It should not be so close, but it should not be so far. Perhaps about 7 inches away from the mouth, depending on the settings or mic sensitivity.
Angle matters too
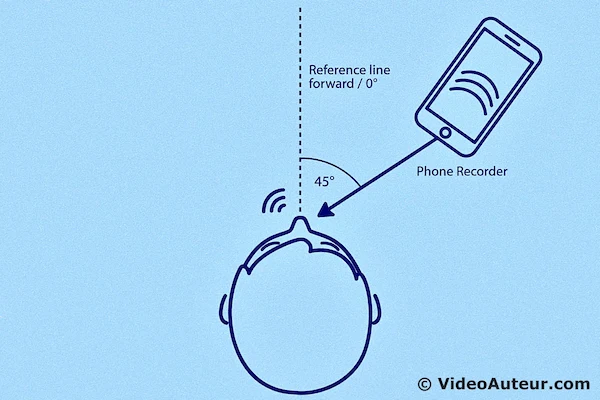
There's also the angle to consider. Sometimes people talk directly into the mic. I tend to angle the mic away from my mouth -- about 45 degrees instead of talking straight into it.
This helps because:
- It's not distorted.
- It's not too boomy.
- It's not harsh sounding.
The silent killer of DIY audio: vibration
Here's something others don't automatically talk about: vibration is the silent killer of DIY audio.
If your phone is sitting on a hard table, every tap, scrape, or keyboard click travels through the surface and into the microphone capsule. You might not hear it in the moment, but it shows up in your recording.
The fix is simple:
- Place your recording device on a soft surface.
- A folded towel works beautifully.
- Or a book covered with a towel.
The towel absorbs high-frequency vibrations. The mass of the book resists low-frequency ones. Together, they keep your recordings cleaner without you buying anything new.
The short version
If you remember only one thing from this section, let it be this:
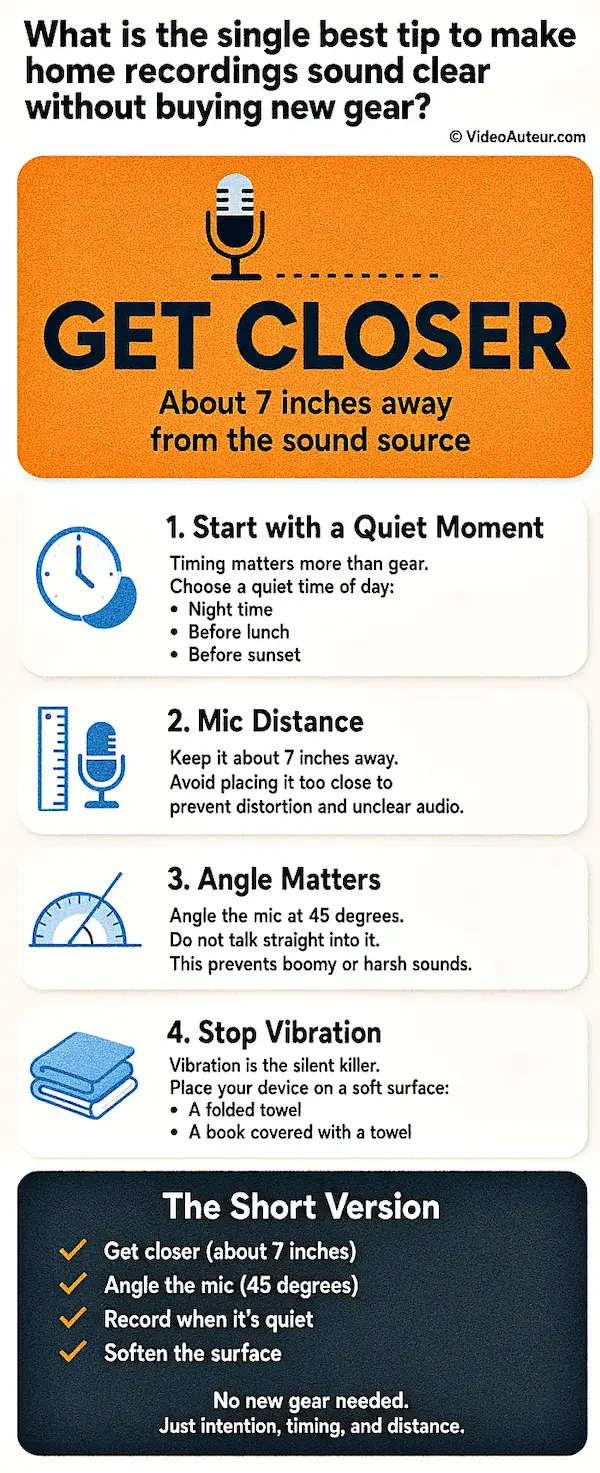
- Get closer -- about 7 inches from your mouth.
- Angle the mic -- about 45 degrees, not straight on.
- Record when it's quiet -- timing matters more than gear.
- Soften the surface -- a towel or a book with a towel stops vibration.
That's it. No new gear. Just a little intention, a little timing, and a little distance. Your recordings will already sound clearer.
How do you record audio for a zero-budget short film or solo video?
You use whatever you have. And you borrow what you don’t.
That’s the honest answer. I tend to use an old mini shotgun mic, my phone and its voice recorder, and sometimes a wireless mic. But not everyone has those.
The principle still works: use what’s under your power. For a zero-budget short film or solo video, the goal is simple -- get clean, close audio, keep it out of frame when needed, and sync it with a clap.
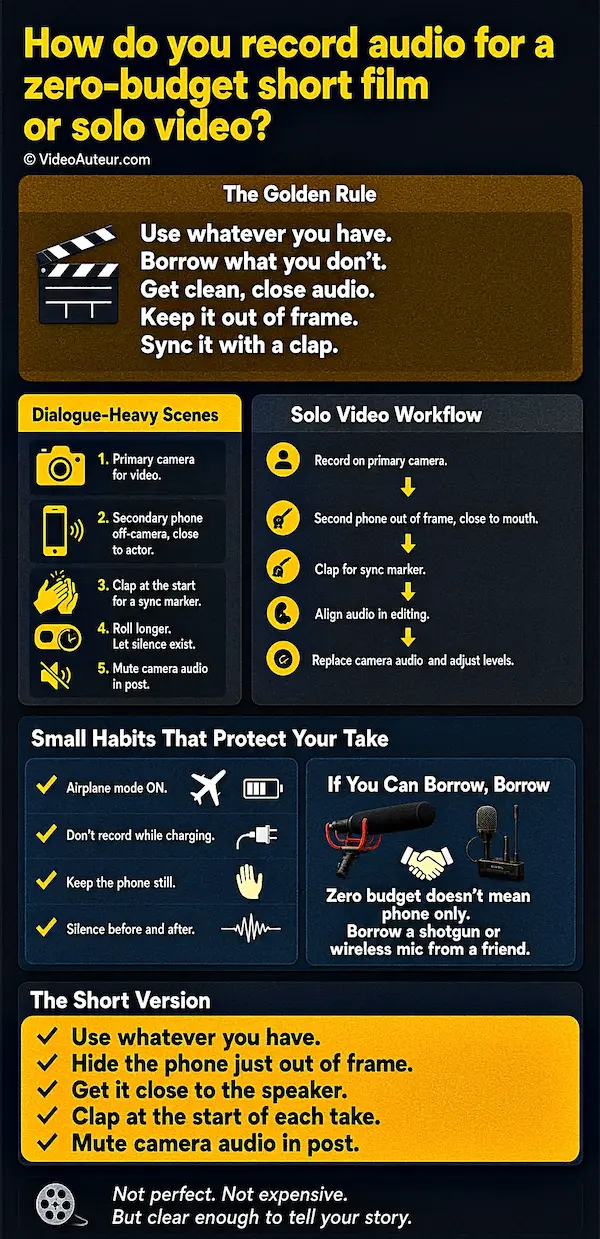
For dialogue-heavy scenes
Short films tend to have many shots. Each shot has its own recording, so each one needs its own audio and its own sync marker.
For narrative scenes, keep the mic out of the frame. It’s not a documentary, an interview, or an event. So if I use a phone to record audio, it’s hidden -- but still close enough to the person delivering the dialogue.
Here’s the workflow I use:
- Use your primary camera for video.
- Use a secondary phone running a voice recorder app for audio, placed just off-camera and close to the actor.
- Clap at the start of each take so you have a clear sync marker in editing.
- Roll longer than you think you need -- let silence exist at the head and tail of every take.
- In post, mute the camera’s internal audio and use the external phone track instead.
That clap is your friend. It gives you a sharp spike in both the video and the audio, so you can line them up without guessing.
A simple workflow for solo videos
If you’re making a solo video -- like presenting on camera -- the same idea works, just simpler.
- Record your video on your primary camera or phone.
- Place a second phone running a voice memo app just out of frame, as close to your mouth as possible without being visible.
- Clap at the start of each take to create a sync marker.
- In editing, align the audio from the secondary phone with your video.
- Replace the camera audio with your clean phone audio, then adjust the levels.
That’s it. It feels a little awkward at first, but it becomes second nature.
Small habits that protect your take
These are basic, but I’ve seen them save recordings again and again.
- Keep the recording phone in airplane mode. One incoming notification can ruin a perfect take or corrupt a file.
- Make sure the phone is fully charged before any recording or shooting session.
- If you can avoid it, don’t record while the phone is charging.
- Let the phone sit still. Vibration and handling noise travel into the mic.
- Give yourself a few seconds of silence before and after each take.
If you can borrow, borrow
You may not have your own shotgun mic or wireless microphone. But you can always borrow from a friend who has those audio tools.
Zero budget doesn’t mean you have to rely only on your phone. It means you stay resourceful.
The short version
- Use whatever you have.
- Hide the phone just out of frame.
- Get it close to the person speaking.
- Clap at the start of each take.
- Mute the camera audio in post and use the cleaner phone track.
That’s how I record audio for zero-budget short films and solo videos. Not perfect. Not expensive. But clear enough to tell your story -- and that’s what matters.
How on earth do you get clear audio when recording inside an untreated room?
Short answer: you soften the room and silence the noise -- with things you already have.
You don’t need acoustic foam or a professional studio. You need to stop sound from bouncing off hard surfaces, and you need to stop background hums from sneaking into your mic. I do this in my own home, and it works.
Let me walk you through it.
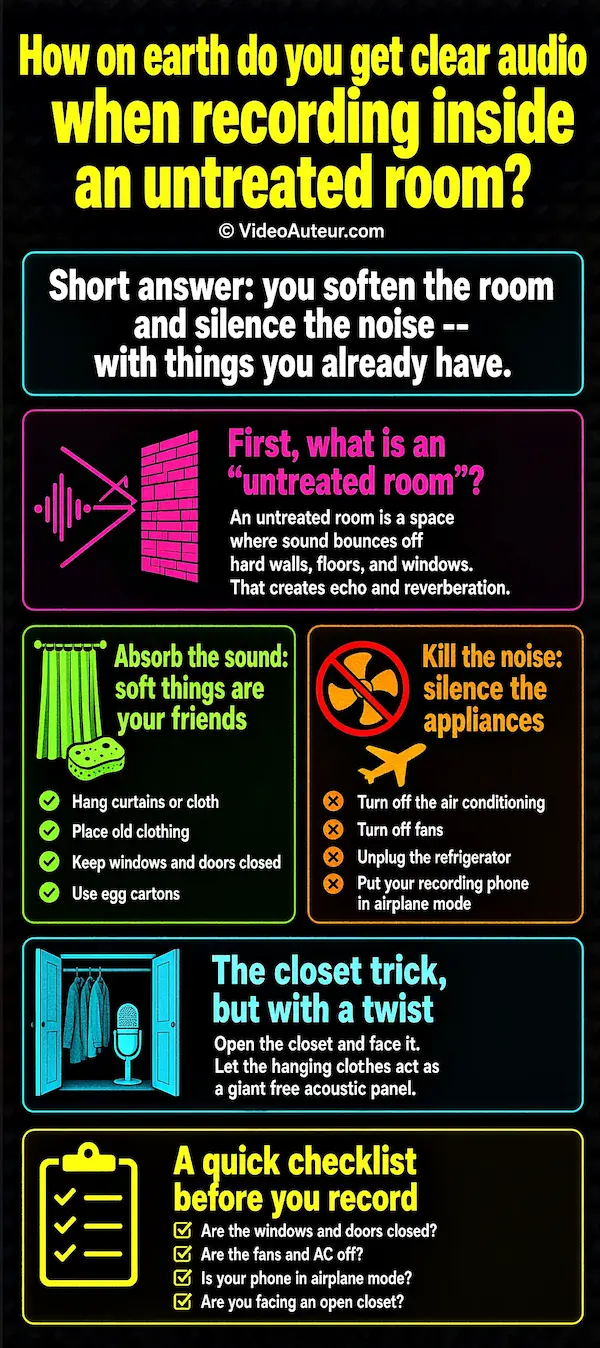
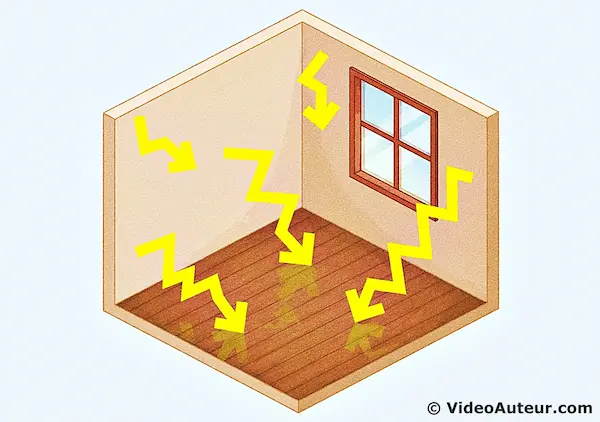
First, what is an “untreated room”?
An untreated room is a space where sound bounces off hard walls, floors, and windows. When you speak, your voice hits those surfaces and reflects back at slightly different times. That creates echo and reverberation -- a hollow, echoey sound that no editing software can fully fix.
I remember when our small house was newly built and had no furniture yet. Every word I spoke echoed. The walls were bare, the floor was hard, and my voice just bounced around. It wasn’t pleasant to listen to, and it definitely wasn’t pleasant to record.
So how do you fix it? You absorb the sound and remove the noise.
Absorb the sound: soft things are your friends
When sound hits cloth, it’s like water dropping onto a sponge. The sponge absorbs the water. Cloth absorbs sound the same way. It minimizes echo and reverb.
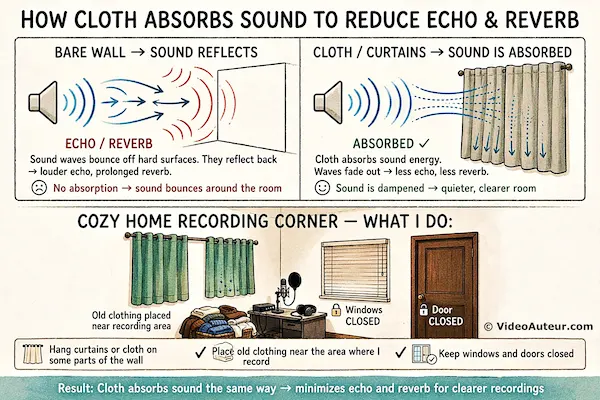
Here’s what I do:
- Hang curtains or cloth on some parts of the wall.
- Place old clothing near the area where I record.
- Keep windows and doors closed.
- Use egg cartons (the paper kind) on the wall if you want a more permanent setup. I’ve seen people use them for music studios -- they work as insulation and absorb sound.
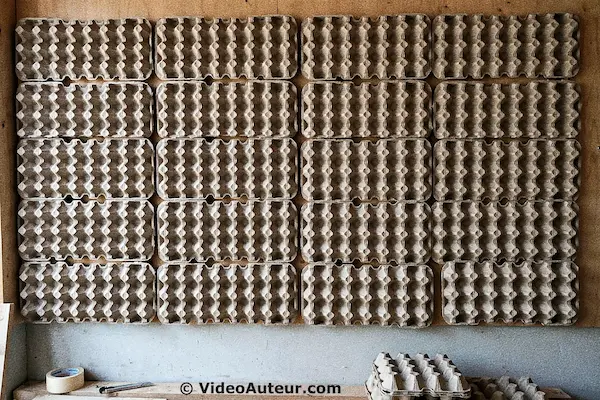
You don’t need to cover every inch. Even a few soft surfaces will make a noticeable difference.
Kill the noise: silence the appliances
This is common sense, but it’s easy to forget. Your mic will pick up frequencies you don’t even notice in the moment.
Before you hit record:
- Turn off the air conditioning or heating.
- Turn off fans.
- Unplug the refrigerator if it hums loudly. (Just for the duration of your recording.)
- Move away from your computer’s cooling fans.
- Turn off phones you’re not using for recording.
- Put your recording phone in airplane mode and turn off Wi-Fi. For goodness’ sake, do this.
These constant low-level noises are the hardest for editing software to remove without making your voice sound robotic. Better to keep them out from the start.
The closet trick, but with a twist
Many people say, “Record in a closet full of clothes.” That’s good advice because clothes are natural absorbers.
But here’s the nuance they miss: recording inside a closed closet creates a very isolated, boxy, almost suffocating sound.
Instead, open the closet and face it. Let the hanging clothes act as a giant free acoustic panel right behind and beside you. You get the same absorption, but none of the boxiness.
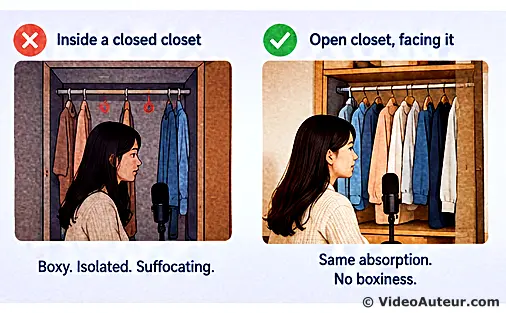
I’ve tried this, and it’s one of my favorite low-effort tricks.
A quick checklist before you record
- Are the windows and doors closed?
- Are the fans and AC off?
- Is the refrigerator unplugged or far away?
- Is your phone in airplane mode?
- Have you added cloth, curtains, or clothing to soften the walls?
- Are you facing an open closet or a soft surface?
If you can check most of these, your untreated room will start sounding a lot more treatable. No new gear. Just a little attention and a few soft things.
How can I make audio recorded on a cheap mic sound like it was made in a studio?
The honest truth: you can't truly make a cheap mic sound exactly like a studio mic. But you can get surprisingly close with editing. And the best results come from capturing clean audio first.
In my experience, the way I enhance sound recorded on a cheap mic is during post-production. I edit in DaVinci Resolve, and I use a few simple tools to clean up the voice and make it sound clearer, warmer, and more even.
It doesn’t matter what video I’m editing -- event video, ASMR, documentary, school project, or anything else. The same principle applies. And it also works for microphones that aren’t considered cheap.
Let me walk you through what I do.
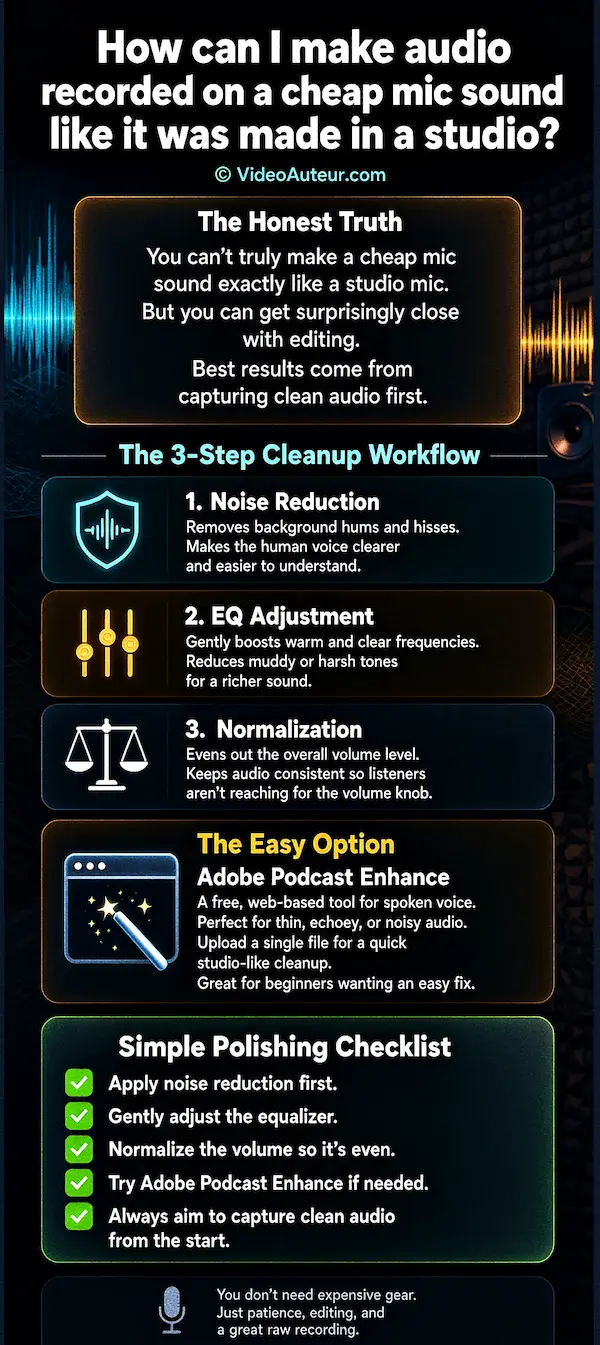
First, remember this: editing polishes, but it can’t add detail
Editing can remove noise, balance levels, and smooth out harshness. But it can’t magically create detail the mic never captured.
If your raw audio is thin, echoey, or full of background noise, editing will help -- but it won’t perform miracles.
So, the best thing you can do is still capture the cleanest audio you can from the start. That saves you headaches later.
The basic cleanup workflow I use
Here’s what I do in my editing software:
1. Noise reduction -- I use the noise reduction feature, especially for voice. There’s usually an automatic setting that removes background hums and hisses. It makes the human voice clearer and easier to understand.
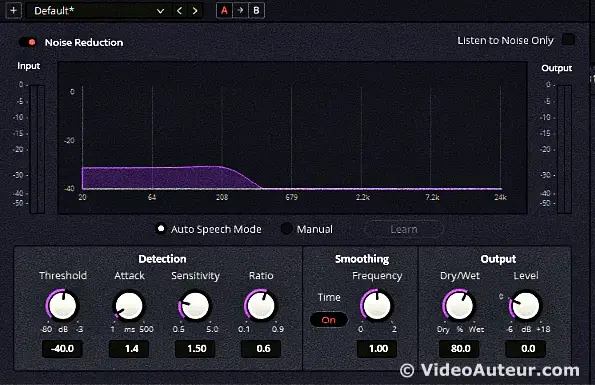
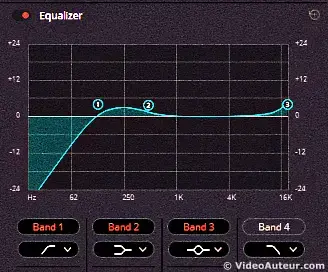
2. Equalizer (EQ) adjustment -- I adjust the EQ a little. This means gently boosting the frequencies that make the voice warm and clear, and reducing the ones that make it muddy or harsh.
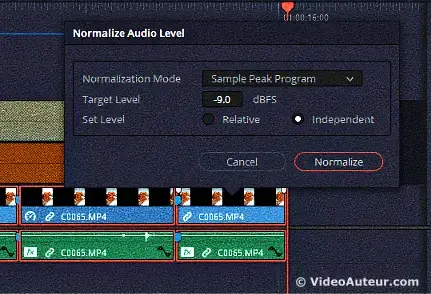
3. Normalization -- I normalize the sound so it’s even and level with other audio sources. This keeps the volume consistent, so listeners aren’t reaching for the volume knob.
That’s basically it. The exact steps depend on your editing software, but most programs have these tools built in.
If you want an easier option: Adobe Podcast Enhance
Sometimes, if I have an audio file that really needs cleaning up and there’s no other way, I use Adobe Podcast Enhance. It’s a free, web-based tool designed specifically for spoken voice. It’s especially helpful when your raw audio is thin, echoey, or noisy -- common issues with built-in mics.
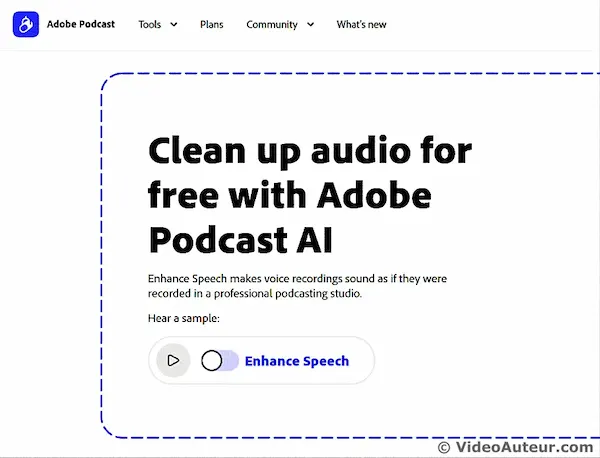
Here’s how I use it:
- I upload a single audio file.
- The file should be long enough so the enhancement applies properly.
- It cleans up the voice and makes it sound more studio-like.
There’s a free version, but it’s limited. If you’re serious about podcasting, you might want the paid version. For me, I seldom use it because I prefer editing in my software. But for beginners who want an easy way, it’s a lovely option.
My honest preference: manual control
I still prefer manual control. I like capturing great, clean audio from the very start -- close to the mic, in a quiet room, with the phone in airplane mode -- so I don’t have to rely heavily on editing. That’s the calmest way to work.
But if you’ve already recorded something and it’s a little rough, don’t panic. You can still improve it.
A simple checklist for polishing cheap mic audio
- Apply noise reduction first.
- Gently adjust the equalizer -- don’t overdo it.
- Normalize the volume so it’s even.
- If needed, try Adobe Podcast Enhance for a quick cleanup.
- Always aim to capture clean audio from the start.
You don’t need expensive gear to get audio that sounds clear and pleasant. You need a little patience, a little editing, and the willingness to start with the best raw recording you can.
That’s how I make cheap mic audio sound closer to studio quality — and you can too.
How do I get the cleanest audio settings directly on an iPhone or Android?
The cleanest audio settings come down to three simple things: turn off the internet, use the best quality your phone already offers, and if you want more control, use an app that records uncompressed WAV and lets you disable automatic gain.
I keep it as easy as possible. I don’t overcomplicate it. And most of the time, the built-in settings are enough -- as long as you remove the things that ruin a recording.
Let me walk you through what I do.
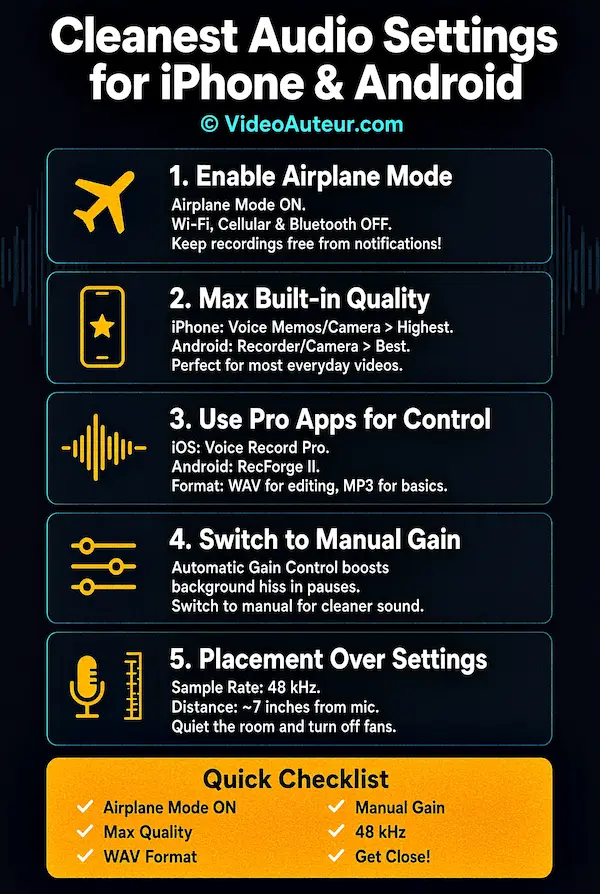
First, turn off the internet. Always.
This is the setting I see people ignore the most. And it breaks my heart a little every time.
- Turn off Wi-Fi.
- Turn off cellular data.
- Turn on Airplane mode.
- Turn off Bluetooth if you’re not using a wireless mic.
Why? Because notifications will ruin your sound recording. A single ping, a buzz, a vibration -- it all gets captured.
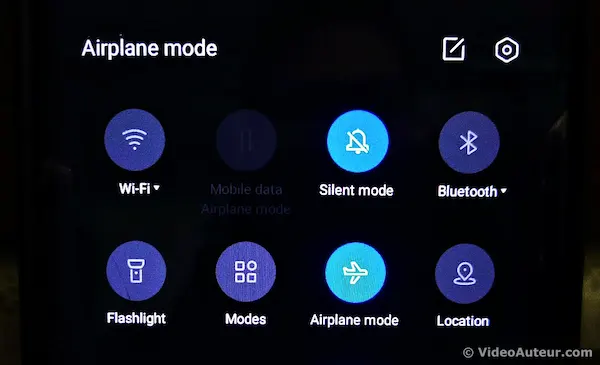
I see so many people record videos and audio on their phones without turning off the internet, and then the notifications are right there in the recording. What the heck, right?
So before you record anything: airplane mode. It’s free. It takes two seconds. And it saves your take.
Use your phone’s best built-in quality
Depending on your phone, go into the settings and choose the best quality available. For casual everyday recordings, the built-in options are usually enough. You typically don't need to download anything extra.
-
On iPhone (voice): Check Settings --> Voice Memos --> Audio Quality and choose Lossless for the highest quality (larger files) or Compressed for smaller files.
- On Android: Settings vary by brand. Some recording and camera apps let you adjust quality; others only provide default quality. Check your specific app's settings.
For most everyday voice notes and casual videos, the built-in settings are fine. I record voice and sound on my smartphone with the best built-in setting, and it works well.
If you want more control: use a recording app
Sometimes, if I really want to edit heavily in post-production, I’ll download an app that records uncompressed audio. That gives me more room to clean things up later.
Here are two I’ve used or recommend:
- For iOS: Voice Record Pro is a good option. It gives you more control over format and quality.
- For Android: RecForge II lets you disable AGC, set manual gain, and record in uncompressed WAV at sample rates up to 48 kHz.
If you’re just starting, MP3 is usually enough. But if you want the cleanest possible file for editing, uncompressed WAV is the way to go.
Why automatic gain control (AGC) is not your friend
This is a small setting that makes a big difference.
- Automatic gain control (AGC) automatically adjusts the input level to keep the output constant.
- That sounds helpful, but it actually boosts background hiss during pauses.
- It makes quiet background noise louder during silences.
So if you can disable AGC, do it. On Android, RecForge II lets you turn it off and set manual gain. That alone can make your recordings cleaner.
A quick word on sample rates
If you’re recording WAV, I typically choose a sample rate of 48 kHz. It’s recommended for high-quality voice recording.
But honestly? Mic placement will help far more than a format switch.
The truth: placement beats settings
I can give you all the settings in the world, but if your mic is far from your mouth and the room is noisy, the settings won’t save you.
- Get close to the mic -- about 7 inches.
- Quiet the room -- turn off fans, AC, and notifications.
- Use airplane mode.
- Then choose the best quality setting your phone offers.
That costs nothing. And it works better than any app or format.
The short version
- Airplane mode on. Always.
- Best built-in quality your phone offers.
- Uncompressed WAV if you need heavy editing (Voice Record Pro for iOS, RecForge II for Android).
- Disable AGC so background hiss doesn’t get boosted.
- 48 kHz sample rate for high-quality voice.
- Get close and quiet the room -- this matters more than any setting.
You don’t need a professional mic to get clean audio on your phone. You just need to remove the distractions, choose the best setting you already have, and remember that where you place the mic matters most.
Is a $15 budget lavalier microphone actually better than a smartphone mic?
Here's my direct answer: yes. A lavalier mic is almost always better than a smartphone mic. And it doesn't matter whether it costs $15 or $150.
Why? Because you can put that lavalier mic close to the sound source. And closeness, as I keep saying, is the whole game.
It doesn't matter if the sound source is the person talking, or a speaker far away from your video camera. A lavalier lets you place the mic near the sound instead of far away on a tripod. That alone changes everything.
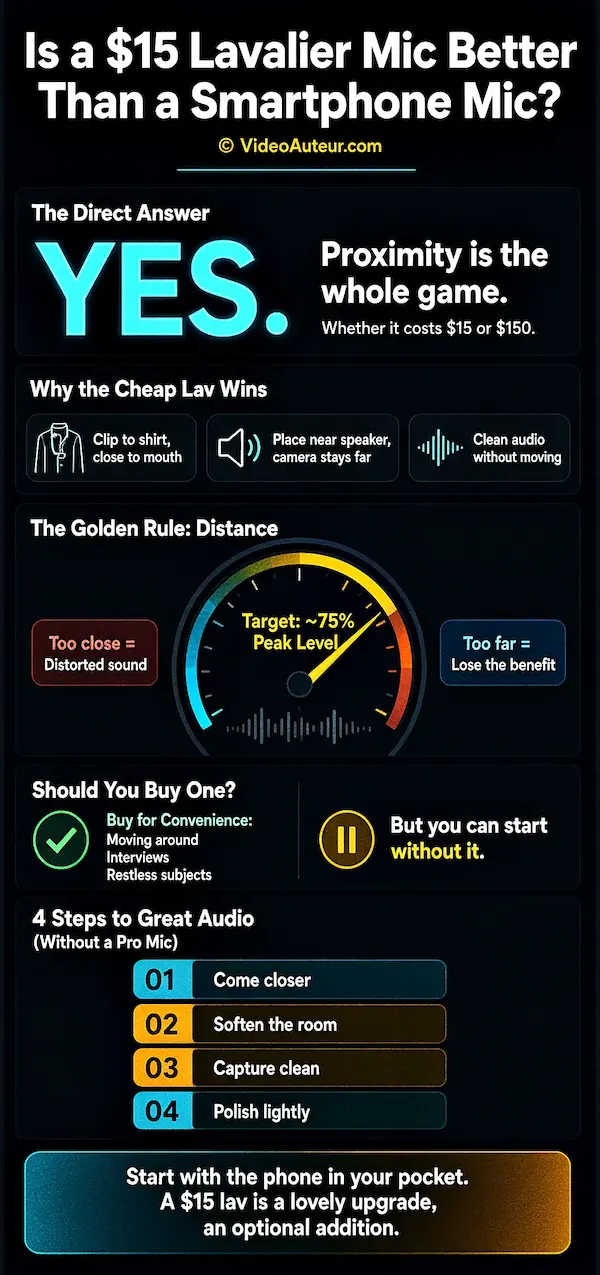
Why the cheap lav still wins
The magic of a lavalier isn't in its price tag. It's in its proximity.
- You clip it to a shirt, close to the mouth.
- You place it near the speaker, even when the camera is far away.
- You get clean, close audio without moving the camera.
I tend to use a wireless lavalier mic, or those tiny microphones you can put near the sound source. The brand doesn't matter as much as the placement.
But here's what I actually watch for
A lavalier is not a magic wand. It's a tool. And the only thing I really watch for is distance.
- If the mic is too close to a loud source, like a loudspeaker, you'll get distorted sound.
- If it's too far, you lose the benefit entirely.
So before recording, I check the sound levels on my camera. If it's hitting a maximum of about 75% peak level, that's fine with me. Not peaking, not clipping, not distorted -- just clean and present.
So should you buy one?
Yes, you can buy a $15 to $60 lavalier for convenience and guaranteed proximity. It's especially helpful when you're:
- On your feet, moving around.
- Filming interviews.
- Recording someone who won't stay still.
But please hear this: you do not need it to start.
The answer to "how do I record high-quality sound if I do not have a professional mic" has never been "buy something." It's always been:
- Come closer.
- Soften the room.
- Capture clean.
- Polish lightly.
Get it?
The short version
- A cheap lavalier beats a smartphone mic because you can place it close.
- Price doesn't matter nearly as much as proximity.
- Watch your levels -- around 75% peak is a good target.
- Buy one for convenience, not because you can't start without it.
- Proximity, a quiet room, and clean capture come first. Gear comes second.
You can begin today with the phone in your pocket. But if a $15 lavalier makes your life easier, it's a lovely little upgrade -- not a requirement.
FAQs - How do I record high-quality sound if I do not have a professional mic?
What can I use if I don't have a microphone at all?
What can I use if I don't have a microphone at all?
Use your smartphone’s built-in mic. Place them close to your mouth and record in a soft, quiet space.
How do YouTubers record video and audio with a separate mic?
How do YouTubers record video and audio with a separate mic?
Many use dual-system recording: video on one device, audio on another (phone, external recorder, or lav mic), then sync in post using a clap or waveform matching.
What’s the best way to record in a non-treated room with hard walls?
What’s the best way to record in a non-treated room with hard walls?
Put soft materials between you and the nearest hard surfaces, like heavy blankets and pillows, to absorb reflections. Move the mic closer, and pick the softest room you have.
Can you record audio without a computer and still have it sound good?
Can you record audio without a computer and still have it sound good?
Yes. A smartphone in Airplane Mode, running a high-quality recorder app, placed close to your mouth in a soft space, can produce excellent results.
How do small YouTubers get good sound without breaking the bank?
How do small YouTubers get good sound without breaking the bank?
By prioritizing proximity, room treatment, and dual-system recording, then using free tools to polish audio in post. For convenience, some add a budget lav.
How do I get clear audio so casually without a complicated setup?
How do I get clear audio so casually without a complicated setup?
Keep it simple: phone close to your mouth, soft room, quiet environment, and one-click AI cleanup if needed.
Conclusion
The journey to high-quality sound doesn't begin with a trip to the electronics store; it begins with a shift in mindset.
As we've seen, the secret isn't in the price tag of your gear, but in the intention behind your methods. It's about understanding that...
- a phone held close,
- a room quieted by soft furnishings, and
- a simple clap for sync
... can achieve a level of clarity that rivals far more expensive setups.
You don't need a professional mic to tell your story with great audio. You need a quiet space, a little patience, and the resourcefulness to use what you already have.
Clean audio is only one piece of the puzzle. For the full three-step process -- planning, shooting, and editing -- see...
So, the next time you're ready to record, remember that the power to create clean, professional-sounding audio is already in your hands.
What's the first technique you'll try to elevate your sound without spending a dime?
You might like these
What Are the Most Common Beginner Video Mistakes and How to Fix Them
Discover what are the most common beginner video mistakes and how to fix them. Learn zero-cost fixes: audio, lighting, editing. Elevate your content instantly.
How Does Image Stabilization Work? 4 Key Techniques
How Does Image Stabilization Work? Learn 4 techniques -- OIS, IBIS, external devices & software -- to create smoother, shake-free videos and photos.
What Are the Core Elements of Video Production Explained
What Are the Core Elements of Video Production explained. Discover why content and audience matter more than expensive equipment. Start here.


Alvin Motilla is the creator of VideoAuteur.com, where he helps everyday people make videos that truly connect with audiences. With over 20 years of experience spanning scriptwriting, documentaries, corporate, and freelance video production, he champions the human side of creation over gear obsession. A graduate of AB Mass Communication, he believes that showing up with heart matters more than owning expensive equipment. Off-screen, Alvin enjoys biking with his wife and daughter, staying active, and studying Scripture.

Get Your Free Cheat Sheet
The Most Common Video Mistakes (and How to Fix Them)

Sign up to download it instantly. You’ll also get tips, step-by-step guidance, and gear guides to make video creation simple.
What's New


-
How do I record high-quality sound if I do not have a professional mic
 How do I record high-quality sound if I do not have a professional mic? Discover simple, zero-budget techniques using your phone for studio-quality audio.
 -
What is B-roll and why does my video need it? A Guide
 Wondering what is B-roll and why does your video need it? This guide reveals simple tips to add visual variety, hide edits, and keep viewers watching longer.
 -
What is the Rule of Thirds in Digital Composition? Visual Guide
 What is the Rule of Thirds in digital composition? A visual guide to placing subjects on power points for better storytelling. Learn how to use the grid.


Get Your Free Cheat Sheet
The Most Common Video Mistakes (and How to Fix Them)

Sign up to download it instantly. You’ll also get tips, step-by-step guidance, and gear guides to make video creation simple.
Copyright © 2014- VideoAuteur.com All rights reserved
This website does not sell any personal information.
Get Your Free Cheat Sheet
The Most Common Video Mistakes (and How to Fix Them)
Sign up to download it instantly. You’ll also get tips, step-by-step guidance, and gear guides to make video creation simple.