- Video Production
- Video Making Tips for Beginners
- What is digital video production
- The most common beginner video mistakes
What Are the Most Common Beginner Video Mistakes and How to Fix Them?
Beginners often struggle with unclear audio, poor lighting, shaky footage, over-editing, and skipping a plan.
Fix audio by recording close in a quiet, soft space; light by facing a window; stabilize by tucking elbows; edit with simple cuts; and hook viewers in the first 5 seconds.
These zero-cost habits instantly elevate your videos.
Key Takeaways - What are the most common beginner video mistakes and how to fix them?
- Audio is your foundation. Record close to the mic (6–8 inches) in a soft-furnished room, keep your voice peaking between -6 and -12 dB, and always make your voice the loudest element in the mix.
- Light with what you have. Face your main light source, avoid mixing warm and cool bulbs, and use a white sheet or paper as a free reflector to fill shadows.
- Stabilize without a gimbal. Tuck your elbows into your ribs, plant your feet shoulder-width apart, and lean against a wall or stack of books to smooth out handheld shots.
- Edit with restraint. Use simple hard cuts 95% of the time, trim ruthlessly to eliminate anything that doesn’t add value, and change the visual stimulus every 5–10 seconds to maintain attention.
- Plan before you press record. Write a compelling 5-second hook, define exactly who you’re serving and what they’ll gain, and sketch a simple storyboard to save hours of re-shooting and frustration.
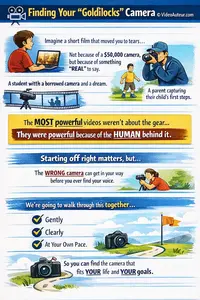
- Focus on workflow, not gear. Mastering the fundamentals with the equipment you already own will always outperform chasing expensive upgrades -- fix audio and planning first, and let your storytelling carry the production.
Imagine you’ve spent hours filming a project you’re excited about. The topic matters to you, the message is clear in your head, and you’re ready to hit publish.
But as you watch the playback, something feels off. The audio sounds tinny, the lighting looks flat, and your edits feel jarring.
You might wonder, "Did I do something wrong?"

The truth is, you’re not alone. Almost every creator starts exactly here. This isn’t a sign of a lack of talent; it’s simply part of the beautiful, sometimes humbling, journey of learning to create.
The good news? You don’t need a Hollywood budget to make your videos look polished.
In fact, the answer to what are the most common beginner video mistakes (and how to fix them) often lies in small, clever adjustments you can make right now with what you already have.
Let’s walk through these mistakes together, gently and without judgment. We’ll focus on practical, zero-cost fixes that prioritize your story over your gear, helping you find your confidence one frame at a time.
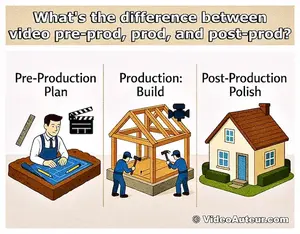
If you’re still wrapping your head around the entire creative journey, start with our foundational overview:
It breaks the process down into three simple, beginner-friendly stages.
Quick Summary Table of Common Beginner Video Mistakes and Fixes
| Category | Common Mistake | The Fix |
|---|---|---|
| Audio | Echoey rooms, mic too far, unbalanced levels | Record in furnished rooms, use blankets to dampen sound, keep mic 6–8" away, and set voice to -6 to -12 dB (music 20 dB lower). |
| Lighting | Backlighting, mixed color temps, harsh shadows | Face the light source, use daylight bulbs (5600K), and bounce light with white paper or sheets. |
| Camera | Shaky footage, wrong orientation, "growing" objects | Use your body as a tripod (elbows in), check orientation (horizontal vs. vertical), and clear background clutter. |
| Editing | Excessive jump cuts, flashy transitions, slow pacing | Leave natural pauses, use hard cuts 95% of the time, change visual stimulus every 5–10 seconds. |
| Color & Music | Inconsistent grading, mismatched mood | Correct white balance/exposure first before adding style; ensure music matches the emotional tone of the scene. |
| Pre-Production | No hook, ignoring the audience, skipping planning | Start with a bold hook in 5 seconds, define your "one" ideal viewer, and sketch a simple storyboard. |
| Workflow | Gear obsession, skipping analytics | Prioritize workflow over gear; study analytics to understand retention; fix audio before upgrading cameras. |
Why Do Beginner Videos Look Unprofessional?
Beginner videos often look unprofessional not from lack of talent or gear, but from fixable gaps in how you plan, record, and edit.
Common culprits are poor audio, bad lighting, and rushed pacing.
Your workflow -- not your camera -- is the real bottleneck.
Learning to address these fundamentals with simple, free adjustments is what truly elevates your work.
If your videos feel a bit rough around the edges, please know that this is completely normal and nothing to be ashamed of. It rarely happens because of a lack of talent.
Instead, it simply reflects that you are still in the early, learning stages of your creative journey.

When a video feels "off," it is usually due to three specific areas:
- how you plan,
- how you record, and
- how you edit.
Many beginners fall into the trap of believing that expensive gear is the magic fix, but gear without knowledge is just expensive noise.
In reality, the most common culprits are avoidable issues like poor audio, bad lighting, and rushed editing, not the camera itself.
You absolutely need a camera to make videos, but you do not need the most expensive one on the market.
It is easy to get caught up in "Gear Acquisition Syndrome" (GAS), thinking a shiny new lens will solve everything, yet your workflow is almost always the real bottleneck.
By learning the most common beginner video mistakes and how to fix them, you can address issues like composition or pacing with simple, free workarounds.
A Google/Neuro-Insight study found that the videos people loved triggered high scores in emotional intensity, personal relevance, and memory encoding.
This means:
-
If a video makes you feel something, you are more likely to remember it and the message it conveys.
- The Secret Sauce: Authenticity and relatability are more critical than flashy effects and expensive gear. Building trust is a long-term "marathon" that requires establishing a 1:1 connection.
At Video Auteur, we believe that your phone or entry-level camera, paired with a little know-how, can produce wonderful results.
Our goal is to help you become a mindful "video author" -- someone who communicates ideas deeply and sensitively using the essential resources you already have.
Let's focus on those immediate, caring fixes together.
What Are Common Video Recording Mistakes? (and How to Fix Them)
Beginners often struggle with echoey audio, dim or harsh lighting, and shaky footage.
Fix audio by recording in a soft-furnished room and keeping the mic close.
Face your main light source to avoid shadows, steady your shot by bracing your elbows, and always check your frame's edges before hitting record.
The most common video recording mistakes usually stem from three overlooked areas: unclear audio, poor lighting, and unstable framing.

The good news is that you can fix almost all of these issues without spending a single dime, simply by adjusting how you use the tools you already own.
Audio Blunders: The Silent Killer
If viewers can't hear you clearly, they will leave, regardless of how beautiful your video looks.
The most frequent errors include recording in echoey, empty rooms, holding the microphone too far away, or having unbalanced volume levels.
- Tame the Echo: You don't need expensive acoustic panels. Record in a small, furnished room like a bedroom, or drape a heavy blanket over your head and shoulders while filming. Soft items like pillows, rugs, and curtains absorb sound and make your voice sound much richer.
- Get Closer: Hold your phone or camera closer to your mouth (about 6–8 inches away). If you are using a phone, the built-in microphone on wired earbuds is often surprisingly clear and keeps the mic closer to your chest.
- Balance Your Levels: In your editing software, aim to keep your voice peaking between -6 dB and -12 dB. If you add background music, ensure it stays at least 20 dB lower than your voice so your words remain the loudest thing in the room.
- Remember the Silence: Since many people watch without sound, adding captions is a crucial, zero-cost strategy to keep your audience engaged.
Lighting Letdowns: Seeing the Difference
Harsh shadows, dim footage, or weird color tints can make even great content feel unprofessional.
Beginners often accidentally shoot with a bright window behind them (backlighting) or mix different types of light, creating ugly color shifts.
- Face Your Light: Always position yourself so the light source (a window or lamp) is in front of you, not behind. If you must shoot outside, find a shaded area to avoid harsh, high-contrast shadows.
- Match Your Lights: To avoid color casts, try to use only one type of light. If you use daylight from a window, switch your indoor bulbs to "daylight" (5600K) bulbs, or simply turn off the mixed lights.
- DIY Reflectors: Use a piece of white paper or a white bedsheet to bounce light onto the shadowed side of your face. You can even use a second phone with a bright white screen (covered by a sheet) as a soft fill light.
Camera Slip-Ups: Stability and Framing
Shaky footage, the wrong orientation, or incorrect frame rates can ruin a take before it even starts.
It is tempting to move the camera around, but stable shots are far more important than fancy movements for beginners.
- Become a Human Tripod: Don't buy a gimbal yet. Hold your phone with two hands, tuck your elbows firmly into your ribs, and plant your feet shoulder-width apart. You can also lean against a wall or rest your hands on a stack of books for stability.
- Check Your Orientation: Before hitting record, glance at your screen. Ensure you are filming horizontal for YouTube or vertical for TikTok/Reels. Fixing this in post-production often results in a loss of quality.
- Mind the Background: Take a quick moment to scan the edges of your frame. Avoid the classic mistake of having objects like lamp posts or picture frames appearing to "grow out of your head."
- Choose the Right Frame Rate: For a natural look, stick to 24fps (cinematic) or 30fps (standard). Only use 60fps if you specifically plan to slow the footage down in editing, as it can look oddly smooth or "soap-opera-like" otherwise.
--
By focusing on these simple, mindful adjustments, you transform from a beginner struggling with gear into a Video Auteur -- someone who creates meaningful, polished content with what they have.
What Are the Most Common Video Editing Mistakes? (and How to Fix Them with Restraint)
The most common mistakes are jarring jump cuts, overusing flashy transitions, sluggish pacing, and mismatched color or music.
To fix with restraint: smooth cuts with B-roll or subtle zooms, use simple cuts 95% of the time, trim ruthlessly to keep only what adds value, and ensure consistent, natural color and audio that supports the story.
The most common video editing mistakes happen when creators try to do too much, using flashy effects and transitions that distract from the story.
The secret to professional-looking edits isn't adding more tools; it's practicing restraint.

Editing should be an invisible art that supports your message, not a showcase for your software skills.
Jump Cuts That Jar: Intention vs. Accident
A jump cut occurs when a portion of the video is removed, causing the subject to suddenly "jump" forward in time.
While removing pauses is necessary, poorly executed jump cuts feel jarring and break the viewer's immersion, making them question, "Should I leave now?"
- Use Restraint: Don't eliminate every pause. Leave small, natural pauses (0.5–1 second) to let the audience breathe.
- Mask the Cut: If you must remove a longer pause, try subtly scaling (zooming in) the footage by 10–15% on the second clip. This mimics a multi-camera setup and feels intentional.
- Cover with B-Roll: The gentlest fix is to overlay relevant B-roll footage (like a product shot, screen recording, or related scene) over the cut. This keeps the visual flow smooth while you trim the silence.
Over-Editing: When Flash Gets in the Way
Beginners often feel the urge to use every transition available -- spins, swirls, and flashing text. This creates visual chaos that tires the viewer's brain.
Stable shots and simple cuts are more important than fancy movements.
- The 95% Rule: Use a simple "hard cut" (just switching from one clip to the next) 95% of the time. Only use a subtle fade or dip to black when you need to signal a major change in scene or topic.
- Clean Typography: Stick to one clean, sans-serif font (like Helvetica or Roboto) for all text. Use a maximum of two sizes -- one for headlines, one for body text -- and ensure text stays on screen for at least 2–3 seconds.
- The Restraint Test: Before adding any effect, ask yourself: "Does this make the message clearer, or does it just add visual noise?" If it’s noise, leave it out.
Pacing and Length: Trimming the Fat
We often fall in love with our own footage, feeling we must include everything we shot.
But remember: your viewers don't love your content as much as you do. They want value, and they want it now.
- Be Ruthless: Every second must earn its place. If a shot, sentence, or pause doesn't add information, emotion, or energy, cut it. Just as carrying too much weight is tiring for the body, holding on a static shot for too long is tiring for the brain.
- Change the Stimulus: To keep attention, change the visual stimulus every 5 to 10 seconds using text overlays, B-roll, or slight reframing.
- The 1.5x Test: Watch your edit back at 1.5x speed. If it still feels slow, you likely have more fat to trim.
Inconsistent Color and Mismatched Music
Nothing confuses an audience like a video that looks and sounds like two different productions.
Slapping a heavy, dramatic filter on cheerful footage, or playing upbeat music over a serious story, creates an emotional mismatch that feels "off."
- Correct Before You Grade: First, fix the basics (white balance, exposure, shadows) so skin tones look natural. Only then apply a very light creative style (LUT) at 25–35% intensity. Consistency is far more important than a stylized look.
- Test the Mood: Before finalizing your music, close your eyes and listen. Does the sound alone make you feel the way you want the video to feel? If not, keep searching. Free libraries like the YouTube Audio Library and Pixabay Music offer thousands of tracks to find the right match.
- Balance the Volume: Ensure your voice is always the loudest element (peaking around -6 to -12 dB), with background music at least 20 dB lower.
--
Editing is where you sculpt your story. By embracing restraint and focusing on pacing, flow, and sound, you respect your viewer's time and create content that truly connects.
What Pre-Production Mistakes Do Beginners Make? (and How to Avoid Them)
Beginners often skip planning, resulting in unfocused videos with weak hooks and no clear audience.
Avoid this by scripting a compelling 5‑second hook, defining one ideal viewer to serve, and storyboarding key shots.
A simple plan saves hours of reshoots and editing frustration.
The most common pre-production mistakes happen when creators skip the planning phase, leading to videos that lack focus, fail to hook the audience, or require endless re-shoots.
The truth is, the best way to fix a mistake is to ensure it never happens in the first place.
A little planning is a profound act of self-care for you as a creator, saving hours of frustration later.

Hook-Less Intros: Give Viewers a Reason to Stay
Starting with a slow "Welcome back to my channel" or a long logo animation is often a death sentence for viewer retention.
If a viewer doesn't see something compelling within the first 5 seconds, they will leave.
- Earn Their Time First: Stop introducing yourself immediately. Instead, start with a bold statement, a surprising fact, or a direct question that addresses your viewer's pain point (e.g., "Does your footage always look flat? Here's why.").
- Promise Value: Clearly state what the viewer will gain by watching. Give them an immediate, compelling reason to invest their attention. They can learn who you are later; right now, you need to earn their time.
- The 5-Second Rule: Your hook should create immediate curiosity, emotion, or perceived value. Show a preview of the best moment or reframe a problem in a new way.
Ignoring the Target Audience: Make It for Them, Not You
This is perhaps the hardest conceptual mistake to see in yourself.
Making a video purely for your own enjoyment, without considering who is watching, is like telling an inside joke to a room full of strangers.
It leads to disjointed, rambling content that serves no one.
- Define Your "One" Viewer: Before writing a script, answer this: "Who is my one ideal viewer, and what specific problem am I solving for them today?" Imagine a specific person (a fellow student, a hobbyist) and speak directly to them.
- Ask the Right Questions:
What does this person already know?
What do they want to leave knowing?
What would make them want to share this with a friend?
- Serve the Goal: Before recording, ask: "What will this person actually learn, feel, or do differently?" If a segment doesn't clearly serve that goal, trim it away.
Skipping Storyboarding and Scene Blocking: Plan to Save Time
Hitting record without a structural foundation often results in missing crucial shots, forcing you to piece together a "Frankenstein-like" video in editing.
Flying blind means you'll shoot everything you might need, creating a massive burden in post-production.
- You Don't Need to Be an Artist: A storyboard isn't about drawing; it's about thinking. A simple bulleted checklist or rough stick-figure sketches in a notebook are enough to map out your A-roll (talking head) and B-roll (supplementary footage).
- Block Your Scenes: Spend 10 minutes deciding where you will stand, where the camera will be, and where the light will fall. This simple step eliminates an hour of trial-and-error on the day of filming.
- Create a Simple Arc: Sketch a basic three-part structure: Hook → Main Explanation → Clear Takeaway. For each part, note one shot type and one background so you know exactly what to capture.
--
Think of pre-production not as extra work, but as the thing that protects all the work that comes after it.
By taking these gentle, intentional steps, you transform a chaotic shoot into a smooth process, allowing you to focus on what matters most: connecting with your audience.
FAQs - What are the most common beginner video mistakes and how to fix them?
What are the most common beginner video mistakes and which affordable tools can help fix them?
What are the most common beginner video mistakes and which affordable tools can help fix them?
The most common mistakes fall into three categories: poor audio (recording too far from the microphone, room echo, unbalanced levels), bad lighting (backlit subjects, mixed color temperatures), and weak editing (over-cutting, no B-roll, inconsistent color).
All of these can be fixed with free tools.
For editing, DaVinci Resolve and CapCut are both free and more than capable for beginners.
For audio cleaning, Adobe Podcast's free web tool (Enhance Speech) can dramatically improve voice recordings in seconds.
For lighting, a window and a white reflector card cost nothing.
What are the common mistakes beginner videographers make?
What are the common mistakes beginner videographers make?
Beyond the technical issues above, the biggest mistakes are: recording without a plan (no hook, no structure), ignoring the audience's perspective while editing, and spending energy on flashy effects instead of clear storytelling.
If your video looks blurry or the sound is off, you're giving people a reason to click away -- fast. You don't need fancy gear. A good phone camera, a mic that doesn't crackle, and decent lighting can go a long way.
What were some of the biggest mistakes new YouTube creators made?
What were some of the biggest mistakes new YouTube creators made?
Across creator communities, the most cited regrets are:
- starting without a consistent upload schedule,
- neglecting audio quality in favor of visual quality,
- making the intros too long, and
- not studying their own analytics.
The first tech upgrade should be audio.
Most creators who have grown significant audiences agree that early obsession with camera gear was a distraction from what actually mattered: learning to tell a story clearly.
Why do so many YouTubers edit out the natural pauses between sentences?
Why do so many YouTubers edit out the natural pauses between sentences?
It's a deliberate psychological technique rooted in keeping the viewer's attention from wandering during moments of silence.
Natural pauses in speech can unconsciously signal to a viewer that it might be time to leave.
Jump cutting those pauses keeps the mental momentum moving forward.
That said, this technique can be overdone -- removing all breath and pacing from speech makes the presenter sound robotic and exhausting.
The goal is to remove dead air, not all air.
Which affordable cameras are best for beginners to avoid blurry or shaky footage?
Which affordable cameras are best for beginners to avoid blurry or shaky footage?
The best camera to start with is the one you already own -- usually your smartphone.
Modern phone cameras, especially from the last three to four years, are genuinely capable of producing excellent video with good lighting.
If you want an upgrade, mirrorless cameras from Sony (the ZV-E10) and Canon (the M50 Mark II) are popular beginner picks.
For stabilization, a phone gimbal (like the DJI OM series) is a more affordable entry point than a new camera, and it will improve your footage immediately.
What are common audio mistakes in beginner videos and which microphones can improve sound quality?
What are common audio mistakes in beginner videos and which microphones can improve sound quality?
The most common audio mistakes:
- recording with the built-in camera or laptop microphone from a distance,
- not treating the room for echo, and
- forgetting to monitor audio levels during recording.
For microphone upgrades that won't break the budget: the RODE VideoMicro is a compact shotgun microphone that clips onto a camera.
The DJI Mic Mini is a popular wireless lavalier option.
Even a simple lapel/lavalier mic that plugs into your phone's headphone jack is a significant upgrade over the built-in microphone.
How can beginners avoid poor lighting in videos using popular lighting kits?
How can beginners avoid poor lighting in videos using popular lighting kits?
Before buying a lighting kit, try the free approach first:
- face a window,
- fix your white balance, and
- use a white reflector on the shadow side of your face.
If you decide to invest, LED panel lights with adjustable color temperature (around 3200K–5600K) are the most flexible for beginners.
The key is placing the light at roughly a 45-degree angle from your face, not directly in front of you, to avoid a flat, passport-photo look.
Which video editing software is best for beginners to correct typical shooting errors?
Which video editing software is best for beginners to correct typical shooting errors?
Common beginner editing mistakes include poor pacing, overuse of transitions, unlicensed music, and inconsistent audio.
For fixing these, the most beginner-friendly free options are:
- CapCut (great for social media content, very intuitive),
- DaVinci Resolve (professional-grade, fully free, excellent color tools), and
- iMovie (for Mac/iOS users — simple and effective).
For web-based editing without downloads, Clipchamp (free, Windows-integrated) works well for basic projects.
Each of these tools can handle color correction, audio adjustment, and basic stabilization.
What are some extremely common video editing mistakes beginners make that are almost never talked about?
What are some extremely common video editing mistakes beginners make that are almost never talked about?
Here are three that rarely appear on lists like this:
- Not watching the full edit before exporting. Many beginners export the first version they feel good about -- and then notice the audio glitch at the 4-minute mark after it's already published. Always watch your full edit in real time, at least once, before you export.
- Leaving the wrong clip in the background audio. When you cut a clip in your timeline, the audio and video are sometimes unlinked. Beginners frequently remove the video of a clip but leave its audio playing underneath the new footage -- creating a phantom voice or ambient noise that doesn't match what's on screen.
- Exporting in the wrong format or resolution. Uploading a video compressed to low resolution, or exporting in a format the platform doesn't optimize well, can significantly degrade quality even if the source footage was excellent. For YouTube, export in H.264 or H.265, at 1080p minimum, in an MP4 container.
Conclusion - What are the most common beginner video mistakes and how to fix them?
Creating video content is a journey of iteration, not a test of perfection.
By recognizing that the most common pitfalls -- muddy audio, flat lighting, shaky hands, and over-editing -- are solvable with simple, zero-cost adjustments, you reclaim the power to tell your story effectively.
Remember, the "Video Auteur" isn't defined by the gear in their bag, but by the intentionality in their workflow. When you...
- prioritize a strong hook,
- respect your viewer's time with tight pacing, and
- treat your pre-production with care,
... your videos will naturally evolve from rough drafts into polished, meaningful connections.
The tools you need are likely already in your pocket or sitting in your living room; the only thing left to do is to hit record with confidence.
Which of these common beginner mistakes have you noticed in your own recent videos, and which fix are you going to try first?
You might like these
How to Make Your Own Video Style: Build, Don't Wait
How to Make Your Own Video Style: Discover your passion, learn from inspiration, create consistently, and refine through repetition. Build, don't wait.
What is Digital Video Production? A Beginner's Complete Guide
What is digital video production? Learn the basics, tools, and step-by-step process to create videos—from concept to sharing. Perfect for beginners!
Editing Videos: Overcome Confusion, Complete Your Project
Struggling with editing videos? Find clarity by seeing the big picture first. Learn the key strategies to move from raw footage to your final cut.


Alvin Motilla is the creator of VideoAuteur.com, where he helps everyday people make videos that truly connect with audiences. With over 20 years of experience spanning scriptwriting, documentaries, corporate, and freelance video production, he champions the human side of creation over gear obsession. A graduate of AB Mass Communication, he believes that showing up with heart matters more than owning expensive equipment. Off-screen, Alvin enjoys biking with his wife and daughter, staying active, and studying Scripture.

Join the
Video Auteur Club
Get tips, step-by-step guidance, and gear guides that make video production simple.
What's New
-
What Are the Most Common Beginner Video Mistakes and How to Fix Them
 Discover what are the most common beginner video mistakes and how to fix them. Learn zero-cost fixes: audio, lighting, editing. Elevate your content instantly.
 -
What is the Difference: Pre-Production, Production, Post-Production
 Confused by film terms? We explain what is the difference between pre-production, production, and post-production using a simple house-building analogy.
 -
What Type of Camera Should I Get as a Beginner?
 What type of camera should I get as a beginner? Learn which mirrorless cameras, features, and budget kits work best for video creators starting their journey.