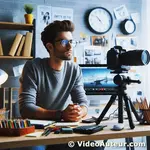
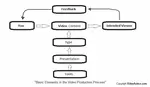
- Video Production
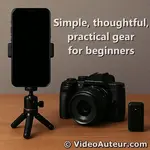
- Video Production Equipment for Beginners
- How Does Image Stabilization Work
How Does Image Stabilization Work? 4 Techniques Explained
How does image stabilization work in simpler language that beginners can understand?
Key Takeaways: How does image stabilization work?
- The Core Mechanism: All stabilization -- whether in the lens, body, or software -- works on the same principle: sensors detect camera shake, and the system counteracts it by shifting the image in the opposite direction to keep the frame steady.
- Hardware vs. Software: Lens-based (OIS) and sensor-based (IBIS) stabilization provide higher quality by physically correcting the light path before recording. Electronic stabilization (EIS) is a software crop that smooths footage but reduces image quality and field of view.
- Avoid Stabilization Conflicts: If your camera body has IBIS and your lens has OIS, do not turn both on simultaneously. Choose one system to prevent the two mechanisms from "fighting" each other and creating jittery footage.
- Know When to Turn It Off: Disable all forms of stabilization when using a sturdy tripod (especially while panning), as it can introduce unwanted wobble or fight intentional camera movement.
- Stabilization is Not a Magic Fix: Hardware and software stabilizers are designed for minor hand tremors and micro-jitters. They cannot salvage footage with extreme shakes, sudden jerks, or heavy vibrations.
- Creative Choice Matters: Smooth footage is not always the goal. The "shaky cam" technique is a valid artistic tool for conveying urgency, realism, or chaos in action scenes and documentaries, but it should be used sparingly to avoid disorienting the viewer.
What is image stabilization in the first place? Did you know...
- That your videos can benefit from image stabilization in 4 ways?
- That image stabilization and camera stabilizers are related?
- That, sometimes, you may decide not to use any means of image stabilization?
Let's find out the answers to these questions and more...
Video Key Takeaways - How do image stabilization and camera stabilization actually work to create smoother, less shaky videos and photos?
Image stabilization uses gyroscopic sensors to detect camera movement, then counteracts it by shifting the sensor (IBIS), moving lens elements (OIS), or digitally aligning frames (EIS).
All methods move the image opposite to the shake direction for smoother footage.
Hardware stabilization delivers better quality, while EIS is effective but crops your final image.

How Stabilization Creates Smoother Shots:
Stabilization systems actively counteract your camera's unwanted movements (shakes) to create smoother videos and less blurry photos. Here's how the main types work:
- Sensor-Based (IBIS): Gyroscopic sensors inside the camera detect shakes. The camera's image sensor then physically shifts in the opposite direction to cancel out the movement.
- Lens-Based (OIS - Optical Image Stabilization): Gyroscopic sensors in the lens detect shakes. Specific lens elements inside move to bend the light path and counteract the movement before it hits the sensor.
- Electronic (EIS): This is software-based. The camera records a slightly larger area than your final frame. When it detects shake between frames, it digitally crops and shifts the image within that larger area to align frames smoothly. This often results in a slightly cropped final video.
In short: Whether moving the sensor (IBIS), moving lens parts (OIS), or shifting the image digitally (EIS), all methods sense your camera shake and physically or digitally move the image in the opposite direction to keep your frame steady.
Hardware (IBIS/OIS) generally gives better quality, while EIS (common in phones) is effective but crops your image.

Key points in the video include...
Purpose of Image Stabilization (IS):
- Reduces blurriness and shakiness in photos/videos caused by handheld shooting.
- Essential for both photography and videography.
Stabilization Axes (5-Axis IS):
- 2-Axis (Yaw & Pitch): Compensates for up-down (pitch) and left-right (yaw) movements.
- 3rd Axis (Roll): Counters rotation caused by pressing the shutter button.
- 4th & 5th Axis (Horizontal & Vertical Translation): Stabilizes full camera body movement (up-down, left-right), crucial for close-ups and macro shots.
Types of Image Stabilization:
Sensor-Based IS:
- Uses gyroscopic sensors to detect movement and shifts the sensor to counteract shakes.
- Less effective with long focal lengths.
Lens-Based Optical IS (OIS):
- Moves lens elements to compensate for shakes.
- Often works in tandem with sensor-based IS for better results.
Electronic IS (EIS):
- Software-based stabilization that crops and aligns frames.
- Works best with high-FPS cameras (e.g., GoPro, smartphones).
- Not ideal for low-FPS or large cameras.
Stabilization Stops:
- IS allows slower shutter speeds without blur.
- Rule of Thumb: Minimum shutter speed = 1/focal length (e.g., 200mm lens → 1/200s).
- Examples: [1] With 1-stop IS, a 100mm lens can shoot at 1/50s (instead of 1/100s). [2] With 2-stop IS, it can shoot at 1/25s.
- Enables better low-light performance by allowing slower shutter speeds.
Limitations & Trade-offs:
- Sensor & lens-based IS increase cost.
- EIS reduces image quality due to cropping.
Actionable Insights:
- For Still Photography: Use lens or sensor-based IS for best results, especially with telephoto lenses.
- For Videography: Combine OIS + EIS (if available) for smoother footage.
- Low-Light Shooting: Higher IS stops allow slower shutter speeds, improving exposure.
- Smartphone/Gopro: EIS works well due to high FPS but expect a cropped frame.
What is the meaning of image stabilization?
Image stabilization reduces unwanted camera shake and jitter in your videos, keeping footage smooth and clear.
It compensates for small hand movements or vibrations, making handheld shots look more professional.
Built into many cameras and lenses, it's essential for clean, watchable video without distracting wobble.
What is image stabilization, in the context of shooting and editing videos?
Image stabilization is the process of making the image captured by your video camera, as clear and as stable as possible. With or without camera movements.
One thing that really messes with the clarity and stability of our visuals—or, footage—is the unintended camera shake...
... It causes jitter.
And that's what image stabilization tries to correct. Or, at least, lessen.
When is image stabilization most useful?
Image stabilization is most useful for handheld shooting (when you don’t have a tripod) and when using a telephoto lens (like a 70–200mm zoom), which magnifies even tiny camera movements.
It smooths out minor shakes, keeping your footage sharp and steady -- ideal for beginners shooting without extra gear.

There are specific shooting situations where image stabilization really helps you:
Handheld shooting
When you're shooting without a tripod, or other stabilization equipment. (I do this a lot! But other shooters are allergic to this approach. ;-))
Even small camera movements can cause blur. Image stabilization helps neutralize these shakes for smoother videos.
Using a telephoto lens
It's like a super zoom for your camera that lets you shoot things far away, as if they were closer to you. When you're using a telephoto lens -- like a 70--200mm zoom lens -- it also magnifies minor camera movements.
This is where image stabilization helps because it keeps your footage looking sharp at those longer focal lengths. (I even shoot videos handheld with a telephoto lens, but with this stabilization feature turned on. I find that others will always use a tripod in this case.)
--
Fact about the limitation of image stabilization: You can only use it for minor camera shakes, not for very shaky footage. We'll explore this limitation further in a later section, along with other image stabilization techniques.
When might you not need image stabilization?
You generally don't need stabilization when your camera is locked down on a sturdy tripod, as there is no shake to correct.
You should also disable it for intentional shaky-cam effects in action or horror scenes, where the jittery movement is a creative choice rather than a technical flaw.

Also, there are situations where you may not want to use any form of image stabilization:
Using a tripod
When your camera is secured on a tripod, there's minimal camera shake to begin with, if any.
So, you may opt not to use image stabilization, especially when you're recording static shots. (I admit, when shooting events, I just keep the image stabilization of the lens on. Even on a tripod! It helps me focus on capturing moments. But my approach is different in other shooting scenarios.)
Creating a specific artistic effect
In some creative scenarios, you might want to intentionally introduce a shaky or jittery feel to your video for a stylistic effect.
For example, the shaky-cam effect for action sequences. Here, using image stabilization can hinder your desired aesthetic.
This effect is also commonly used in horror films and handheld documentaries. (More about the shaky-cam effect later.)
How does image stabilization work for video shooting and video editing?
Image stabilization works two main ways: during shooting, hardware in the lens or camera body physically shifts glass elements or the sensor to counteract hand shake in real time.
During editing, software analyzes the shaky footage and digitally crops, rotates, and repositions each frame to smooth out the motion path after you've already recorded the clip.
You may have the impression that image stabilization refers to the "IS" on a camera lens. But it's just one of the ways of achieving image stabilization, as you'll soon discover. Because...
Image stabilization works in several ways.
In a broader perspective, we can see several means of image stabilization.

Here are 4 ways of stabilizing the images, or shots, recorded by video cameras...
- Stabilizing the image, "inside the lens".
- Stabilizing the image, "inside the camera body".
- Stabilizing the image, "from outside the camera body".
- Stabilizing the image, "in video editing software".
Interesting data: There's a 5th way of stabilizing shots, that is, "Stabilizing the image, through Artificial Intelligence" (or AI-powered Image Stabilization).
According to a report by Markets and Markets, some camera manufacturers--like Sony and Panasonic--are incorporating AI into their image stabilization systems.
AI can analyze camera shake patterns and predict movements, allowing for more precise counter-corrections and potentially better stabilization results, especially for video recording.
1. How does image stabilization work in a lens: stabilizing the image, "inside the lens"
In-lens stabilization uses a tiny floating glass element inside the barrel.
Gyroscopic sensors detect handheld shake, and a micro-motor instantly shifts that element sideways or up/down.
This physically redirects the light path to counteract your movement, keeping the projection steady on the sensor before the video is recorded.
 How does image stabilization work? One way is by stabilizing your shot inside the camera lens.
This is "in-lens image stabilization", or image stabilization happening inside the camera lens, as you're shooting video.
I won't examine in detail the technicalities of how it happens. I'll just say that some parts of the lens already stabilize your image, before the camera records it. This is also known as, "lens-based" image stabilization.
If you heard of, "Vibration Reduction (VR)", and "Image Stabilizer (IS)", they are examples of, "lens-based" image stabilization.
Good for stabilizing slight camera movements without camera stabilizer
Using this in-lens image stabilization is good for correcting, or smoothening, minimal camera motions—without using a camera stabilizer device yet.
And I'm talking about using this type of image stabilization, "while you're shooting". Not when you're done shooting, and then correcting your footage inside an editing app, or video stabilization software.
—
But what causes those minimal camera movements?
Well, those slight movements happen mostly—and naturally—when you're shooting handheld.
Sometimes, you may want to use slightly shaky shots in your video. Intentionally. Because they suit your video's story, mood, or style.
Other times, you want to correct the slight camera shake right away, as you're shooting.
—
So, why not use a camera stabilizer at once, to correct or smoothen those minimal camera shakes?
There are 2 reasons...
- Those camera shakes may be very insignificant, to call for the use of a camera stabilizer device. And...
- There are other ways of correcting them. And one of those ways is to simply use the image stabilizer in the camera lens, while you're shooting video.
What is image stabilizer on camera lens?
An image stabilizer is a mechanism built into some lenses that counteracts minor, unintentional camera shake during handheld shooting.
By turning it on via the side switch, internal elements shift to smooth out slight wobbles, resulting in steadier video footage -- especially helpful when filming without a tripod or support rig.
You may have seen a lens with a switch on its side—a stabilizer "on-off" switch. Like this one...

That's the switch that accesses the inside parts of a lens, which help stabilize your shots.
Turn it on, start shooting handheld, and that stabilizer compensates for minimal camera shakes, you may be making.
What does IS stand for on a camera lens?
IS stands for Image Stabilization.
This lens-based technology uses tiny internal motors to counteract handheld shake and vibration before the light hits your camera's sensor.
For video creators, this means smoother, less jittery footage when shooting without a tripod, resulting in a much more professional-looking final shot.
The "IS" you see on digital cameras—specifically, on some lenses—simply means...
... Image Stabilizer, or Image Stabilization.
Others call it "Optical Stabilizer"—OS, or "Vibration Reduction"—VR, or "Optical SteadyShot"— OSS.
—
I'm not going to talk about too much technical stuff about it. Because we're video creators, not camera repair technicians. So, just note that...
- First, not all lenses have this technology.
- But, if a lens has IS feature, something inside that lens is fighting any shake, that the camera and lens are experiencing.
- This lens-based image stabilization enhances your shot. Even before the camera body records it.
Is image stabilization necessary for video? Do you need image stabilization for video?
For handheld video, image stabilization is very helpful -- it smooths out minor shakes and jitter that make footage look amateur.
While not strictly "necessary" if you use a tripod, it is essential for getting usable, professional-looking clips when shooting with your bare hands as a beginner.
In a way... "Yes".
Let me explain a little...
Camera and lens makers designed Image Stabilization, originally for shooting still images.
But video shooters discovered, that IS also enhances camera motion. Again, I'm reminding you that this feature, only helps correct very minor camera shakes.
So, image stabilization is necessary—if you shoot videos with your bare hands. And need to smoothen some minimal camera shakes.
Should the image stabilizer be turned on or off when shooting videos?
For handheld or monopod shooting, definitely turn it on -- it smooths out small shakes.
Switch it off when using a sturdy tripod, especially while panning, as stabilization can fight intentional movement and create jitter.
If using a gimbal, test both ways; sometimes the systems conflict, sometimes they work beautifully together.
Hey, don't think of image stabilization on your lens as a magic bullet. Sometimes, you'll need it on. Other times, it might be best to switch it off.
So, when do you turn it on?
You switch on the IS on the lens, when you're shooting handheld. You want the image stabilizer inside the lens, to compensate for minimal camera shakes you may be making.
Listen, even if your camera's nice and steady on a monopod, turn on image stabilization anyway! It really helps with video, especially when you zoom in a lot. You know, those big lenses you use for faraway stuff, like the 70-200mm or 55-250mm zooms?
Those zoom lenses with long reach can be a bit tricky to hold steady. Even tiny shakes get magnified in the recording. But with IS turned on, you minimize the shake.
Note that the lens has to have this IS feature, because not all lenses have it.
When do you turn off this stabilizer feature of the lens?
Basically, you switch IS off, when a very secure camera stabilizer—like a well-designed tripod—already supports your camera. The IS won't help anyway.
Some video shooters suggest that it's better to turn off IS, even when you're panning on a tripod.
Why?
Because the basic IS mechanism inside the lens, will just mess up your panning, and make your recorded video look somewhat odd. So, turn off the IS—unless the lens has a dedicated IS for panning, or horizontal movement.
—
What if your camera body and lens with IS feature, are attached to a steadicam, or a gimbal?
Well, opinions among video shooters are divided...
- Some say they just let the IS feature of the lens work with the gimbal, or the steadicam. So, they switch it on.
- Others say they turn it off, for some reason. They don't want Image Stabilizer, to interfere with the workings of the gimbal, or the steadicam.
I have a wide angle lens without IS feature, "Vibration Reduction", or "Optical Stabilizer". My experience is that, using it together with my DSLR and a steadicam-style stabilizer, I have no problem stabilizing my shots.
If you have a lens with IS, a motorized gimbal, or a mechanical stabilizer, my advice to you is this...
...Test. See for yourself.
- Try shooting videos with the IS turned on.
- Then, try shooting videos with the IS turned off.
- Compare the resulting shots.
Not all camera bodies, and lenses with IS feature, are the same.
Does image stabilization affect video quality?
Yes, image stabilization directly affects video quality -- usually for the better by smoothing out small, handheld jitters and micro-shakes.
However, it cannot fix large, sweeping wobbles.
Leaving IS on while using a tripod or panning can sometimes cause a distracting "wobble" or slight crop, so use it intentionally.
Yes, IS affects video quality—or the look of the shots. That's why a video shooter has to use it properly.
Again, you can use the IS feature of the lens, to compensate for minimal camera shakes. But you cannot use it, to fix drastic camera disturbances.
You'll notice more the benefit of the lens' Image Stabilizer...
- When you're shooting handheld.
- When your setup combines this lens with IS, a DSLR or a mirrorless camera, and a monopod.
- When you're using a telephoto lens with IS. Whether you shoot handheld, or mount your camera on a monopod, you can really see shot improvement with IS turned on.
So, we were talking about cameras, and how some have this cool feature inside the lens to smooth out shaky hands. That is, the image stabilizer.
I emphasize, though, that you'll benefit from this means of image stabilization, if you're committing minimal camera shakes. Only.
I don't recommend it for cleaning up huge camera wobbles. For that, you have to use a camera stabilizer device—like a steadicam, or a gimbal.
2. How does in-body stabilization work: stabilizing the image, "inside the camera body"
In-Body Image Stabilization (IBIS) uses tiny sensors to detect camera shake.
The camera's sensor then physically shifts up, down, and sideways to counteract your hand movements in real-time.
This happens before the light is recorded, effectively canceling out wobble to deliver smoother handheld video directly from the body.
 How does image stabilization work? Another way is by stabilizing your shot inside the camera body.
We've talked about using the Image Stabilizer—or IS—on lens.
But, there's another way of stabilizing your shots—that is, using the camera body's image stabilization feature. This is called, "in-camera-body" image stabilization.
This time, the camera body you use for filming, does the image stabilization. If you move your camera while recording, some mechanism inside the camera body, will compensate for that movement. This is also called, "In-Body Image Stabilization"—or IBIS.
Some mirrorless cameras have the IBIS feature. IBIS can also help you shoot, and record smooth handheld videos, just like lenses with IS.
Image stabilizer on lens or camera body?
For video, use whichever stabilization you have available -- the best tool is the one on hand.
However, if your camera body has IBIS and your lens has optical IS, do not turn both on simultaneously.
They can conflict and cause jittery footage. Pick only one system to avoid the two mechanisms "fighting" each other.
Honestly, whichever you have, just use it. Some people say, the best tool is the one you already have. In this case, what they say rings true, as well.
—
What if you have both—(1) a camera body with IBIS, and (2) a lens with IS? Do you turn on the image stabilizers of both the camera body and the lens, when shooting videos? Or do you use one of them only?
Good questions.
My opinion is, I'll only use one of them. I don't want a scenario, where the camera's IBIS and the lens' IS, seem to fight each other. It's like letting 2 persons drive the same car, and hit the same brakes.
Other shooters also say, they avoid switching on the camera's IBIS and the lens' IS, at the same time. Because they don't get smooth results, if both are turned on, when shooting handheld and doing camera movements.
—
Now, here's some guidelines for you to consider...
1. If you're shooting handheld, using a wide angle or a telephoto lens with IS:
Just use one type of image stabilization.
Your camera might have two image stabilization features -- one built-in (IBIS) and another in your lens itself. They are basically teammates working to prevent blurry shots.
But here's the thing: Having both on at the same time can be a bit like having two chefs arguing in the kitchen – it can actually mess things up. So, just pick one to activate and let it work its magic!
—
2. Shooting video on a tripod? Here's a quick tip:
If you're using a wide angle or telephoto lens with built-in stabilization (IS), and you're panning or tilting the camera, you can actually ditch that IS.
Why? Because a good, sturdy tripod, especially one with a smooth-moving head, will do a fantastic job of keeping things stable on its own.
Leaving your camera's IBIS or lens IS on can actually make your video look a little wonky. The frame might jitter slightly, and there could be a weird delay when you pan or tilt.
So, turn that stuff off and let your tripod do its magic!
—
3. Using a tripod with a zoom lens that has IS and you're not planning on sweeping shots?:
Crank up IS on both your camera and lens. This helps you achieve really static shots.
In a static—or, "locked-off"—shot, the frame is securely fixed or totally undisturbed. But it can contain movement, just inside the frame—such as moving people, animals, vehicles, and the like.
—
4. If you're shooting on a monopod, using a wide angle or a telephoto lens with IS:
Use only one type of image stabilization.
Yes, it's kind of a pick-one situation. You can turn on the camera's shake reduction (IBIS) but switch off the lens stabilization (IS). Or do the opposite.
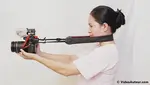
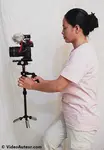
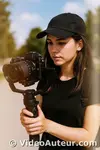
3. How do camera stabilizers work: stabilizing the image, "from outside the camera body"
External camera stabilizers work by physically isolating the camera from your body's shakes and steps.
Devices like gimbals use motors and sensors to keep the camera level and steady, while weighted rigs use counterbalance and a pivoting arm to absorb unwanted movement, creating smooth, floating footage instead of shaky handheld video.
 How does image stabilization work? Another way is by stabilizing your shots from outside the camera body...
So, we've talked about two ways of stabilizing images internally—[1] "inside the lens", and [2] "inside the camera body".
Now, we're talking about stabilizing our shots, by stabilizing the camera externally.
This is what we call, "camera stabilization". Or, when we use one of the camera stabilizer devices to shoot videos with clarity, stability, and smoothness of motion.
How do camera stabilizers work to achieve image stabilization for videos?
Camera stabilizers work by using mechanical parts or electronic motors to isolate your camera from unwanted movement.
They act like steady legs, counterbalancing or absorbing shakes and wobbles.
This ensures that when you move -- whether walking or panning -- the recorded footage remains smooth and fluid, preventing the jarring, distracting jitters that ruin a shot.
To understand that, we start by knowing what camera stabilizer is...
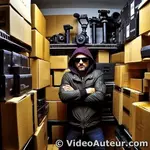
What is a camera stabilizer?
A camera stabilizer is any external tool -- like a tripod, gimbal, or shoulder rig -- that physically steadies your camera body to prevent shaky footage.
Unlike built-in digital smoothing, this gear absorbs movement from outside the camera, letting you walk or hold the shot while keeping the final video smooth and professional.
A camera stabilizer is any video production tool, that can help you make your camera stable from the outside, while you're shooting.
And that's the key phrase, "from the outside". Impliedly, there's other means of stabilizing your shots, apart from doing it from "outside" the camera body.
I admit that, in the past, I thought that "camera stabilizer" refers only to any gear used to execute smooth tracking shots. But that is not the case...
What is a tracking shot?
A tracking shot is a camera move that physically follows your subject through a scene, gliding smoothly forward, backward, or sideways rather than staying fixed in one spot.
It keeps the action in frame while adding motion and energy, typically achieved using a dolly, slider, or a stabilized handheld gimbal.
I mentioned earlier about executing "smooth tracking shots". So, what is a tracking shot, especially in film or video production?
A tracking shot is one that a cinematographer decides to do to smoothly follow the action of the subject. You do a tracking shot by moving your camera--either sideways, forward, or backward. You can get smooth camera movements...
- by attaching your camera to a movable cart, and executing your desired camera moves, or
- by mounting your camera on a special hand-held device, that keeps your camera stable while you're moving it.
"Camera stabilizer" doesn't refer only to a steadicam, a gimbal, or a dolly... which may come to mind at first. According to dictionary.com, to "stabilize" means...
- to hold something firm.
- to prevent something from fluctuating.
- to keep the equilibrium stable.
If any device can do at least one of these functions for your video camera, you can consider that device a camera stabilizer.
What is camera stabilization?
Camera stabilization is the act and technique of keeping your footage steady and smooth.
Whether your camera is locked down on a tripod or moving for a tracking shot, it’s the practice of minimizing unwanted shake and jitter.
This ensures your video looks professional and is comfortable for viewers to watch.
Camera stabilization is both...
- an act, and
- a technique.
"Act"... Because, it is simply your effort to make your camera steady, while you're shooting videos.
"Technique"... Because, it is also one of the means of making your shots stable, as you record them with your video camera. Camera stabilization is actually under the umbrella of, "image stabilization", as we found out earlier.
--
There are 3 situations where you do camera stabilization...
- When you put your camera in a stationary position.
- When you move your camera to create tracking shots.
- When you want to do something in-between these first 2 situations... that is, when you want to make minor, or near-zero, camera movements.
What device is used to stabilize a video camera?
The most common device for smooth motion is a handheld gimbal, which uses motors to counteract shake.
For locked-off shots, a tripod provides absolute stillness.
Beginners often start with a tripod, but a 3-axis gimbal is the go-to tool for achieving professional-looking, floating camera movement while walking.
There are many devices actually. Different camera stabilizing tools have been invented for video production and filmmaking industries, and even for enthusiasts and hobbyists. But to give you some ideas, here's a quick list...
- Dolly

- Steadicam

- Gimbal

- Tripod

- Monopod

- Shoulder mount

- Improvised or DIY ("do-it-yourself") versions of these devices
—
And if I'm going to categorize them according to specific shooting situation, here they are...
"When you put your camera in a stationary position."
- tripod
"When you move your camera to create tracking shots."
- dolly
- steadicam
- gimbal
"When you want to make minor, or near-zero, camera movements."
- monopod
- shoulder mount
Your bare hands are your own free camera stabilizer.
Maybe you don't have yet any device that can stabilize a video camera. But if you do, sometimes, you may just want to hold your camera while shooting, right? Since it's you, you have your own unique ways of doing that.
However you hold your camera, you surely want to come up with usable shots. So inevitably, your hands—and your arms—really function as your camera stabilizer.
 How does image stabilization work - A pair of steady hands is a natural form of image stabilizer.
You may not be able to record absolutely stable footage with bare hands, compared to mounting your camera on a tripod. But, depending on your skill and stamina, you can execute stable enough shots, which contain usable—even artistic—small camera movements.
What does a camera stabilizer do?
A camera stabilizer eliminates shaky, handheld footage to create smooth, professional-looking video.
It steadies your camera for static shots, prevents wobble during small pans or tilts, and provides a balanced counterweight.
This allows you to execute fluid tracking movements that glide rather than jerk, making your final video look polished.
Those devices I mentioned earlier, what can they do?
By now, it's pretty obvious...
Depending on the specific camera stabilizer that you have, it can do one of the following...
- Hold your video camera securely, while you're shooting from a stationary position.
- Keep your video camera from wobbling or fluctuating, when you're making minor camera moves.
- Give your video camera a nice counterbalance, that will allow you to execute smooth, or fluid tracking shots.
What is the purpose of using a video camera stabilizer?
The purpose of a video camera stabilizer is to deliver a smooth, distraction-free viewing experience.
It eliminates shaky footage so your audience can focus entirely on the story and emotion within the frame, rather than being pulled out of the moment by jarring movement.
It is...
To make it easy and pleasurable for our viewers, to look at our shots, and see what those shots are conveying to them.
So, this is about giving our audience quality viewing experience... in the form of well-thought-out shots, well executed with camera stabilizers.
Some say the purpose is, "to stabilize the camera", mentioning the root word "stabilize" to express the purpose. ;-)
Others say, "to prevent camera shake", a very common thing you'll hear. Well, it might look like the purpose—or, the WHY—of using a video camera stabilizer. But if you'll take a closer look, "preventing camera shake" refers to WHAT a camera stabilizer can do. Not necessarily WHY we use one—or, our purpose.
Because...
Our purpose is the very outcome that we desire. The "WHY we do, WHAT we do".
Purpose is the end result that you hope to happen, when you do something, or use something.
How does camera stabilizer work?
Camera stabilizers work like human legs.
Their mechanical or electronic parts coordinate together to support and smooth your camera's movement.
This teamwork absorbs bumps and hesitations, turning jerky, unintentional shakes into steady, fluid motion.
The result is clean, professional-looking footage that won't distract or dizzy your audience.
It depends on a specific camera stabilizer.
Remember what we learned earlier?...
- That the term, "camera stabilizer", doesn't only refer to a steadycam, a dolly, or a gimbal?
- That there are other devices we don't normally think of as camera stabilizers, but they do stabilize the camera?
So, let's agree, once and for all, that "camera stabilizer" is a general term. And, "How does camera stabilizer work?", is a general question.
And here's my general answer...
If you look closely at camera stabilizers you happen to use, you'll notice that their parts work together in holding and supporting your video camera. The parts can be mechanical, electronic, or both.
You can liken these parts, to the parts of your legs—muscles, tendons, joints, bones—that help each other,...

... so that when you stand, walk, or run, it's going to be a coordinated movement.
Camera stabilizers work like that.
The parts of a camera stabilizer work together, to help you avoid camera movements that look jerky, crazy, or hesitating. Which you don't intend to be recorded in your shots. Right?
Because shots that contain irregular camera motion, can make your audience feel dizzy or confused. And those camera disturbances take away from your audience's quality viewing experience.
So, that's how camera stabilizers work, in general.
--
Now, here's how some specific camera stabilizer devices work...
What are the different types of camera stabilizers?
Camera stabilizers fall into three main categories for beginners.
For locked-off shots, use a tripod.
For smooth moving shots, choose a handheld gimbal or Steadicam.
For supported handheld work with natural movement, a shoulder mount or monopod is ideal.
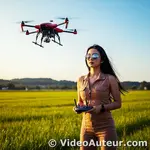
Drones provide unique aerial stabilization.
Earlier in this article, we already mentioned some camera stabilizer devices, like…
- the tripod,
- the dolly,
- the steadicam,
- the gimbal,
- the monopod,
- the shoulder mount, and
- the camera drone.
Now, for us to better understand these devices, there are different ways of categorizing them. And so, we have the types of camera stabilizers.
Types of camera stabilizers - according to the result you want for your shot
 How does image stabilization work - stabilizing your shot from outside the camera body - camera stabilizer types according to the result you want for your shot
1. You don’t want your shot to move, only the subject in the frame (camera stabilizer for static shots).
For that, you use…
… a tripod.
—
2. You want your video camera to follow the action of your subject (camera stabilizer for tracking shots).
You can use either…
… a dolly,
… a steadicam,
… a gimbal, or
... a camera drone.
—
3. You want to allow some minor, but stabilized camera motion for your shot (camera stabilizer for minimal camera movements).
For that to happen, you can use…
… a shoulder mount, or
… a monopod.
Types of camera stabilizers - according to your source of energy, for operating the device
 How does image stabilization work - stabilizing your shot from outside the camera body - camera stabilizer types according to the result you want for your shot
1. Camera stabilizer powered by pure human strength. Especially the strength of your arms, back, and legs.
Examples include…
… handheld steadicam-style stabilizers,
… camera dolly (or DIY versions of it), and
… shoulder mount.
—
2. Camera stabilizer powered by battery and human strength.
Like…
… the electronic or motorized gimbal.
—
3. Camera stabilizer powered solely by batteries.
Example of it is…
… the drone.
Types of camera stabilizers - according to the way you control the device
 How does image stabilization work - stabilizing your shot from outside the camera body - camera stabilizer types according to the way you control the device
1. By holding the device with your bare hands (handheld camera stabilizer).
You usually do this with lightweight cameras, and lightweight stabilizers. Like…
… a handheld gimbal,
… a small mechanical video stabilizer, such as the handheld steadicam, and
… a small dolly.
—
2. By wearing a vest that supports the camera (camera stabilizer with body harness).
You can see this form of device in big budget productions, like Hollywood feature film making.
Because high-end productions typically use large and expensive cameras, a cinematographer needs to use…
… a camera stabilizer with vest and arm--like the original Steadicam.
Camera stabilizers with body harness can support these heavy cinema and video cameras.
—
3. By using a remote control (remote-controlled camera stabilizer).
For example, you use a remote control when you operate and fly…
… a drone with integrated gimbal and camera.
4. What is stabilizing in video editing and how does it work: stabilizing the image, "in video editing software"
Video stabilization in editing software analyzes the shaky footage frame-by-frame, tracking pixel movement.
It then subtly crops, scales, and repositions the image to smooth out unwanted bumps and jitters.
This is a post-production fix for minor handheld shake, but it cannot fully salvage extremely rough or blurry footage.
 How does image stabilization work? Another way is by stabilizing your recorded shot in a video editing software.
The first 3 means of image stabilization happen, when you're shooting videos. Or during production phase.
But this one is about stabilizing your shots, when you edit your videos. This is the use of video stabilization software in post-production.
Sometimes, after a video shoot, we still end up with shots that are a bit shaky, and we want to correct them. We can do that, by using the image stabilization feature, available in some non-linear video editing programs.
Can video be stabilized in post? Can you stabilize a video in post-production?
Yes, video can absolutely be stabilized in post-production.
Most editing software includes tools that analyze and smooth out shaky motion by slightly cropping the frame.
However, it works best as a corrective measure; excessive shaking often results in unnatural warping or a noticeable loss in image quality.
Yes.
However, I prefer to do "stabilization in editing" as my last resort. Meaning, I try to make the stabilization right—as much as possible—during video shoot, or coverage.
And, if I still have some shortcomings, that's the time I'll try to correct a shaky video in post.
This approach compels me to really think about a shot, before I execute it.
—
"How do you stabilize a shot in post?"
You use an image stabilization software--or, a video editing software that has some feature for stabilizing shaky footage.
What is Warp Stabilizer?
Warp Stabilizer is a post-production tool in editing software like Adobe Premiere Pro.
It analyzes your footage and smooths out minor, irregular camera shakes -- specifically the small jitters from handheld shooting or slow movement.
It acts as a digital fix for subtle instability already recorded in your shot.
Warp Stabilizer is a functionality in a video editing software, intended to cure small irregular camera movements, already recorded with the shot.
In other words, Warp Stabilizer is your camera stabilizer in post production.
However, please notice what I said... "small irregular camera movements"... So, if the camera shake is only...
- minor, and
- due to shooting handheld while you're moving slowly,
... Warp Stabilizer can cure that.
However, extreme camera shakes caused by running, or moving abruptly, are a different story.
People who say, "Warp Stabilizer makes it worse", are probably expecting too much from it. Or, relying so much on post-production, to fix lousily executed shots—which a mindful shooter wouldn't do in the first place.
By the way, "Warp Stabilizer" is the image stabilization in Premiere Pro. But, this editing software isn't free, and Adobe only offers it by subscription.
If you like Adobe Premiere Pro, and you have concerns such as, "Where is Warp Stabilizer in Premiere Pro?" Or, "How do you use Warp Stabilizer?" Or, "How to stabilize video in Premiere Pro"...
... click here to know more from Adobe itself.
—
But, if you're asking, "how to stabilize video for free" in post-production, check out this next discussion...
How to stabilize video with DaVinci Resolve for free?
Yes, DaVinci Resolve's powerful free version includes stabilization.
To quickly fix shaky footage, select your clip in the timeline on the Cut page, click the Tools icon, then the Stabilization icon, and finally hit the Stabilize button.
The default setting works well for most basic fixes.
"Does DaVinci Resolve have Warp Stabilizer?" Or, "Is there stabilization in DaVinci Resolve?"
Yes. DaVinci Resolve has a feature that works like Warp Stabilizer.
—
The best part? DaVinci Resolve has a totally free version! It's more than enough if you're new to video editing. This free version is seriously powerful. Don't let that zero price tag fool you!
So, yes, Resolve's free version has video stabilization feature.
—
So, "how do I stabilize video in DaVinci Resolve?
There are 2 places in Resolve, where you can stabilize your shots...
- in the Cut Page, and
- in the Edit Page.
Think of a "page" as a mini software inside DaVinci Resolve.
The Cut Page is the easier-to-use video editor in Resolve. Just a heads up, DaVinci Resolve opens to the Cut Page by default.
—
On the other hand, the Edit Page is the more advanced video editor. You can go to this page, by clicking on the Edit Page icon.
Cool thing about this editor is you can edit your project on either the Cut Page or the Edit Page. And guess what? You can even jump back and forth between the two while you're working on the same thing!
Also, you can stabilize your footage either on the Cut Page, or on the Edit Page.
How to stabilize in Resolve - image stabilization in DaVinci Resolve Cut Page
Here's how you can stabilize your shots, in DaVinci Resolve's Cut page...
- Make sure you're on the shot in the timeline that you want to stabilize. Then, click on the "Tools" icon.

—
- This panel opens.

—
- Click on the "Stabilization" icon.

—
- Click on the "Stabilize" button, if you want to use the default setting. This setting already works so well.

—
- Beside the "Stabilize" button is a drop down menu. You can also choose from the list: "Perspective", "Similarity", and "Translation". Think of them as different camera stabilizers inside Resolve. Choose one, then click on the "Stabilize" button.

—
- There's also a toggle switch that allows you to see the shot, with and without the stabilization effect. Just click on that and play the video.

—
- Not satisfied with the result? Just click on the reset button. From the drop down menu, choose another "camera stabilizer" mode. Click on the "Stabilize" button again, and play the video. If you like what you see, you're done stabilizing your shot in post. :-)

—
How to stabilize in Resolve - image stabilization in DaVinci Resolve Edit Page
Here's how you can stabilize your shots, in DaVinci Resolve's Edit page...
- Make sure you're on the shot in the timeline that you want to stabilize. Then, click on the "Inspector" icon.

—
- This area will show.

- But, to have a better view of the "Inspector", click on the "Expand" button.

—
- Now, you get a better view of the "Inspector" settings. Next, click on the "Stabilization" button.

—
- Inside the "Stabilization" adjustment, click on the "Stabilize" button, if you want to use the default setting. This setting already works so well.

—
- But, if you're not happy with the result, you can click on the reset button opposite the "Stabilization" on/off switch.

—
- Start making your own adjustments, by choosing another camera stabilizer mode from the drop down menu. The modes include "Perspective", "Similarity", and "Translation". Think of them as different camera stabilizers inside DaVinci Resolve.

—
- Then, make your fine tuning by moving on to "Camera Lock", "Zoom", "Cropping Ratio", "Smooth", and "Strength". Adjust these settings one by one. See the effect by clicking on the "Stabilize" button, and playing that particular shot in the timeline. (By the way, "Mode", "Cropping Ratio", "Smooth", and "Strength" have their own specific reset buttons.)

—
- NOTE: If you tick the checkbox right next to "Camera Lock", you’ll disable "Cropping Ratio", "Smooth", and "Strength" settings. It means, the shot you're stabilizing will become a "locked shot"—that is, a shot without any camera motion at all. It's a shot made by mounting your camera on a stationary tripod, and just pressing the record button.

—
- If you like the result of your adjustments and fine tuning, click on the "Stabilize" button.

What is the "shaky cam" style of filming: when you choose not to use any means of image stabilization
"Shaky cam" is an intentional filming technique where you shoot handheld without tripods or gimbals, embracing the natural, unsteady motion of your hands.
Rather than a mistake, it's a creative choice used to make footage feel raw, spontaneous, or urgent -- commonly seen in documentaries and action scenes to heighten realism.
Time may come when smooth camera movements, and super stable shots, are not what you want. And so, you'll prefer not to stabilize some of your shots.

But why?
Because you may find yourself wanting, or needing, the opposite—shots created with a shaky camera.
What is exactly a "shaky camera"? Why would you want some of your shots to be shaky? When are you going to need shaky camera shots? And is there a proper way of doing them?
Let's find out...
What is shaky camera?
Shaky camera refers to footage that appears visibly unsteady or jittery, typically resulting from handheld recording without stabilization.
For beginners, this is often an unintentional, distracting wobble.
However, it can also be a deliberate filmmaking choice -- used sparingly -- to inject raw energy, tension, or a documentary-style realism into a scene.
To understand what "shaky camera" is, let's look at it both from...
- your audience's eyes, and
- your perspective as video creator.
—
To your audience's eyes, a shaky camera is footage that not only looks unstable, but feels intrusive as well. That's the "shaky camera effect" on human viewers.
Now, that could be bad—or good. But, it really depends on why you want "shaky camera", and how you're going to use it.
—
To your point of view as video creator, shaky camera is a film technique at your disposal.
Yes, you may use it whenever and however you want. But, bear in mind—you're giving your viewers the look and feel, of unsteady handheld shot, on purpose.
So...
What is the purpose of shaky camera technique?
The shaky camera technique conveys realism and immediacy, making scenes feel spontaneous or documentary-like.
It evokes urgency, panic, or chaos during intense action, and places viewers directly into a character's subjective perspective for a more immersive, visceral experience.
The purpose shaky camera film technique is to suggest a thought—or, make an impression—in the minds of your audience. The "thought" or "impression" could be one of the following...
- Something is happening spontaneously—like a news coverage, which carries an impromptu feel to it.
- Something is happening intensely—like fights or accidents, which can evoke panic.
- How one character in your video is experiencing something—like the subjective 1st person point of view, or POV shots, in a narrative film.
In other words, you want to communicate an idea inside people's minds, when you use the "shaky camera film technique".
When would you want to use the shaky camera film technique?
Use shaky cam for unpredictable documentary moments, to inject raw urgency into action or chase scenes, or as a practical necessity when you lack stabilizers and need to shoot fast.
In these cases, the handheld movement serves the story or captures reality rather than distracting from it.
There are times when you're more likely to use "shaky camera"...
- When you're shooting a news event, or a documentary.
Real life events are sometimes unpredictable, and moments worth capturing just happen.
When you really need to document them, sometimes you just can't fully avoid recording the video, without some camera shake. It's only natural. And it's better to capture an important life moment that way, than to miss it.
Also, camera shake gives a raw feel to your news, or documentary video.
—
- When you're making a fictional short film, that has some action scenes in the story.
It's when the story, or script, contains scenes that naturally call for the use of "shaky camera technique".
Examples include chase and fight scenes. Also, the subjective 1st person point of view of a character—especially when that person is experiencing some trouble.
—
- When you have no device dedicated to smoothening camera movements, and very limited time to shoot what you need.
Let's say you have those production limitations. However, your intent is—still—to produce a decent video.
You'll be compelled to shoot handheld, most of the time. Which, in turn, allows you to shoot faster and use the shaky camera technique.
It may be a raw shooting style, but it gets the job done.
—
Now, here's when you might consider, NOT to use the shaky camera film technique...
- When your only reason for using "shaky camera" is pure style. Even though, you have some camera stabilizers to use.
Why? Is it bad to use the shaky camera technique, purely for stylistic reasons?
Not at all—if your main reason for creating a video is to satisfy your own production taste. That is, if you'll make that video just for yourself.
But, if you're concerned with making a video that connects with your audience, you'll use style to serve the story. Because the story is what your viewers relate to.
The story—or, content—dictates the style—or, the way of shooting, like the "shaky camera film technique". In other words, the style follows the story.
How do you do the shaky camera effect?
Shoot handheld to let your body's natural movement create the shake, or use a shoulder rig for more control.
For maximum precision, add the effect in post-production using your editing software.
Keep shots short and use it sparingly -- treat the effect like a seasoning, not the main course.
There are, at least, 3 key things you need to keep in mind—if you want to execute the "shaky camera effect"...
- The shaky camera effect is all about the viewing experience of your human audience.
- How they experience the shaky camera effect, when you give it to them, is crucial.
- The way you use "shaky camera", directly affects their reactions to it.
—
So, how do you treat the shaky camera effect?
Treat it like a spice for the food, that you're cooking or preparing. You need just the right amount of spice.
People who'll watch your video need to feel, that your use of this effect is just enough. And the intensity of the effect has to feel natural.
Your use of "shaky camera" should enhance chosen story moments, like a spice that enhances the taste of food.
—
How does it translate to the actual use of the shaky camera effect?
- Avoid using "shaky camera" throughout the entire video.
- Carefully choose those moments in your presentation, where you'll use the effect.
- Make your shaky camera shots—or, series of shots—short.
—
Why?
Remember what I said earlier—"the shaky camera effect is all about the viewing experience of your human audience"? Your audience will complain, if there are so many shaky camera shots in your presentation. And if the shakiness is so intense and distracting.
To understand this, you simply need to be in their cinema seats, and review your video from their perspective. Then ask yourself, "How do I feel about all those lengthy shaky camera shots?" Be honest about your answer.
—
So, how do you execute the shaky camera effect?
- Shoot handheld. Your body's natural movements—like walking—will create small camera shakes.
- You can also create that handheld shot look, by using a shoulder rig of any form. This lets you better control the shake, when you move while shooting.
- You may also add the camera shake effect in post. The steps on how you'll do this, of course, will depend on the specific video editing software you'll use.
How do you know when camera shake is too much?
Camera shake is too much when it distracts from your story instead of serving it.
Watch your footage as a first-time viewer.
If the movement feels random, makes you dizzy, or pulls focus from the subject, it's excessive.
Purposeful, brief shake adds energy; chaotic wobble just loses your audience's attention.
I already hinted about this earlier...
"Your audience will complain, if there are so many shaky camera shots in your presentation. And if the shakiness is so intense and distracting."
And I also said...
"You simply need to be in their cinema seats, and review your video from their perspective..."

That's how you know if camera shake is too much. You imagine how audience would react and feel about, all the shaky camera shots in your video. And that's empathy.
- When you watch your video presentation, do the shakes really communicate ideas—or suggest some mood—in your mind? Or they feel like randomly executed and pointless?
- If the camera shakes do say something, or suggest some mood, are they tolerable enough to watch? Or they make you feel dizzy?
Empathy seems like a rare human quality nowadays. But, it's simply a skill that video creators can practice, and develop—if they want to.
—
Do you wonder why someone would overuse an effect, like "shaky camera"? What do you think?
To me, if I'm overusing an effect—like "shaky camera"—it's because I became self-absorbed. I became obsessed with whether or not, I could use the effect in my video.
I should—instead—focus on the story or content, which is what viewers care about and relate to. If I see opportunities for "camera shake", to really add to or enhance the content, then I use the effect.
FAQs: How Does Image Stabilization Work? (For Beginners in Video Production)
What is the purpose of image stabilization?
What is the purpose of image stabilization?
The main purpose of image stabilization is to reduce or eliminate the blurring caused by camera shake or movement, especially when shooting handheld or at slower shutter speeds.
It helps make your photos and videos clearer and sharper by compensating for small, unintended camera movements.
Is image stabilization good for video? / How important is image stabilization for video?
Is image stabilization good for video? / How important is image stabilization for video?
Image stabilization is very important for video because even tiny camera shakes can make your footage look jittery or unprofessional.
It helps keep your video smooth and steady, making it easier to watch and more visually professional.
What does an image stabilizer lens do?
What does an image stabilizer lens do?
A lens with image stabilizer (often labeled IS, VR, or OIS) has built-in technology to sense and correct for camera shakes by physically adjusting lens elements.
This helps you shoot sharper photos and smoother videos, even at slower shutter speeds or without a tripod.
Is image stabilization only for video?
Is image stabilization only for video?
No, image stabilization is used for both video and still photography.
While it’s essential for smooth video, it also helps capture sharper photos in low-light situations or when using longer lenses.
How much difference does image stabilization make?
How much difference does image stabilization make?
Image stabilization can allow you to shoot at shutter speeds three, four, or even five times slower than you could without it, while still getting sharp results.
For video, it can make the difference between wobbly, shaky footage and something that looks polished and professional.
How does image stabilisation work?
How does image stabilisation work?
Image stabilisation works by detecting camera movements (like hand jitters) and compensating for them in real-time.
This is done either by shifting special lens elements (Optical IS), moving the camera sensor (IBIS), or adjusting video frames digitally (EIS/Digital stabilization).
How does camera image stabilization work?
How does camera image stabilization work?
In cameras, stabilization either moves certain glass elements in the lens or physically shifts the sensor inside the camera body to counteract small shakes detected by gyroscopes or similar sensors.
How does video stabilization work?
How does video stabilization work?
Video stabilization uses built-in hardware (like OIS/IBIS) or software algorithms to smooth out jitters and shakes over time.
Software solutions may crop the edges of your frame and shift the video to compensate for movement, resulting in steadier footage.
How does OIS work? / What is OIS and how does it work?
How does OIS work? / What is OIS and how does it work?
OIS (Optical Image Stabilization) works by using tiny gyroscopes to detect camera movement, then instantly adjusting certain internal lens elements in the opposite direction.
This helps to counteract hand shake, keeping your shot steady.
What is EIS and how does it work? / What is EIS stabilization?
What is EIS and how does it work? / What is EIS stabilization?
EIS (Electronic Image Stabilization) is a software-based method. It captures a slightly larger image than needed, then crops and shifts the video frames in real time to cancel out motion.
EIS is common in smartphones and action cameras.
What is a camera in body stabilization (IBIS)?
What is a camera in body stabilization (IBIS)?
IBIS (In-Body Image Stabilization) means the camera physically moves its sensor to offset camera shake detected by internal gyroscopes or accelerometers, no matter which lens is being used.
What is the difference between lens stabilization (OIS), in-camera stabilization (IBIS), and digital stabilization (EIS)?
What is the difference between lens stabilization (OIS), in-camera stabilization (IBIS), and digital stabilization (EIS)?
Technology: OIS (Lens-based)
How It Works: Moves lens elements
Where It’s Found: Many lenses, smartphones
Technology: IBIS (Sensor-based)
How It Works: Moves sensor inside the camera body
Where It’s Found: Certain cameras
Technology: EIS (Digital)
How It Works: Crops and digitally shifts image or video frames
Where It’s Found: Smartphones, software
OIS is built into the lens, IBIS is in the camera body, and EIS is software-based.
What are the techniques used in image stabilization?
What are the techniques used in image stabilization?
Techniques include OIS (moving lens elements), IBIS (moving the sensor), EIS (software/frame adjustment), and gyro-based gimbals for active hardware stabilization.
How do video camera stabilizers (gimbals) work?
How do video camera stabilizers (gimbals) work?
Gimbals use motors and gyroscopes to keep your camera physically steady, even when you’re moving.
They actively counterbalance shakes, letting you get smooth tracking shots or handheld video.
What are the pros and cons of image stabilization?
What are the pros and cons of image stabilization?
Pros:
- Sharper photos at slower shutter speeds
- Smoother, more professional videos
- Less need for tripods in many situations
- Helps with longer lenses and low-light shooting.
Cons:
- May add weight and cost to cameras and lenses
- Can drain battery faster
- May reduce sharpness if used on a tripod or when not needed.
What are the cons of image stabilization?
What are the cons of image stabilization?
- Increases hardware cost and complexity
- Sometimes causes slight blur or artifacts when used unnecessarily (like on a tripod)
- Can use more battery power
- Not all lenses or cameras have it
Does image stabilization affect image quality?
Does image stabilization affect image quality?
When used appropriately, image stabilization generally improves image quality by reducing blur. However, used on a tripod or in some situations, IS can introduce slight blur or image "jumping".
Why would you turn image stabilization (OIS) off? / What is the purpose of disabling stabilization?
Why would you turn image stabilization (OIS) off? / What is the purpose of disabling stabilization?
You’d turn IS off when your camera is completely steady, like when it’s mounted on a tripod.
This prevents the stabilization system from trying to "correct" non-existent movement, which can cause a small amount of shake or blur.
Why does OIS rattle?
Why does OIS rattle?
The rattling sound from some OIS lenses or devices is normal when the system is powered off.
The floating lens elements are held in place only when powered; otherwise, they may move slightly inside the lens and make a noise if you shake it.
When should I use Image Stabilization?
When should I use Image Stabilization?
Use image stabilization when shooting handheld, in low light, with long lenses, or for video. Turn it off on a tripod.
Do all cameras have image stabilization?
Do all cameras have image stabilization?
No, not all cameras or lenses have image stabilization.
Many modern smartphones, mirrorless, and some DSLR cameras have it built-in, but budget or older models may not.
Do I need image stabilization on my lens?
Do I need image stabilization on my lens?
You need stabilization on your lens if your camera body doesn’t have it, or if you shoot often in low-light or with long lenses.
Stabilized lenses are especially helpful for telephoto and handheld shots.
Is image stabilization in the camera (IBIS) or lens (OIS)?
Is image stabilization in the camera (IBIS) or lens (OIS)?
Image stabilization can be found in either the camera body (IBIS) or in the lens (OIS), and some systems even combine both for extra effectiveness.
Should I turn off image stabilization when using a gimbal?
Should I turn off image stabilization when using a gimbal?
Yes, it’s often recommended to turn off IS when using a gimbal, because the two systems can sometimes "fight" each other, causing unwanted movement instead of smoother footage.
Do I really need image stabilization if I have a gimbal?
Do I really need image stabilization if I have a gimbal?
If you’re using a gimbal, hardware stabilization generally handles shake, but having IS can still help in extreme low-light or long-zoom shots.
You can experiment to see which setup gives best results for your style.
Do iPhones have OIS? / Do iPhones have video stabilization? / Does the iPhone have anti shake?
Do iPhones have OIS? / Do iPhones have video stabilization? / Does the iPhone have anti shake?
Most recent iPhone models feature both OIS for photos and EIS for video, meaning they use both hardware and software to help you get smooth, shake-free footage and photos.
How do I know if image stabilization is working?
How do I know if image stabilization is working?
You’ll notice that the live view or video preview shakes less with IS enabled, and you’ll likely get sharper photos at slower shutter speeds.
Some lenses show a stabilized image in the viewfinder.
Can you stabilize an already recorded video? / Can you edit a video to stabilize it?
Can you stabilize an already recorded video? / Can you edit a video to stabilize it?
Yes! Many video editing programs, including free ones, offer video stabilization features that can analyze and smooth out shakes after you’ve recorded your footage.
How to stabilize a shaky video for free?
How to stabilize a shaky video for free?
Free video editors like iMovie, DaVinci Resolve, and even CapCut offer basic video stabilization features.
Just import your video, find the stabilization option, and follow the on-screen instructions.
What does 'stabilize' mean in video editing?
What does 'stabilize' mean in video editing?
In video editing, ‘stabilize’ means using software to digitally smooth out the shakes and jitters in your footage, making it look steadier and more professional.
How to stabilize video with editing?
How to stabilize video with editing?
Open your video in an editor, look for the “stabilization” or “anti-shake” option, and apply it.
The software will scan for camera movement and adjust each frame to reduce shaking.
What is the best video stabilization software?
What is the best video stabilization software?
Popular choices include Adobe Premiere Pro, DaVinci Resolve, Final Cut Pro, and free apps like iMovie and CapCut. These offer powerful stabilization tools and all-around editing capabilities.
Does CapCut do stabilization?
Does CapCut do stabilization?
Yes, CapCut has built-in stabilization tools that are easy to use for making shaky clips look smoother.
What are the techniques of video stabilization in editing?
What are the techniques of video stabilization in editing?
Editing software typically uses either frame analysis and cropping, or more advanced motion tracking and AI to smooth video.
You choose the amount of stabilization to apply.
Can you edit a video to make it more stable?
Can you edit a video to make it more stable?
Absolutely!
This is one of the most common video editing tasks, and easy to do in most editing programs.
Which method is most commonly used for (software) stabilization?
Which method is most commonly used for (software) stabilization?
The most common method is digital frame analysis, which crops and shifts your footage frame-by-frame to counteract unwanted movement.
Advanced tools use AI for even better results.
What can damage OIS? / Can OIS be damaged?
What can damage OIS? / Can OIS be damaged?
OIS systems are made of small, sensitive moving parts. Strong impacts (like dropping your device) or exposure to strong magnetic fields can sometimes damage them, affecting stabilizer performance.
Is OIS good or bad for cameras?
Is OIS good or bad for cameras?
OIS is overwhelmingly good for cameras, especially for handheld and low-light use.
However, it can sometimes create issues when used with a tripod or gimbal, or may not be needed in every situation.
Conclusion: How does image stabilization work?
Image stabilization is a powerful tool that enhances video quality by minimizing unwanted camera shake, whether through in-lens or in-body stabilization, external stabilizer devices, or post-production software.
Each method has its strengths and ideal use cases—from handheld shooting with telephoto lenses to dynamic tracking shots with gimbals or steadicams.
However, stabilization isn’t always necessary. Sometimes, a locked-down tripod shot or even intentional camera shake can serve your creative vision better. The key is understanding when and how to apply these techniques to match your project’s needs.
As technology evolves, AI-powered stabilization and smarter software tools are pushing the boundaries of what’s possible. But no matter how advanced these tools become, the foundation remains the same: thoughtful execution in both shooting and editing.
So, the next time you pick up your camera, ask yourself: Does this shot need stabilization—or would a little shake actually tell the story better?
To better understand getting stabilized shots through camera stabilizers, check out these related specific topics on...
You might like these
Free Editing Software for Beginners: No Watermarks
Discover genuinely free editing software for beginners without watermarks. Learn which tools like DaVinci Resolve & CapCut truly deliver—no tricks, no paywalls.
Why do we make videos? Create Emotional Connection
Why do we make videos? Discover how to create emotionally resonant content that connects with audiences through authentic storytelling and real experiences.
Video Production Equipment for Beginners: Ditch the Hype
Video Production Equipment for Beginners made simple. Ditch expensive gear. Start with essentials: smartphone, wireless mic, tripod and natural light.


Alvin Motilla is the creator of VideoAuteur.com, where he helps everyday people make videos that truly connect with audiences. With over 20 years of experience spanning scriptwriting, documentaries, corporate, and freelance video production, he champions the human side of creation over gear obsession. A graduate of AB Mass Communication, he believes that showing up with heart matters more than owning expensive equipment. Off-screen, Alvin enjoys biking with his wife and daughter, staying active, and studying Scripture.

Join the
Video Auteur Club
Get tips, step-by-step guidance, and gear guides that make video production simple.
What's New
-
Video Making Tips for Beginners: Start Creating Today
 Video Making Tips for Beginners: Overcome overwhelm and start creating. Practical tips on content, audio, framing, editing and finding your voice.
 -
How to Make a Family Video: Capture Real Moments
Learn how to make a family video that captures authentic moments, not perfect takes. Simple steps, free tools, and heartfelt memories your family will treasure. -
What Type of Camera Should I Get as a Beginner?
 What type of camera should I get as a beginner? Learn which mirrorless cameras, features, and budget kits work best for video creators starting their journey.